Outdoor Summer Barn Kitchen Completed

With the barn party deadline looming for this past Sunday (Barn Party photos and post coming Thursday! ) – Friday and Saturday became a mad rush to finish up the outdoor kitchen before guests arrived.

We started by making the frame from  2 x 4′s – using treated lumber for the bottom

We added more of the old barn roof material for siding and trimmed it out to match barn

We used the same recycled materials to match the barn

Wooden countertop on and grill slid into place

When we first started to put down some initial designs on paper – one thing we didn’t want was a typical brick, mortar or stone outdoor kitchen.  We wanted something unique, and we wanted it to match the existing barn and reclaimed brick patio. Even more – we wanted to make it from the left over recycled barn materials we already had on hand.  The only other requirement was to make sure we had enough counter space on each side to be able to easily prepare food straight from the garden to the grill.

We finally decided on a simple straight line island design. 14′ long, with a 48″ grill and burner slide-in space in the middle. Each side would then be flanked by 5 foot overhanging counters.  We made the width of the counter 34″ to give extra surface room to prepare and serve foods.  With limited time – we opted for a simple wooden top for now to match the farm table – however- as future time allows – we really want to replace with some stained concrete countertops.

THE BUILDING PROCESS
We first built a simple 2 x 4 stud frame, leaving a 48″ space in the middle and front for the grill and burners to slide in.  We used treated wood for the bottom to sit on the brick pad – and then built the rest from standard 2x lumber.  Next -we encased the inside of the grill area with cement board to protect the structure from the heat of the grill.  Then sided the entire structure with more of the left over corrugated roofing and trimmed it out to match the barn.

All that was left was to slide in the grill – attach the top and the outdoor kitchen project was complete!

Shared on The Barn Hop, Frugally Sustainable and the Funky Junk Interiors Saturday Night Special and Time for a Party

The Recycled Barn Trestle Table – Seating for 14

Our Barn Trestle Table made from our left over barn wood. 12′ long = 45″ wide

Nothing will quite make you finish up projects like hosting a party.

The barn table project has been on the “to-do” list for sometime and was one of our “TOP 30 GOALS” to accomplish for the farm this year. So, with our first barn party scheduled for this weekend, and needing some extra sitting and eating areas for the guests – this was the week to tackle the project.

We wanted a big long table that could seat at least 12 – so we made it 12′ long and 45″ wide. Eventually we will make matching benches to go down each side – which will seat 6 to a side.  If we  added a chair to each end –  it would give us a total of 14.

The old 2×4 barn rafters we had saved for this and a few other projects.

We started by building the trestle out of the old 2 x 4″‘s barn roof rafter pieces from the Cardington Barn we took down last summer. Not your typical 2×4′s – these boards are made from old growth solid red oak, and unlike today’s lumber – actually measure 2 x 4″. I just used a sawzall and cut them smooth – leaving all of the character of the old nails holes and dents of the wood in tact. Grey and weathered – they made the perfect base material for the table.

The trestle base. We had to pre-drill every hole to get the screws in because of how hard the old wood was!

We made the trestle base 9′ long – with angled 2 x4′s supplying all of the strength needed to hold up the 12′ top piece.

For the top piece – we just simply used alternating 2x8x12 and 2x10x12 pine boards and glued them together to make a large table top. We used ratchet straps in place of clamps (I didn’t have any that long!) to hold it together while it dried.

2 coats of rubbed on stain and 3 coats of polyurethane to the top.

After that, Mary took over and applied 2 coats of stain with a rag – and then finished it off with 3 coats of polyurethane to make it strong and tough.  We also added some 1 x 4′s underneath and screwed  them into the underside of the table top to secure it all together.

It should be great for the barn party this weekend to give plenty of seating.  One more thing to mark off the list!

If you would like to follow along through the year and receive our weekly DIY and Gardening Posts – be sure to sign up to follow our blog via email in the right hand column of this blog, or click the link and follow us on our Facebook or Twitter pages.

The Barn Trestle Table set in place. Once the brick floor goes down in the barn – it should look complete!

A Barn Raising In Photos – How to Build A Barn When You Haven’t a Clue How to Do So.

Our recycled barn as it looks today.

Our recycled barn as it looks today.

100% nuts! Looking back – that’s what we were! The idea came with a simple pencil drawing over the winter of 2010-2011. It was what we hoped would someday become the barn to our little farm. I’m not even sure how it really started, but the dream grew from that little drawing. Our hope was to be able to build the barn using some reclaimed lumber from an old barn. What it became was a project of tearing down two barns and building a new one from it.

It started as a wishful drawing in the fall of 2010.

As we get ready to host our first ever barn party this weekend – we took a second to look back in photos at our once in a lifetime project.

I will be the first to tell anyone we are not barn builders. We did a lot of things completely backwards : i.e. – who puts up walls before a roof, and even more – who starts hanging signs in the barn for decoration without a roof! But we built things when we could and when we found materials. So it didn’t always follow traditional building plans. We re-used and recycled everything we could find a use for – like the old roof barn to become our new barn’s lower siding. But we had a vision – and we stayed the course with a lot of help from friends and family – and a lot of advice from a lot of people.

Late 2010 – A big pile of overgrown brush waits to be cleared.

And now that it’s finished – We can reveal some of the scarier moments along the way. Like that the reason we waited so long for the roof was I was completely unsure how to build it. But we figured it out :) We can also now say we had no idea how we would tear down the Cardington barn or dad’s by ourselves and haul it back – but we did it. And we can now say – that we really had no idea how we would ever be able to make our barn doors from the old floor boards – but we somehow figured it out. And we had a blast along the way. Yes – there were injuries and losses – the smashing of many of Mary and I’s fingers – the knocking myself out when a board snapped me in the head – or Mary running over and destroying her cellphone with a 25′ rollback truck. But they were all worth it! So here it is without the pain – the barn raising in photos:

Shared On Southern Savvy Style Wow Us Wednesdays and All Star Block Party, Funky Junk

October 2010. It took us an entire weekend – but the brush is cleared and mowed off.

Early in April of 2011 – we marked out the barn with some string and stakes.

June 2011.  Leveling the land. Our neighbor Dave came in with his bulldozer and leveled off space for the barn pad. He has some serious grading skills and is amazing to watch work.

July 2011 – We tear down the Cardington Barn piece by piece and haul back to the farm. Sore – Sore – Sore nights!!!

Late July 2011 – Next up  came the digging of the poles. I have to say a bobcat and an auger bit are much easier on the body than digging by hand!

First of August 2011. Mary and I set the 6x6x16′ poles one by by one over the course of one weekend – Neither of us could move for another week! :)

2nd week of August 2011. Taking a break from our pole setting – we tear down Dad’s barn with the help of Family and Friends. It should be noted this went much smoother and easier on the muscles with the added help of extra hands taking it apart!

Mid August  2011.  So not the normal way to build a barn – but we started to put up the lower walls with the roof from dad’s barn. We wanted to make sure it fit and looked good.

Mid August 2011.  So who needs a roof when you can put up walls. We had the boards so next went the rough sawn pine. We milled down the old board from dad’s barn to use as the batten strips. We also brought out the doors from the house and leaned them up where they would eventually be hung.

1st of September 2011.  Still waiting for the roof – we decided to go ahead and hang the “fresh egg sign” we had made from the old floorboards from the Cardington Barn.  Its neat looking back and seeing how much deeper blue the sky becomes in the fall

2nd week of September 2011.  We cut all of the rafters in a few days – the hardest part was making the first one.  This is where the pergola building skills payed off !!  At least we were used to making a lot of precise cuts!

1st of October 2011.  Finally – with some HUGE help from my brother Bob and two brother-in-laws Brian and Rob and a nephew Ryan – we put up all of the rafters on a beautiful fall day. Family can save you!

Late October 2011.  We began the process of putting up the roof.  Mary and I would put up a panel or two each trip – then we had some late help to finish it off from a good friend Nate and my brother-in-law Brian again.

December 2011.  With the roof on – and over the course of the winter months – we installed the loft and began to close in the upper sides.

Late February, 2012 –   We installed the barn doors that had been leaning there “pretending” to be hung. It was a great feeling to finally close the doors with a roll.

March / April 2012 – Finally, something we know how to do :)  We began to mount the barn pergola in early spring.

Late April 2012.  Barn pergola finished up and stained – on to the landscaping!

May 2012.  In between spring rains – we also began work on the back landscaping wall – first up – installing all of the drain tile to carry water away from the hill behind the barn.

Continuing on with the back wall project – we installed boulders to create a break in the hill and to allow for landscaping all around barn

Barn back wall finished up – all of the transplants just need to a year or two now to fill in

Late Mary 2012.  It was nice to finally have the gutters installed – it allowed us to finally get the water holding tanks set up and working.

Late May 2012 – one of our biggest accomplishments – getting the rainwater collection system installed. It has allowed us to water all year through a hot summer with 100% reclaimed rain water. So far to date – we have used over 1000 gallons of rainwater in the garden.

June 2012.  Next up – using all of the reclaimed brick to make the patio – this didn’t really take too long – we had it finished up within a couple of days.

Barn Patio finished up!


The Barn Doors We Made From Barn Floors


The Barn As It Stands in September 2012

The ‘Must-Haves’ for Canning!

It’s Harvest Time!

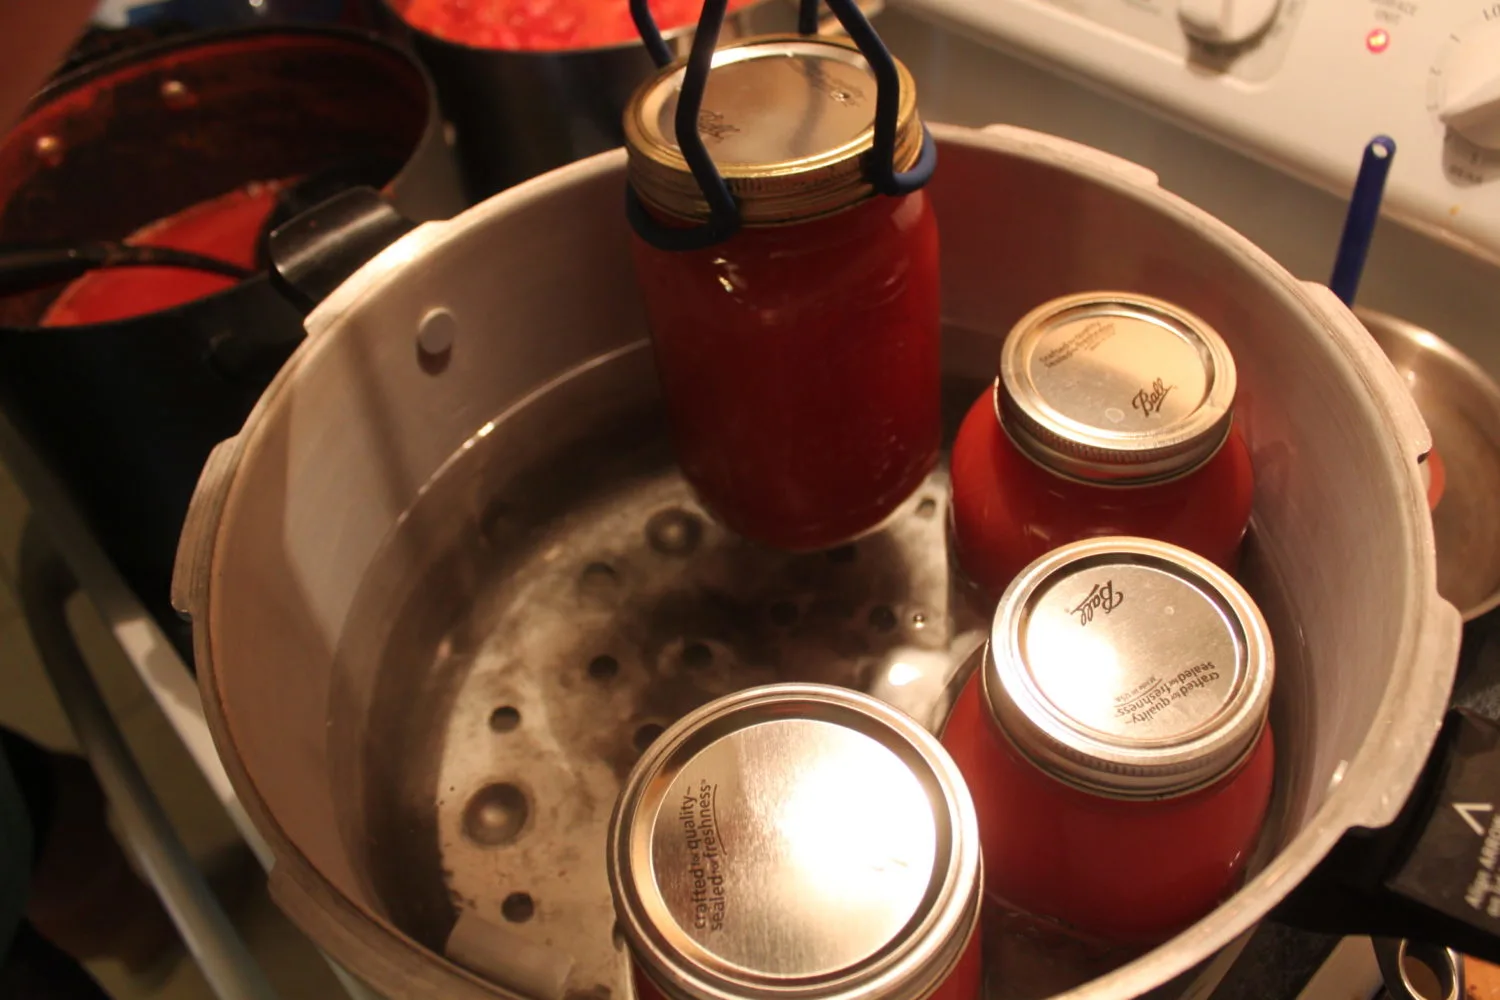
It’s one of my favorite times of the year – Harvest Time!  We are starting to pick baskets of vegetables out of the garden each day, and we don’t let anything go to waste.  We love to eat fresh veggies from the garden throughout the season.  However, even after giving a lot away to family and friends, we have plenty that need to be preserved for future use.

Whether you plant your own garden, or purchase fresh vegetables at your local Farmer’s Market, you can enjoy the summer time luxuries throughout the entire year.  Canning your own tomatoes, salsa, pickles, etc… will allow you to have peace of mind in the middle of winter, that what you are eating is healthy and not full of artificial preservatives.

The following is a list of the ‘must-haves’ for maximizing the preservation of your garden vegetables:

Make sure to use fresh, firm vegetables when canning.

1. FRESH, FRESH, FRESH (and I do mean FRESH) VEGETABLES:   If your vegetables are becoming soft, then that is how they will turn out when canned. Use softer vegetables in cooked dishes – but don’t use them for preserving.  You want to make sure you have firm vegetables when you are canning.  You can place them in the crisper drawer of your refrigerator for a few days until you have gathered enough crops to make a full batch, but for the best results – can them as soon as they come out of the garden.

Here is our Pressure Canner being used to Hot Water Bath.

2. HOT WATER BATH : a large stock pot will work just fine.  You want to use the largest diameter stock pot you have.  If you are thinking of purchasing a commercial Hot Water Bath product from the store, I would like to suggest something different.  If at all possible, make the jump and purchase a Pressure Canner.  You can use the base as your Hot Water Bath and you are able to can so much more using a Pressure Canner.

3. THE INTERNET : Sure, you could go purchase the Ball Canning Guide, but there is a wealth of information at your fingertips with the Internet.  You can find basic tips, recipes, and even videos to take you step-by-step into the canning process. Be smart and do your research   Now you will be able to find out what you may can by using a Hot Water Bath and when you will need a Pressure Canner. The specific instructions are  NOT interchangeable!  As a great resource, you can always use the online Ball Canning Guide too!

3 Must-Have tools for canning: Jar Funnel, Magnetic Lid Lifter, Jar Lifter

4. $6 FOR 3 BASIC TOOLS : These 3 tools are a LIFESAVER when you begin to can.  I am serious – spend the extra $6 dollars to purchase these items – it will save you time, energy and possibly prevent burns to your hands down the road:

Funnel : Do not use the one in the garage!!!  These funnels are designed to fit the rims of canning jars.  They will prevent extra leakage and drips that will save you clean up time.

Jar Lifter : This will allow you to place the jars in and out of the boiling water without splashing and burning your fingertips – Must HAVE!

Lid Lifter : You would be surprised how this magnetic tool will make your life easier when canning.  Typically when you try to get your lids out of the hot water, they end up sticking to one another, and then you waste valuable time trying to separate the lids.  Just place 3 or 4 lids in a small skillet with water covering the bottom of the pan. When you are ready for the lid, use the lid lifter to magnetically attach to it and place it on your jar.  Simple as that!

5. TOWELS and WASHCLOTHS : Sounds simple, but make sure you have 4-5 towels, and 2-3 washcloths handy during the canning process.  You will be surprised on how many you use — and if you are like me, you can’t remember where you put the one you were just using.  Wiping the rims of the jars is a critical process of canning — keeping an extra washcloth close by will come in handy.

Remember, these are just basic tips to save you time when you begin to can. Although the must-have list includes only physical items,  I would have to say the most important tip not listed above is the COURAGE to try.

The finished product!

There are many people that have never been around canning and it is completely new to them. However, more and more people have a desire to live a healthier lifestyle which includes knowing what they are eating, and canning is a great way to have healthy food year around right from the garden.

Go ahead and try to can something –you just might be surprised with yourself!

- Mary

Using Pallets to Build A Canning Pantry Cupboard

Crate and pallet boards after disassembly

Our crate and pallet board pieces after disassembling a pallet and a shipping crate

Over the last few months – about every few days we get a comment or two on the canning cabinet or buffet hutch we built out of old shipping crates and pallets.  A lot of people want to know how we went about making it. So we thought for today’s post we would go through the how 2′s of building things with pallets and shipping crates – with a little extra information on the canning pantry.  In fact, we finally added the canning pantry plans to our Etsy shop because of it’s popularity.  It’s a great project – with very little cost involved – and lets you store over 200 jars of canned goods!

Our Canning Cabinet made from pallets and shipping crates

Our Canning Cabinet made from old pallets and shipping crates.  We tilted the top shelf forward a touch for a better display, and added a lip to keep jars from coming off the other shelves.

We have actually made two of them – the first we built from pallets – the second from some old shipping crates and pallets.  But for both – the only tools we used were a Sawzall, Nail Gun, Construction Adhesive (liquid nails heavy – duty), 3″ coarse drywall screws and a drill with a Phillips #2 screw bit (for drywall screws)

For the canning cupboard, we started by tearing apart about 4 pallets to use for the sides and shelving boards.   We learned early on to not waste time trying to pull the nails from  boards and remove every little speck of everything.  You end up damaging way too many boards and it takes forever!

Canning pantry shelves are made from pallet boards nailed into 2 x4 frames.

We use a reciprocating saw with a long demolition construction blade and simply slice through the nails.  Leave all of the remnant flat nails in the boards, not only does it add lots of  character – its super quick.  If you place the pallet up on end you can slice through all of the nails in about 15 seconds.  Just repeat the process until you have cut them all and you end up with 15 to 25 single boards to work with for every pallet. (depending on pallet size and make-up – you usually get boards about 3 to 5″ wide by 30 to 48″ long).  With shipping creates – we just disassemble the sides with the sawzall and then you have ready-made building panels to work with.  Whatever you use – pallets, shipping crates or old barn wood – the important thing is to have simple straight boards to build with.

Buffet Hutch made with pallet panels and shipping crate remnants.  Same concept – just a little bit bigger than the canning cabinet.

Anytime we make anything with pallets – whether it’s the canning cupboard or the buffet hutch – we will then use the left over 2 x 4′s that make up the pallet’s inside rails to build the carcass structure.  They are durable – and although heavy – they are free and make the structure strong.  Speaking of the structure – we always use coarse drywall screws and heavy-duty construction adhesive to assemble.  The screws hold tight and the adhesive holds forever.  Don’t worry about anything other than the framing being straight.  Once again if there are some left over bits of nail that have been sawed off smooth – let it be – it just makes for a great patina when stained or painted over.

Side of the cabinet – simple straight pallet boards nailed to a long pallet board makes up a building panel.

Once we have the structures carcass built – we just simply use all of the straight boards cut from the pallets to cover.  For this we will use the nail gun for speed and looks – but you could just as easily use a hammer and nails.  Once you have trimmed it out to your liking – you can paint, stain or leave natural – and you have a unique conversation piece.

The biggest piece of advice – don’t sweat the details!  The biggest mistake people make when using reclaimed lumber or pallets is tot try to make it too perfect.  It’s far better to not try to sand everything super smooth  - or take out every little crack or dent in the wood.  Let them be  - it just makes it look that much better.

Jim and Mary

Make sure to hit the “like” button on our Facebook sidebar (in the right column) to get our weekly DIY Tips and Projects Post.

Front view of the cabinet

Front view of the cabinet


Canning Pantry made from pallets

Canning Pantry made from pallets

Garlic Dill Pickle Canning Recipe

I have to admit, with the heat and lack of rain this year, our cucumbers have suffered.  We continue to pick 3-4 cucumbers per day, however, they are smaller and thinner than last year’s crop.

Although the leaves look healthy, the lack of rain and high temperatures have taken a toll on the production of cucumbers this year.

After eating cucumbers and onion salad and cucumbers directly off the vine (yes, standing there in the garden), we decided we better preserve some of our crop for later in the year.

One of our favorite canning recipes for cucumbers includes Garlic and Dill Pickles.  The key is to use fresh, firm cucumbers.  If you use soft cucumbers, your pickles will also be soft – and who wants that?  Try this recipe and you will never buy pickles again!

Garlic Dill Pickles – sliced in chunks

Garlic Dill Pickle Recipe 
Makes approximately 8 pints 

16 (approximate number, depending on the size) of pickling cucumbers, sliced any way you prefer (coin sized, spears, chunks)
2 cups apple cider vinegar
2 cups distilled white vinegar
4 cups water
5 tablespoons pickling salt
16 garlic cloves, peeled (2 per jar)
2 teaspoons crushed red pepper – 1/4 teaspoon per jar
8 teaspoons dill – 1 teaspoon per jar
4 teaspoons black peppercorns -1/2 teaspoon per jar

Optional: If you like your pickles a little more on the spicy side, you can add fresh sliced hot peppers (any variety) to the jar with the cucumbers.

In a large saucepot, combine vinegar, water and salt. Bring to a simmer.

Arrange jars on counter. Evenly divide each of the spices and place them in the bottom of the jars.

Wash and slice the cucumbers. Pack the slices firmly into the jars, leaving as little space in between them as you can. Pour the brine into the jar, leaving ½ inch headspace.

Canning using a Hot Water Bath

Wipe rims, apply warmed lids and rings and process in a boiling water bath for 10 minutes. Promptly remove the jars from the pot and allow them to cool on a towel placed on the countertop.  Make sure each lid has sealed (you will hear the popping sound as each jar begins to seal).  After 24 hours, press down on each lid to make sure they do not pop back up.  If they do not, then the process is complete.

After the canned pickles are gone, add fresh cucumber slices/chunks to the brine to make refrigerator pickles.

Pickles can be stored in a cool, dry place for up to a year.  However, our pickles never make it on the shelf that long – they are usually gone by early winter.

If you want to skip the boiling water process, these pickles are also wonderful as refrigerator pickles. Just pop the jars into the fridge once they’re cool. Conserve your time and energy — once the pickles are gone from the jar, you can use the brine over and over again (up to 5 times) by just adding fresh cucumbers to the cold jar.

Happy Canning!

Jim and Mary

We Will Make No Wine Before It’s Time

The Grapes arrived healthy – but only a few inches high with very tender young leaves

Remember the old commercial from Paul Mason? :  ”We will make no wine before it’s time”.  Well – theses days…I certainly have a whole new appreciation for that saying!  There are some things that just take time, and grapes, grapevines and the resulting wine and jellies are certainly one of them.  If you read our blog, you may remember back about a month ago, when during our first heat wave and dry spell – our tender little 1″ to 2″ grape plants arrived in a UPS box.  To say we were worried about planting them in such conditions was an understatement.  The temperature soared to 100 for the two days after we planted them – with no rain in sight.  We planted them – we mulched them – and we watered every morning and night for the first two weeks.  The plants certainly struggled – with two of them even losing most of the little leaves they had….but through all this heat and dryness – they have somehow started to grow.  In fact – about a month ahead of schedule, last week we had to stake each small plant and begin the long process of training the vines up.

It doesn’t look like much yet – but hopefully these will be beautiful vineyard rows in years to come.

We currently have (3) full 80′ rows of Marquette (wine) grapes – and one 80′ row of the Concord (jellies and jams) established.   In the first part of August – the plan is to sink large end posts at the end of each row, along with a few more in between – and string across a low galvanized trellis wire about a 1.5  feet above each row.  We will then tie off the plants and get them to grow as high as they can until the end of the year.  Then next season – we hope to add wires 2 (about 3 feet off the ground) and 3 (about 5 feet off the ground) to the posts.  Hopefully by the end of year two – with some good pruning and training – the grapes will have reach the 3rd wire and we can begin to let them canopy and fill in.

It is a long, drawn out process – but one we hope will pay off in some great jellies, jams and of course wine in the future.  If all goes to plan – we may be able to pick some small yields of grapes by season 3 – but it will be at least  four years before we can make our wine.

The Marquette grapes growing up the stakes nicely!

So – there is something to be said about the quick crops like lettuce and radishes that you can plant and eat within 45 days.  Then there are the  tomatoes we patiently wait for each year to ripen over the course of a few months after planting.  But when it comes to grapes…grapes are surely the “gotta have” patience crop!  We will begin next year the same way as this year – planting a final three more rows of  Marquette grapes up the hill – and beginning the plant’s long journey to wine as well.  So I guess for now we will have to make our motto : “We will make no wine before we have grapes!”

Jim and Mary

This post shared on the Monday Barn Hop :

We’ve Been Featured On Lil’ Suburban Homestead!!!

We’ve Been Featured!!!

A big Thank You to Karen Thompson and Lil’ Suburban Homestead for selecting our blog to be their featured blog of the week.  You can check out the story at http://lilsuburbanhomestead.wordpress.com/.  Lil Suburban is a great blog based out of North Carolina with a wealth of information on topics such as gardening, canning, cooking and so much more.  Karen highlighted our blog as part of her Ole’ Saturday Trading Post feature that she hosts each week to let people from all over share their farm and garden stories.  Thanks so much Karen!!!

Preparing for Canning Time – Stocking The Shelves

The cupboard as it was late last summer – filled and ready for the winter season!

It’s getting to be that time of year – CANNING!

When we built the canning pantry cupboard last year – I don’t think we realized how much we would use all of the goods stored from the garden.  The cupboard, built from some old shipping crates and pallets we had holds close to 250 quarts and pints of product.  It seemed like so much at the time – but that full pantry from last fall has a lot of empty shelves on it now!

So before we begin the new season of storing up some food – we spent some time and went through last year’s inventory to get ready for this season’s canning efforts.

STOCKING UP:

It’s a pretty quick study as to what we need to make more of :  Hot Pepper Mustard, Pasta Sauce, Picante Sauce  and Apple Butter!

Mary’s Hot Pepper Mustard Sauce – A family favorite!

Hot Pepper Mustard :  By far the most popular !!!  It’s Mary’s secret recipe and  I think everyone that comes over takes home a jar.  Mary already had orders for them and already pre-sold every one she made from her first batch this week.  The boys love it as a dip with pretzels, and it great to use on brats and hamburgers or any sandwich for that matter!  I used it last year to make tuna fish salad and replaced the mayonnaise portion with the mustard and it was a great combination.

Pasta Sauce : Another big hit.  We used close to 35 to 40 quarts last year – with about 5 remaining.  It’s a great way to make quick dinners a thousand different ways!

Our Salsa and Picante Sauce…we will have to learn to make some more mild this year for those not loving the HEAT!! :)

Picante Sauce – We went through a ton of this last year – and I think the only thing we will do is to create more pints that are medium and mild heat as opposed to so many that were hot.  We love  it hot – but sometime the guests like it a bit more mild :)

Apple Butter – We “found” two jars stashed behind some sauce…I vaguely remember hiding them among other jars to keep for myself :) –  and then like a challenged squirrel –  forgetting that I hid them in the first place!  It’s so good on toast – definitely going to make more!

Tomato Juice – We canned 80 quarts last year – which we thought might have been too much , but we are down now to about 12.  I think we will do about the same again this year.  It’s great for our soups and chili – and we drink quite a bit of it as well.  One thing we want to do this year is to can more made with some pepper extract  - for a hot and spicy juice.

Still good on our inventory of banana and jalapeno hot pepper rings. They are great toppings for pizza and nachos!

Roasted Tomato and Peppers :  Mary trialed them last year and they turned out great – so I think we will add a few more pints this year.

I think we still have enough jalapeno, and banana pepper rings to last us for another year – so this year  instead of canning the rings, we will  freeze more whole and use them for appetizers.

So as the garden approaches ripening time, one thing is for sure: I know we will start to hear that gentle hum of the pressure canner or the roll of boiling water almost every evening in the kitchen as one or both of us cans something….it’s a sound we love to hear!

Jim and Mary

This post featured on The Barn Hop

Making Garden Signs From Old Barn Wood

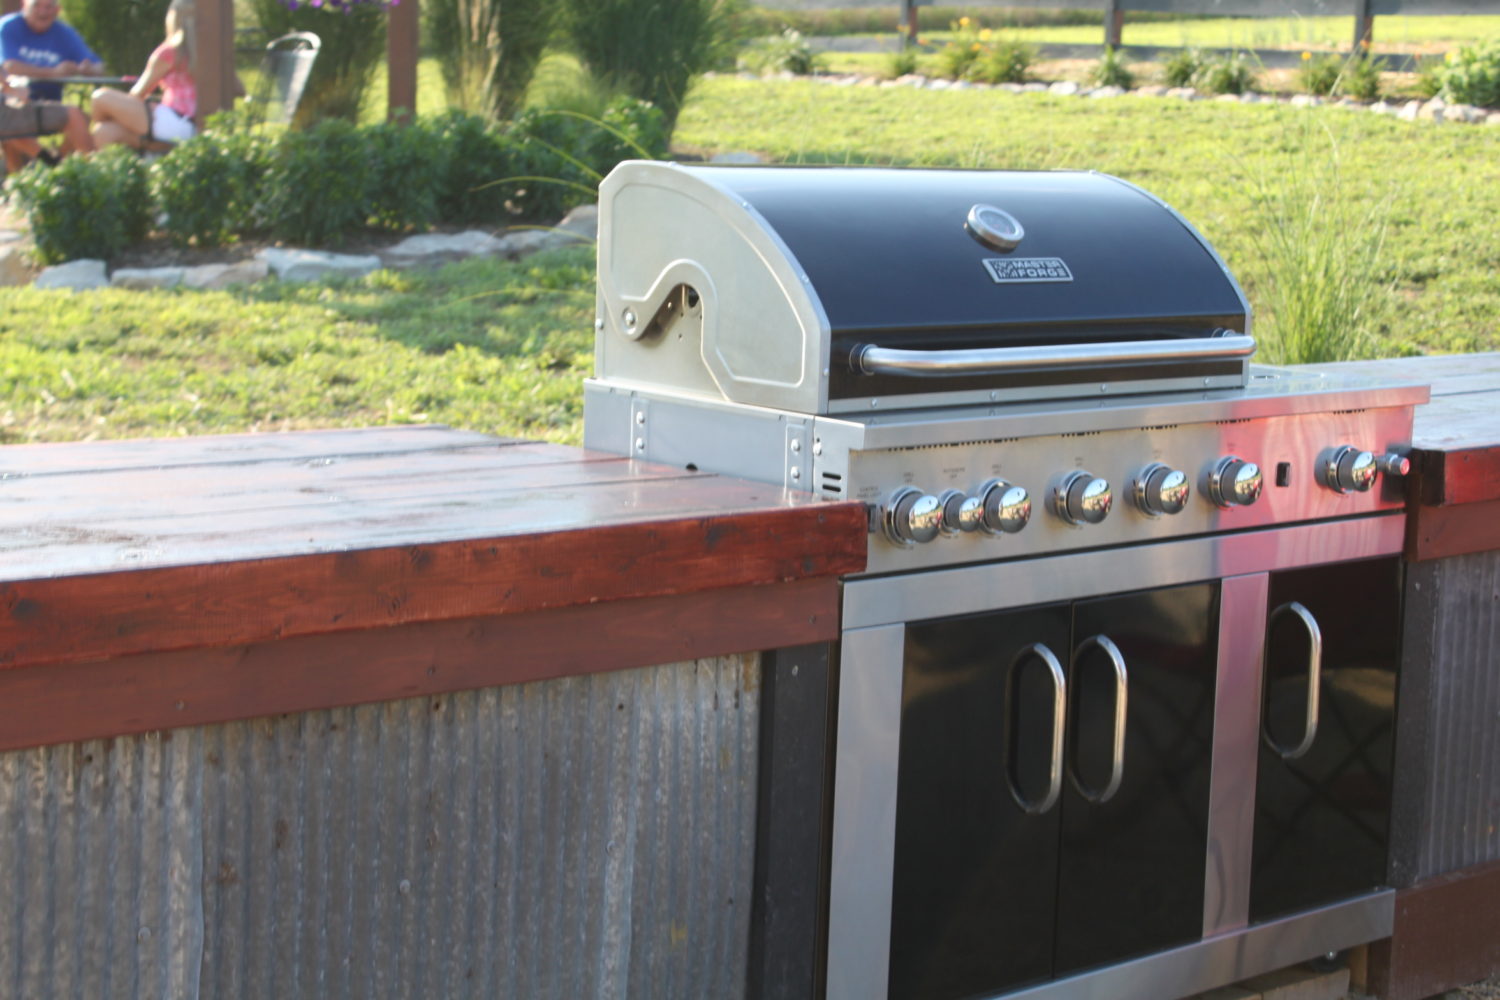
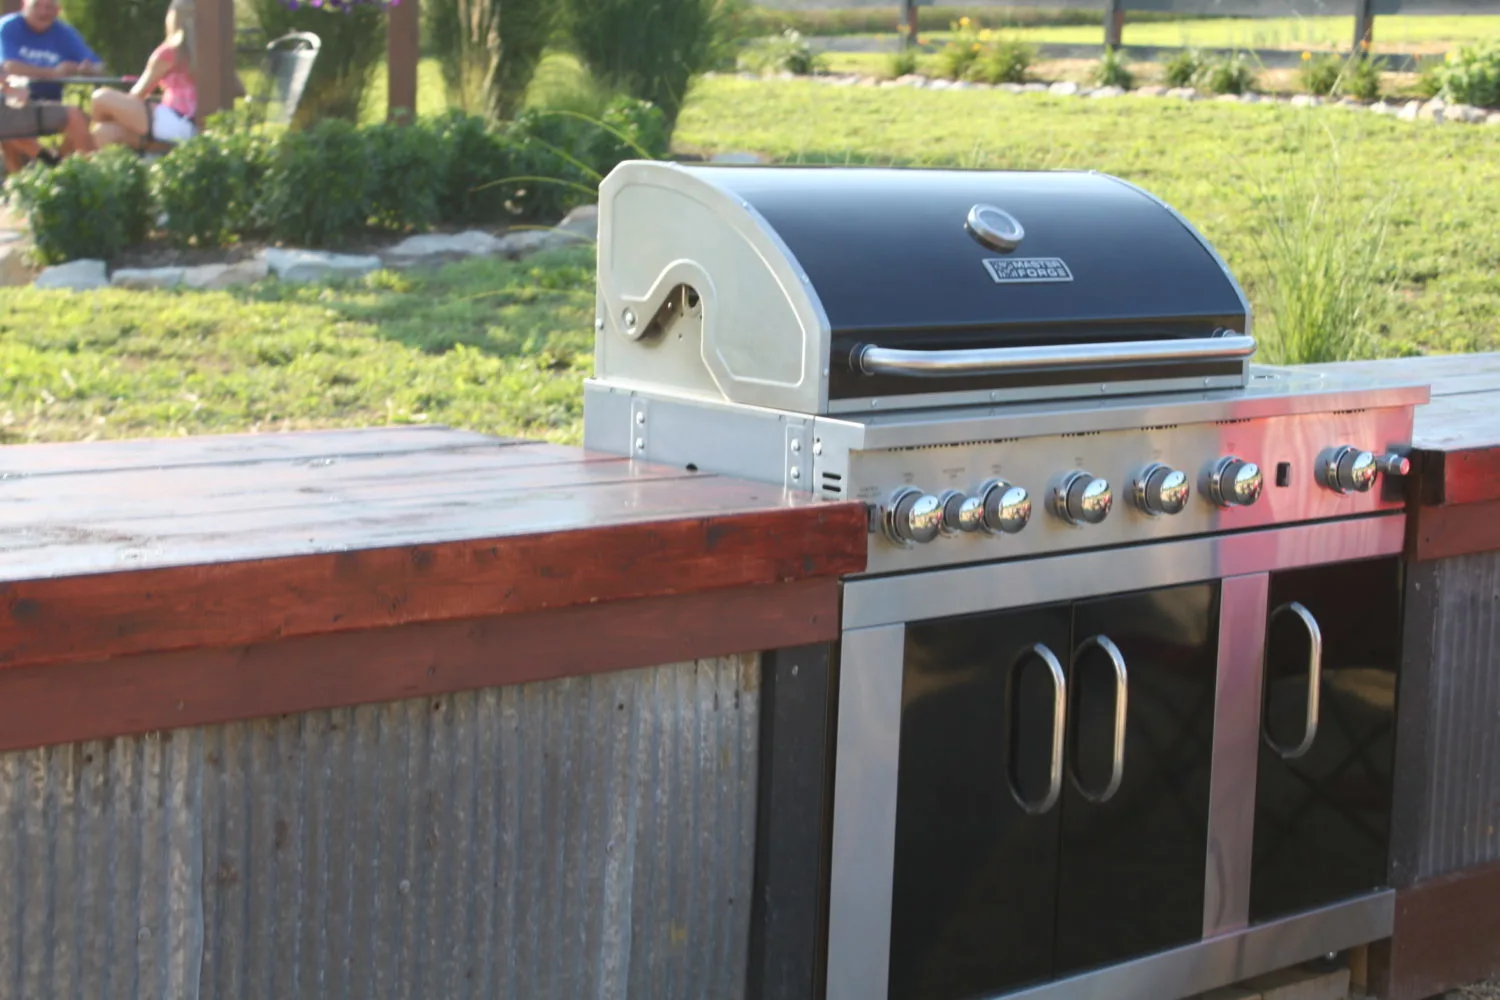
We have used pallet wood and the left over barn wood from the two barns we tore down to do just about everything.  This past week – Mary came up with one more great idea.  We wanted a way to mark the various rows of our gardens – mainly for appearance and to help identify plants and rows for visitors to the farm.

It was actually a simple project.

Our garden signs made from recycled barn wood and pallet wood

A quick sanding of the boards and a little paint – and the signs were ready to go

We still have a fair amount of the barn wood left over – including a lot of small 24 to 36 slat and floor pieces.  We trimmed them all down to be about 3″ wide by 20″ long – and then added a simple rounded curve on each end with a jigsaw before stenciling in the names of our plant rows.  We then pre-drilled a couple of holes on each end.  Th

en then drove 3/4″ x 18″ stakes into the ground. After that – we attached the painted boards to the stakes with some inexpensive course black drywall screws (We figure if they rust a little it will just add character) and we were finished!

The markers all up and in the garden – we just attached them to a simple small stake and drove them in the ground

The result -  a creative way to identify our garden with unique signs – created for free from our stash of old barn wood! We thought about adding a clear coat to the signs, but figured it was best to let them naturally fade and bleach with the sun. All in all, a great way to use up some more of the wood and not have to spend a dime on signage for the garden. It took us about 2 hours to make and paint the 25 or so signs – and 15 minutes to put them up.

Happy Gardening – Jim and Mary

If you would like to receive our DIY & Gardening Tips every Tuesday – be sure to sign up to follow the blog via email in the right hand column, “like” us on Facebook, or follow us on Twitter