“Canning is Cool” – The Class.

How do you find the time?
I wouldn’t know where to begin.
I would end up poisoning someone if I tried that.

These are the comments that Jim and I hear from so many people whenever we talk about canning our vegetables from the garden.

The kitchen in “full canning mode” during the last “Canning is Cool” class

Just like any new adventure, canning can be frightening if you have never tried it before. But the best way to try something new is to just do it. Easier said then done, right? Ok, I have to admit, I would rather have someone right there with me when I am trying to learn something new. That is the exact reason that we decided to hold a ‘Canning is Cool’ class series this summer.

Our last canning class of the year occurred this past weekend. I like to keep the classes small so participants can have “hands on” experience, and everyone has the opportunity to practice the skills that we talk about. The participants all had interest in canning, but most had never tried it before or had tried it once and needed a refresher course.

Lots of cutting and chopping…

Two of the individuals I have known and kept in touch with over Facebook for the past three years. The other two, I had met a couple of weeks before the class at a Goodyear Tire store of all places! While in the waiting area to have the dreaded “nail in the tire” fixed – I overheard a conversation next to me about gardening, recipes, and canning. My ears of course perked up! As i joined in the conversation – I ended up meeting two new friends that were delighted to hear about the ‘Canning is Cool’ class.

What do we cover in the class? Well it really depends on the attendees and what is available in the garden. Since this last class was filled with individuals new to canning, we covered the basics.

Jarring up the Salsa before the water bath

We completed two recipes – salsa that can be canned using the water bath method, and spaghetti sauce by pressure canning. Each of them had a cutting board and a knife and all chipped in to make the recipes. We were then ready to give everyone the opportunity to practice the actual canning methods.

There is no charge for the class. In fact, the only “cost” was a band-aid for a tiny cut, and a little milk poured over the hands of someone who touched a few too many hot pepper seeds :) . The best part is getting to spend time with others who enjoy the same things we do, and knowing that we helped someone else learn to preserve the goodness of a summer garden.

Some important tips from the day:
1. You learn best by doing – both successes and failures
2. Wipe the rim of the jars after you fill them
3. You don’t have to have fancy equipment to can
4. You must follow a recipe to know what are safe water bath or pressure canning procedures.
5. You don’t have to have a garden to can – Farmer’s markets are a great resource for fresh vegetables!

Shared on Frugally Sustainable , Transformation Thursdays, Gnowfglins Simple Lives Thursdays, Little House In The Suburbs, Funky Junk Interiors and Six Sisters

Trestle Table II – Expanding The Farm A Little Quicker

Your not seeing double…this is table # 2 :) :)

One of the upgrades from table 1 – the 10′ benches that go down each side

No – you are not seeing double – and no this isn’t a repeat post.  By now, most of you who follow know that our dream of a completely self sufficient farm is helped along by our little pergola business that we do in our spare time.

So after posting about the old barn wood trestle table we built in time for the barn party – we had an offer to purchase the table that was in short - too good to pass up.  It was a way to bring a little more income to the farm and purchase the orchard trees and what we have wanted since day one – an old farm truck to use around the place. (what’s a farm without an ol’ farm truck??) So we did what any respectable Americans with a little entrepreneurial spirit do – we sold it and went about building another for our barn.  We still have a large stash of old barn rafters left from the barns we tore down, so wood wasnt a problem – just finding the time to build it…again!

A Sad Day…Table 1 loaded on the new “old” farm truck.

I won’t lie – it was actually tougher than I thought loading it up on our new “old” farm truck and delivering it to its new home.  And the first time I walked in the barn and saw the bare space where the table once stood – it was a really empty feeling.  However – as with all things – the second time you do something it really is easier.  You learn some tricks and can change some things you want to include the 2nd time around.  And we did just that.  We widened and lengthened the table – this one is a little over 12′ long and is now 46″ wide – which will allow for plenty more room for plates and dishes right down the middle.  We also opted to darken the top stain to more match the barn sign and look “older”.  We also added the 10′ benches and stained them to match.

Our Old World Garden Vintage Logo we designed..what do you think?

The result…We can now walk in our barn and smile again that our table is back! This actually has led us to think long and hard about expanding the old wood working to maybe a little Etsy shop and just design and build things we can with old barn and pallet wood in our spare time.  It’s not like we build pergolas in the winter.  We have had some requests for the pallet canning cabinets and a smaller table – so what the heck – maybe it’s a  way to build that farm even quicker.  We even came up with a name and a logo : “The Old World Garden Vintage Collection”.   Feel free to drop us your thoughts in the comment section below – we’d love to hear what you think of it.

In the mean time…no matter what…this table is staying put – my promise to Mary :) :)

Shared on Clever Chicks Blog Hop, The Barn Hop,  Frugally Sustainable, Transformation Thursdays Savvy Southern Style Wow Us Wednesday, The Shabby Nest

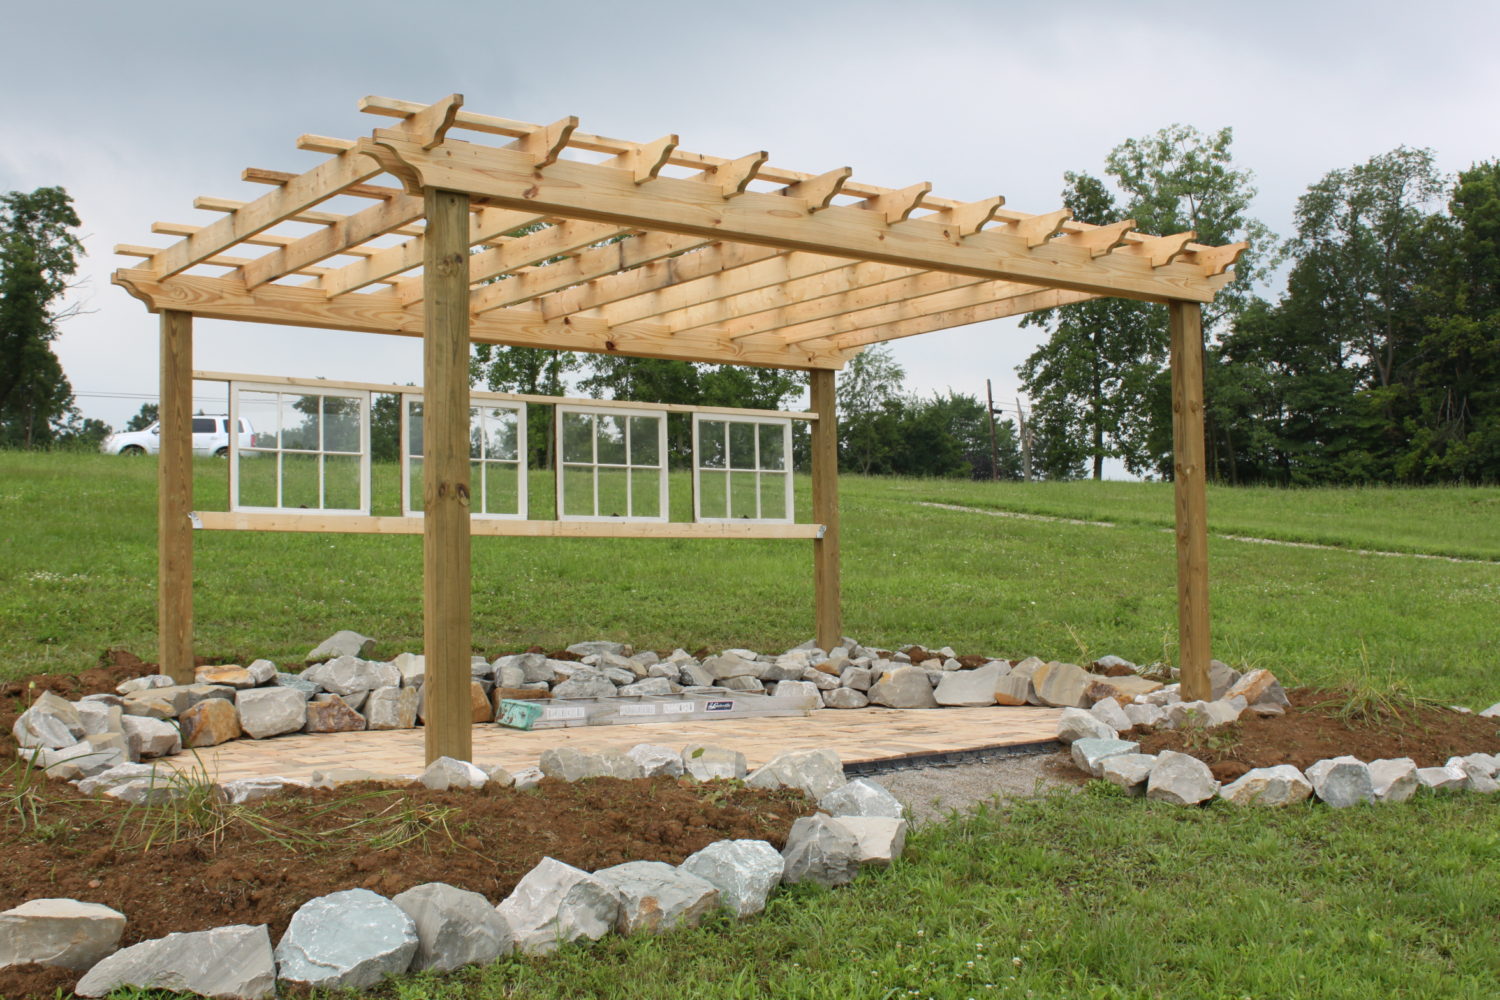
Creating Your Own Outdoor Paradise

This space has become a great place for the couple that purchased this one to enjoy their morning coffee and watch their fish swim in the ornamental fish pond they installed

Creating An Outdoor Room – We were blown away when we saw what Robin and her husband created with the pergola

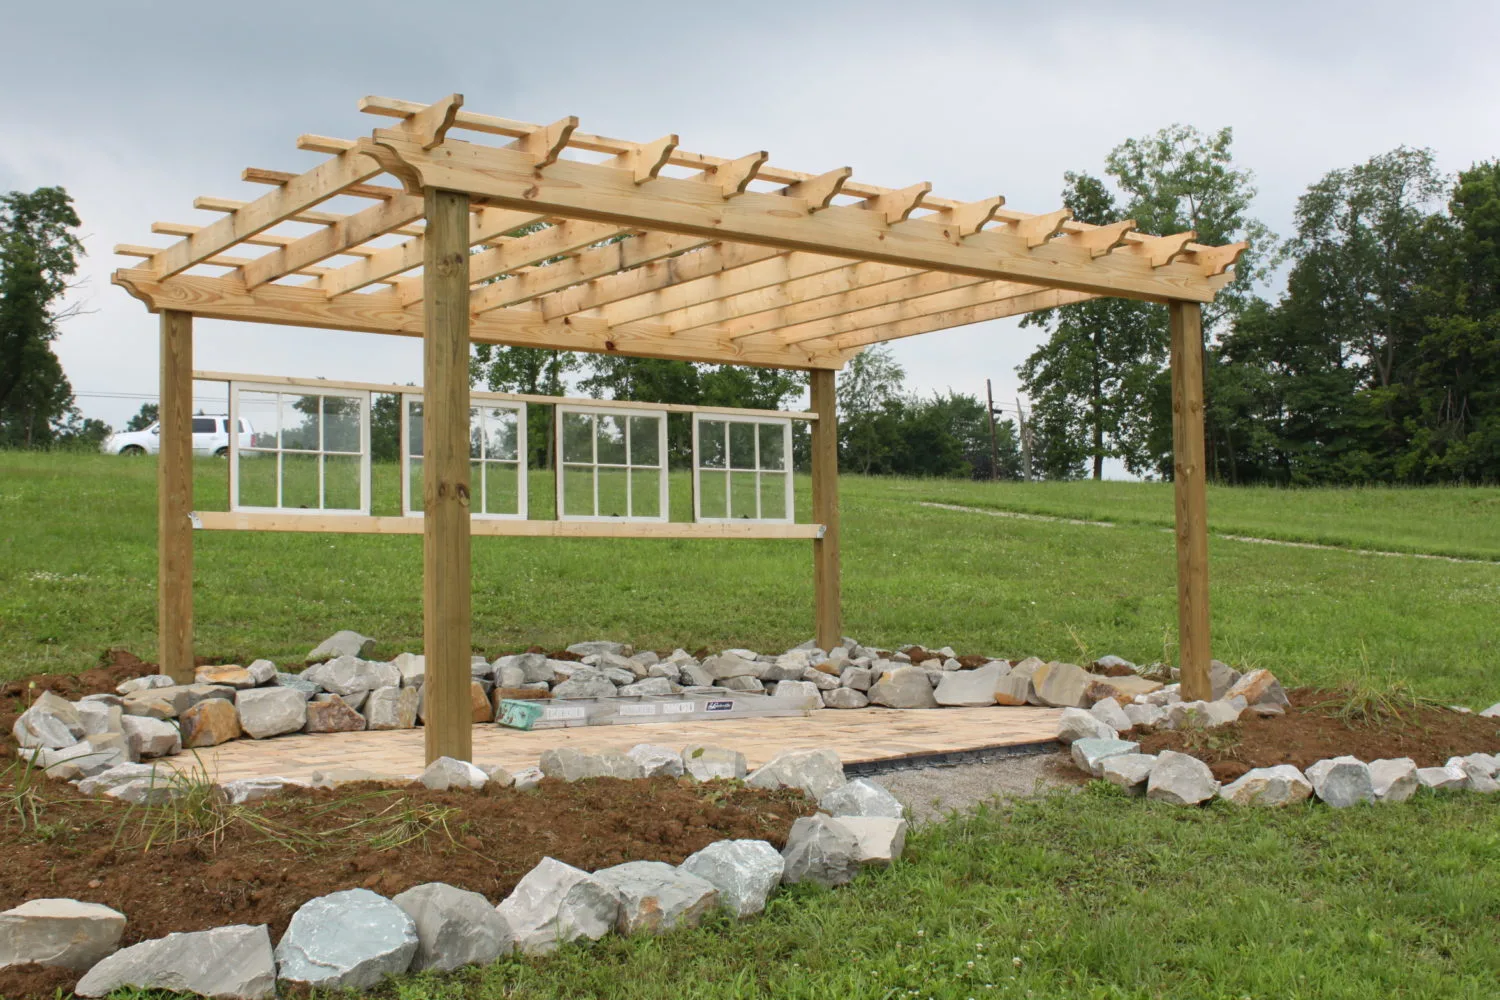
Beyond getting to meet so many spectacular people – one of the most rewarding aspects of building our pergolas is knowing that they become a special place for people from all over to enjoy their own backyard space.

I am always amazed at the creativity of people and how they can take something and make it completely their own.  Although the basics of how we build our wooden pergolas are the same – each and every one looks completely different once someone takes it into their own space.

This past week we received an email from one such couple that truly blew us away with the space they created.  Robin and her husband contacted us back in the early summer after building a patio from reclaimed brick, and wanted an outdoor pergola structure to go over it.  So, over the next few weeks, like we so often do, we traded emails and pictures and worked our way through the design and size of it.  It ended up being a large pergola –  16′ x 14′ with 12′ posts to be sunk in the ground. On a sunny Sunday in early July, they came down and picked up their pergola kit.   What they did with it from there is simply amazing – building an outdoor paradise – complete with curtains, lights, tables and chairs.
.

Our Garden Pergola - the very first one that started it all

Our Garden Pergola – the very first one that started it all

It’s neat really to think sometimes where all of the pergolas have ended up.   They have been installed on the top of a 40 foot deck overlooking a small forest – on top of a loft in the middle of Cincinnati -and in backyards across Ohio, Kentucky, Indiana and Pennsylvania.  We never get tired of getting pictures back from those that have purchased – telling us how they have “made it their own”.   We love the stories of enjoying their morning coffee outside, having  an outdoor dinner, or enjoying a glass of wine at night under the stars.  It makes us happy to see others enjoying their own “little slice of heaven” – just like we enjoy ours at our farm.  You can also see our post on Tips and Tricks To Building Your Own Pergola for more info.

Jim and Mary

One of our 16 x 16 pergolas built over a patio - this is another of my favorites.

One of our 16 x 16 pergolas built over a patio – this is another of my favorites.

Landscaping and Extra Features Can Make All The Difference

Our Finished Barn Pergola And Patio

Our Finished Barn Pergola And Patio

“Wow – I Could Have Made My Own V-8!” Can Your Own Hot and Spicy Tomato Juice

An easy way to make some hot and spicy tomato juice to can!

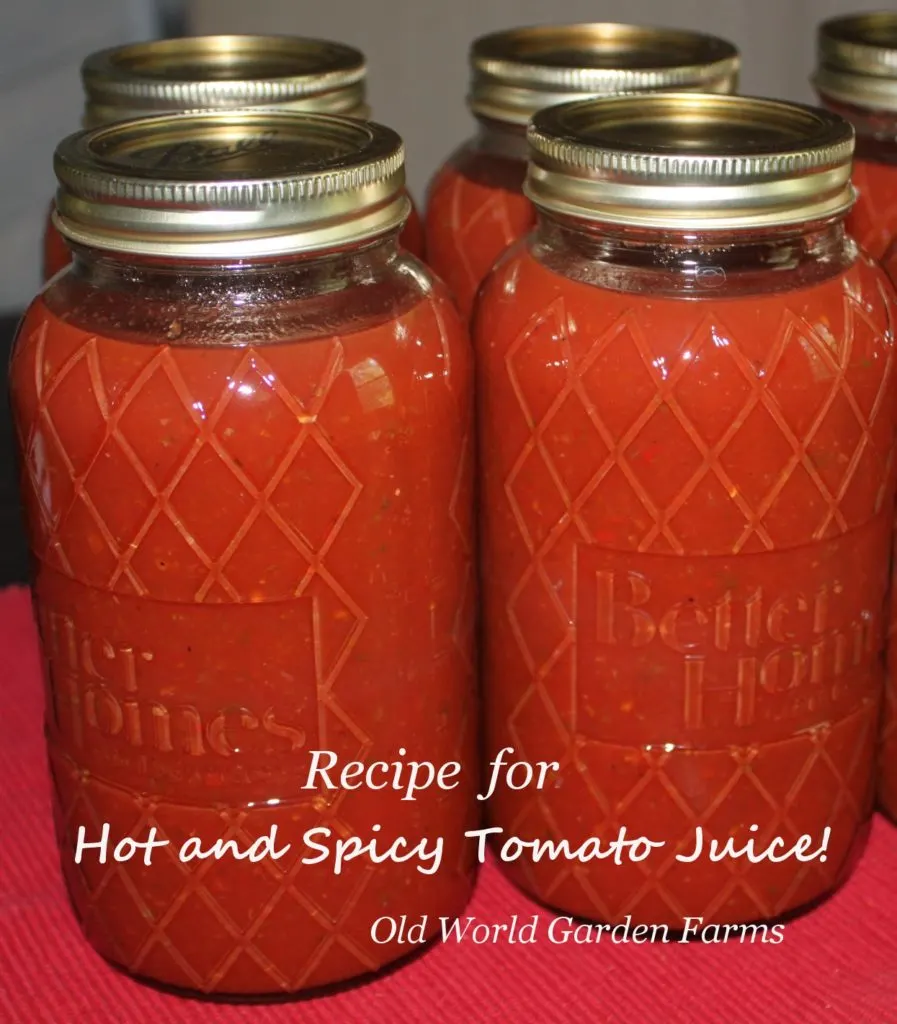
So as the garden season nears the end – are you are left with still more tomatoes and peppers?  Here is a quick and easy recipe to turn those extras into a great tasting hot and spicy tomato juice.

Although regular canned tomato juice is fantastic to use throughout the year – how about turning a few of those canned jars into a hot and spicy tomato juice drink.  Not only is it a great tasting and refreshing drink – but you can use it to liven up homemade chili, make a spicy spaghetti sauce, or use as a great base for a bloody mary.

Here’s How:

( This recipe will make enough to can about 6 quarts of juice )

Start with the following garden fresh ingredients:

Tomato juice is a great way to use up those ripening tomatoes on the vine

40 to 50 medium tomatoes (Use them all up here – Roma, Celebrity, Big Boy and any others you have)
2 onions (sweet yellow or vidalia work best)
2 red peppers
2 green peppers
4 jalapeno peppers
4 cayenne peppers
2 seranno peppers

4 Cajun Belles (optional)
4 cloves of garlic

If you have a food processor – chop up all the above ingredients (seeds and all) into a liquidy pulp and place on low to medium heat and cook down for an hour or so, stirring often to avoid scorching the bottom of the pan. If you don’t have a food processor – no worries – just chop up into small pieces and throw in a large pot and cook down..it may take a little longer – but it works just as well. The important thing is to get the tomato and vegetable mixture soft and cooked down to run it easily through a strainer or food mill.

When the mixture has heated and cooked down – strain it through a food mill into a clean pot to remove all of the skins and seeds.

Now add your spices (add to taste – some like a little more – some a little less)
1 tablespoon black pepper
1 teaspoon of celery salt
1/2 teaspoon of garlic salt

Heat on a low simmering boil for another 30 to 45 minutes.
Simply can up into quart jars, put on your lids and then water bath for 30 minutes. (You can also pressure can it for 12 minutes instead of the water bath)  You are left with some great tasting hot and spicy tomato juice around to enjoy through the winter months!   – Jim and Mary

If you would like to receive our Recipe Of The Week each Friday – be sure to sign up to follow the blog via email in the right had column, “like” us on  the Facebook, or follow us on Twitter

Click here for our Bloody Mary Recipe

The Beauty, Versatility And Durability Of Ornamental Peppers

The Sangria Peppers – A mass of color among dark green foliage

The Sangria start out in June with dark purple peppers before turning bright red in late fall

The “blooms” of ornamental peppers can fill an entire plant with brilliant color.

If you follow our blog – you know from time to time we talk about our love and use of ornamental peppers at our little farm.  Today, I wanted to take the time to really showcase the beauty, versatility and durability of the plants for use in the home and garden landscape.

This year – we placed a large mass planting at a corner stone bed as you enter the farm.  It is almost always the first thing that a visitor to the farm will comment on.  It usually starts with : “What kind of plant’s are those?” - followed by – “I’ve never seen those before!”

Each year – we continue to find more uses in our landscape for the ever-expanding varieties of ornamental peppers – with great results. We use them in planters, hanging baskets, and plant them in mass plantings right in the ground – all with good success.  In addition to being beautiful plants – they are much more animal, bug, heat and drought resistant than any of the other annual flowering plants that we use.

Of all the different variety of hanging baskets and planters we have – the ornamental peppers are the ones that are the last to show any kind of water or heat damage throughout a hot day.  Everyone knows that look of a hot and thirsty planter that starts to droop and wilt in the hot mid-day summer sun.  Our ornamental peppers all stand proud and beautiful – their leaves upright even during the hottest of the scorching days we had in late June and early July.

When planted directly in the ground – you can use ornamental pepper plants as a single accent plant to add a splash of color – or plant in mass to become a focal point of your landscape. They really are an amazingly versatile plant.

There are so many great varieties of ornamental peppers that cover the full color spectrum of red, orange, black, purple, green and yellow.

So….Are they edible?  Some, like our Poinsettia peppers are – in fact – if you like incredible fiery little hot peppers to light up a chinese dish – they are a great choice.  I can say that from experience – I “field tested” one last week and nearly choked to death from the heat :)   Another great use for the Poinsettia is to soak and infuse into olive oil for a hot pepper oil to use when cooking.

Others, like the Sangria,  really have zero taste, But their beauty in landscape  beds, pots and hanging baskets is incredible – and you can use the multi-colored peppers in glass bottles or containers with vinegar to make incredible table pieces.

So why so slow to catch on?
Each year you see a little more publicity for the ornamentals…but I am convinced one of the reasons they haven’t caught on is the length of time it takes to get the colorful blooms on the plants. If you start the seeds in late February like normal annuals – it takes until mid to late June to get your first pepper blooms. We actually planted our seedlings this year in mid January to speed up the process of blooming and had our first blooms of peppers in mid to late May – right alongside our other annuals first blooms. The length of the early wait is more than made up for the length of pepper blooms you get to enjoy. The ornamental peppers are the last to “frost out” and usually hold their color into late October, long after the blooms of Impatiens, Petunias and other annuals have disappeared.

Seed starting is a breeze as well – we simply save and dry out the seeds from the largest peppers each year to use for next years seed stock.

So as you think about next years garden and landscape – think about trying some ornamental peppers in your landscape to liven it up!

Poinsettia Ornamental Peppers

Poinsettia Ornamental Peppers

Sangria In Late Summer Turning From Purple to Red

Sangria In Late Summer Turning From Purple to Red

Ornamental Peppers

Buffet Hutch Made From Pallets, Shipping Crates and A Piano Lid

The pallet hutch made from old pallets – shipping crates, an old wooden desk top and a piece of an old piano

What to do with a bunch of left over pallet wood and shipping crate panels?  Well – for us – it became the materials to build our buffet hutch in our dining room.  It’s a large piece – measuring  6′  wide x 5′ high x 32″ deep.  But it gives us a great place to display and store our dishes, bowls and glasses – while giving us a lot of storage room underneath.  Storage room that we use to store our crock pots, electric skillet, roaster, and our canning pots and pressure cooker.

We created the framework for the piece by screwing and glueing together some old 2 x 3′ scrap lumber.  Next up – we added two  panels from a shipping crate  to form the two sides of the hutch (The same crate panels we used to build the canning cabinet – they work great to provide walls for any cabinet project).  We then covered the rest of the frame with pallet boards and also used pallet boards to create the base of the display shelf

The left and right sides of the buffet hutch are made from a shipping crate panel

For the top – we used the top of an old wooden work desk that I had salvaged and saved from an old decrepit office desk.  Once we had it all together – we gave it a quick coat of black paint – and then followed up with a single coat of off-white paint to give the piece a worn look.

For some finishing touches – we added the top Italian ristorante sign and some lighting.   For the sign we used the flip top piece of an old upright piano that was headed for the trash.   The panel was the perfect length and a perfect fit for the top of the piece.  After that, a little black paint and some white stenciled letters - and the sign was finished

A simple cabinet light mounted inside of the cabinet provides some nice light for display.

For lighting – we drilled a small hole in the back to allow for a cord – and then hung a small under counter light to illuminate the display shelf – and a small spotlight on top to light up the sign.

The best part – with the dings of the old recycled wood – it looks like it has been around forever.  If we do manage to ding a door or nick the wood – it just serves to add a little more “character” to the piece. :)  To receive our DIY and Gardening Tip Posts each Tuesday – sign up to follow the blog via email or hit the “Like” button on the Facebook tab on the left side of the page.  - Jim and Mary

An old piano lid became a sign after a little paint and some stenciled letters

Full size picture of the hutch

Making A Unique Address Sign From An Old Window

Barn window sign with landscaping still in progress.

Barn window sign with landscaping still in progress.

The small hill and entrance to the property as it stood in Oct 2010.

We taped off the old window frame and then used double sided tape to attach cthe cut out numbers – we printed off the numbers on simple copy paper.

Next step was to attach the finished window sign to two old oak posts from the barn – we just used simple rafter brackets.

The “new” address sign at the front entrance. For now – we planted some grasses – later on we will add more stone and landscaping.

Our little farm is actually easy to miss as you drive by the main road.  Nestled down in a small valley – and surrounded by some other barns, a couple houses and open land – it’s pretty easy to drive right by the little hill of a driveway entrance that welcomes you in.  Not to mention – all that marked it was a 3″ x 8″ high home made address marker that fell over more than it stood :) .

So a few weeks back – after someone coming to pick up a pergola drove by a few times before finding us – we decided we had to finally mark the entrance a little better.  Of course we always want to try to keep with the recycle theme – so Mary came up with the idea to use one of the old windows we had sitting around  out of Dad’s barn.

It turned out to be a relatively easy project.  Mary simply brushed off and roughly sanded the old wooden frame – and then added a few coats of exterior black paint.  She left all of the details of the window – the little swinging lock at the top – and the thin little lift handle at the bottom.

After that – she laid out and printed off some 8″ letters on our printer and cut them out – attached double sided tape and centered them on the window.  After taping off the painted wooden frame and a couple of coats later of window frosting – and whalaaaa…instant unique address sign!   To make the numbers stand out even more – she then outlined the numbers with a thin coat of black paint.

To finish it off – we sunk in two of the old oak posts left over from the barn on either side -and then attached with brackets.  I love pulling into the driveway in the early morning as the rising sun comes up behind the sign and lights up the numbers for all to see.  For now – we planted a few of the leftover grasses we had in the holding area – and then early next spring – we will finish off with rock and landscaping to create an inviting entrance for visitors to the farm.

- Jim and Mary

If you would like to receive our weekly DIY and Gardening Posts – be sure to sign up to follow our blog via email, Twitter or Facebook in the right column.


Picante Salsa – Fresh Or Canned

We definitely need more than two rows of picante and salsa in the pantry canning cabinet for this year!

A big bowl of Roma’s waiting to be made into picante salsa

We dice up the roma’s – skins and all into 3/4 in ch to 1 inch pieces and fill the stock pot.

A big bowl of diced tomatoes cooking down

Cooked tomato being strained through a mesh sleeve to remove skins

Minced onion, garlic, peppers chopped up in the food processor

There is nothing better than home made salsa or picante. Each of our kids, family and friends prefer it a different way – some mild, some medium and some hot – so we make and can it all three ways. But one thing is for sure – they all love it and we go through a ton of it throughout the year. I think what I like most about this recipe is that it tastes so fresh coming out of the jar. So many canned salsas we have tried and canned just had a flat, overcooked taste to them. With this – we open up a jar – chop up a little fresh cilantro – and it’s like you’re in the garden again!

So here is a really straightforward and simple way to make some great tasting picante salsa in no time at all. It usually takes us about 2 1/2 to 3 hours of real-time to can a batch – but we are only truly working at it for about 25 to 30 minutes of that time – and are free to do other chores around the house.This recipe will make enough for about 8 to 10 pint jars.

As for mild or medium or hot – that is really to personal preference – but I can tell you that we use no hot peppers for the mild – 1/2 of the amount for medium, and all of the amount for hot.

Here are the ingredients and steps:

MILD INGREDIENTS:
40 to 50 Roma Tomatoes
4 Green Bell Peppers
8 Cloves of Garlic
1/4 cup of chopped cilantro
3 Sweet Red Peppers
4 Medium White or Yellow Onions
2 Tablespoons Garlic Salt
1 Tablespoon of Black Pepper
1 to 2 teaspoons of Salt
2 Limes
1/2 cup apple cider vinegar

HOT INGREDIENTS :
NOTE : Use 1/2 for medium heat – ALL for Hot – we use a variety of hot peppers to add more depth of flavor – if you want – you can just use 5 jalapeno’s for medium heat and 10 for hot
4 Jalapeno Peppers – seeds and all
6 Cajun Belle Peppers
3 Tequila Sunrise peppers
2 Serrano Peppers

STEP 1 (10 minutes) We start with about 40 to 50 washed Roma tomatoes – We cut the ends off and dice them up into small 1/2 to 1 inch chunks – skins and all. We will fill a 6 to 8 qt stock pot – add in 1/4 of the cup of apple cider vinegar and put them on low to medium-low heat to cook down.

STEP 2 (10 minutes) While the pot full of tomatoes is heating slowly and cooking down (we will stir it about every 10 minutes or so) – we take all of the other ingredients listed above – in no particular order – and dice into a fine liquidy chop in our food processor. We also add the juice from the two limes and the other 1/4 cup of vinegar to the mix. We place it all in a large Tupperware bowl – put the lid on it and set it to the side.

Step 3 (1 minute) After an hour or so – when the tomatoes first start to break down – we take our immersion blender into the stock pot and blend it all together – it speeds up the cooking down of the tomatoes.

Step 4 (1 minute) After another 20 minutes or so – when the tomatoes are really heated up and breaking down – we take the immersion blender one final time into the stock pot and blend together.

Step 5 (5 minutes) Using a small mesh strainer bowl – we then shake through the contents of the tomato plan into another stock pan – it leaves behind all of the skins and most all of the seeds – and leaves us with some good pulpy tomato stock to start our picante salsa with. You could also use a mill grinder at this point – the strainer bowl has always seemed faster for us.

Picante Salsa!

Step 6 Dump in all of the ingredients you have in the Tupperware bowl and let it all heat through for another 30 or so minutes to a slow boil

Step 7(5 minutes) Ladle into clean pint jars – and pressure cook at 10 lbs. of pressure for 18 minutes. You could also choose to water bath at this point for 45 minutes – we just find that it is so much easier to pressure can.

After that – your all set! When we do open up a jar to use – a lot of times we will chop up a little fresh cilantro and maybe a chopped sweet pepper or onion to add even more freshness to the picante.

Happy Canning!

Jim and Mary

 **If you would like to receive our Recipe Of The Week each Friday – be sure to sign up to follow the blog via email in the right had column, “like” us on  the Facebook, or follow us on Twitter

A Simple Click Can Help Us Build a Sensory Garden for Autistic and Special Needs Children

This is a little bit of a different post for us – but I hope you will read on to see how a simple “Like” on Facebook, (
http://www.facebook.com/pages/Old-World-Garden-Farms/320724164624407
), and of this post can help us to help hundreds of children and their families enjoy a sensory garden free of charge for Autistic  and Special Needs Children.  And please – if you can – help spread the word!

Mary

Textures of plants and structures can be used in a garden setting to help the exploration of various senses

It’s that time of year again….Back to School Time.  Now this year, for me, it is a little different.  You see, I have been lucky enough to have most of the summer off of ‘work’ for the first time ever.  Although, that is quickly coming to an end.  Let me explain….I am an Occupational Therapist (no, this is not a profession that helps people get jobs).  I work with children with special needs in a school environment.  My specialty lies within helping children diagnosed with Autism, Down’s Syndrome, and various disorders especially in the area of Sensory Processing/Integration Disorders.

Just a quick explanation of what this means.  Most of us have some ‘quirks’ about us….some people can’t stand to have tags in their clothing, some people can’t listen to other people eating crunchy food next to them, and some people just can’t get any work done unless their desk is neat and clean.  We all have something about us that make us ‘strange’ in a small way to others.  However, when you have a Sensory Processing Disorder, like in children with Autism, these ‘quirky’ things are multiplied by hundreds, if not thousands.  For instance, these children may not be able to tolerate one single speck of dirt on their hands….otherwise they will yell, scream, and run until it is cleaned off.  The smell of a person’s perfume coming from the front of a bus may be too much to handle even if they are sitting in the very back seat, and may put them in a ‘rage’ – appearing as if they are a ‘behavior’ problem child to the bus driver.  There are many more examples….way to many to list here.

THIS IS WHERE YOUR HELP IS NEEDED!!!!!!!!

Sweet Basil provides fresh aromas to stimulate the senses

All summer, as Jim and I have worked on “The Farm”, I constantly think about the children that I have seen in the past 19 years as I have been their Occupational Therapist.  As I pick weeds, mow the grass, stain the pergola, etc… I think about what they are doing now, how the family is coping every day with the struggles that they must go through, and in what way could we make their lives better.   Then I feel how lucky we are to be able to enjoy all the elements of “The Farm”.  Getting our hands in the soil, rocks, rain, chicken feed; smelling the beautiful petunia’s, basil, mint, and everything the garden produces, and hearing the sounds around the farm – the chickens proudly clucking after they lay their egg for the day, the wind blowing through the tall ornamental grasses, and even the barn doors closing on the rails are sights, sounds, and touches that not everyone gets to experience, especially some children with special needs.

I knew there had to be some way to integrate my farm ‘job’ in the summer with my love for the children that I work with throughout the school year.  The answer…A SENSORY GARDEN!!!!

Foghorn can serve a second purpose on the farm…to enhance the senses of children learning about touch, sounds and sight.

Sensory gardens are places designed to help those with special needs to relax and enjoy themselves by stimulating their senses in a comfortable and safe way.  They are very bright children, but their different way of learning can get in the way in the typical environment sometimes.  They just have to be able to be in the right environment for them to learn.  This is a learning experience that will incorporate what is taught in the classroom and be applied outside in a natural environment.  A Sensory garden is designed to be accessible and engaging to people with special needs by appealing to all of their senses – especially the smell, sight, touch, and sound.

Let me explain briefly what I envision.  In order to stimulate the visual, tactile, olfactory, auditory and other systems, a variety of surfaces will be included–brick, pea gravel, sand, bark chips, slate, stones, grass, soil etc. as well as plants with a variety of leaf textures, colors, shapes, sizes and, various fragrances.There will be a quiet area of the therapeutic garden include a sand table and water table for sensory play. Other objects such as pinwheels, wind chimes, flags and wind socks may also be used to engage the senses. There will also be opportunities for the child to develop gross motor skills and exercise large muscle groups by adding objects for climbing and jumping.

What does this have to do with you, you ask?  Well it is simple.  In order for approval  for a grant  to get this project underway, we need to show governing agencies that there is widespread community support and interest in our idea.  We simply ask to let your friends, neighbors, teachers, coworkers, and even the mailman if you can, to like our Facebook page and this blog post.  We want to show on our application proof that people care and that these children matter –  and that we need to do something to allow them the opportunity to enjoy exactly what we enjoy – experiencing life in and around the outdoors.  We hope that show of support, along with our finished Sensory Garden plans, will be enough to show a need to approve the grant.  We hope that by next spring – we can bring you an update on the progress of the garden -and maybe by late next year – pictures of the sensory garden in use!

Thank you for taking the time to read and feel free to spread the word on your facebook, twitter, and/or blog page.

You can hit the following link to go to our Facebook page to help or feel free to forward on this link :
http://www.facebook.com/pages/Old-World-Garden-
Farms/320724164624407 .

Thank you!  Mary

Shared on Transformation Thursdays,  Savvy Southern Style Wow Us Wednesdays, and All Star Block Party

Making Your Own Hot Pepper Flakes

Our Hot Pepper Powder, Hot Pepper Flakes, Dried Chipotle Peppers and Hot Pepper Ketchup made from all of our summer peppers

When your harvest starts to pile up – make good use of your peppers by making hot pepper flakes or powder

What to do with all of those peppers in the garden?

Here is a simple and easy method to use up all of those hot peppers – make fresh hot pepper flakes.   We love them on pizza, eggs, or any other dish we want to spice up with a little heat and flavor.

We even make different kinds of pepper flakes depending on the peppers that are ready to pick.  We have made cayenne, jalapeno, Cajun Belle and even Habanero (very hot!!!) flakes from all of our extra peppers.   Many times we will use them all and make a mix.

Much like you would do when canning – you want to select the nicest and best looking of your peppers for drying.  Wash and rinse the peppers off, cut off the stem and then dry them off with a towel and place on cookie sheets.  Make sure you line the cookie sheets with aluminum foil before placing the peppers on them – we learned the hard way that drying peppers on unprotected cookie sheets can leave an everlasting heat to anything you bake on them afterwards :)

Here – four trays of Habanero go into the oven for roasting!

We can fit 4 loaded cookie sheets of peppers on the two racks in our oven – and then we just simply turn on the heat to a very low setting (usually 160 to 170 degrees on ours )

We will let them roast on low for about 8 to 10 hours.  If you have to leave – no worries –  just turn off the oven and resume again when you come home – no harm done at all to the drying peppers.  We will often dry them in the evening – and then turn off before bed – and finish drying the next morning or evening.

Grind the peppers in a food processor

When your peppers have turned crisp and dry (usually 8 to 10 hours – but it can be a few more or less depending on the dryness of the peppers) – take them out and let them cool completely.  Then place into your food processor or food chopper – and in a matter of seconds you have fresh home-made pepper flakes.  If you want to make hot pepper powder (like cayenne) – just simply take your flakes and run them through a food mill to remove the seeds – and your left with  a fine powder that can be used in dishes, soups, and sauces.

We keep some on the counter year round to use in everything from soups to eggs to pizza.

One last great use for the hot pepper grind  - mix up a few teaspoons of hot pepper flakes or powder in a gallon jug of water.  Let it stand for a day or two and then use a mister to apply to plants where bunnies or other critters can be a problem.  One taste of the hot pepper on the leaves and they tend to leave it alone.  Just remember to re-apply after any rain that might wash off the hot spray.

Last but not least – a few cautions when working with hot peppers:

Always wear rubber gloves to prevent your hands from absorbing the heat from the peppers – from experience – I can tell you that it’s no fun to have your hands hurt for days from handling raw peppers.

When heating in your oven – you will definitley notice the smell and a little heat in the air from the peppers as they dry – we always keep a window or two open to help keep it from bothering us too much.

When grinding up in your food processor – we actually take ours to the porch back screened in porch to grind – just to avoid the sneezing dust that can come with the grind.

**If you would like to receive our Recipe Of The Week each Friday – be sure to sign up to follow the blog via email in the right had column, “like” us on  the Facebook, or follow us onTwitter

- Mary and Jim