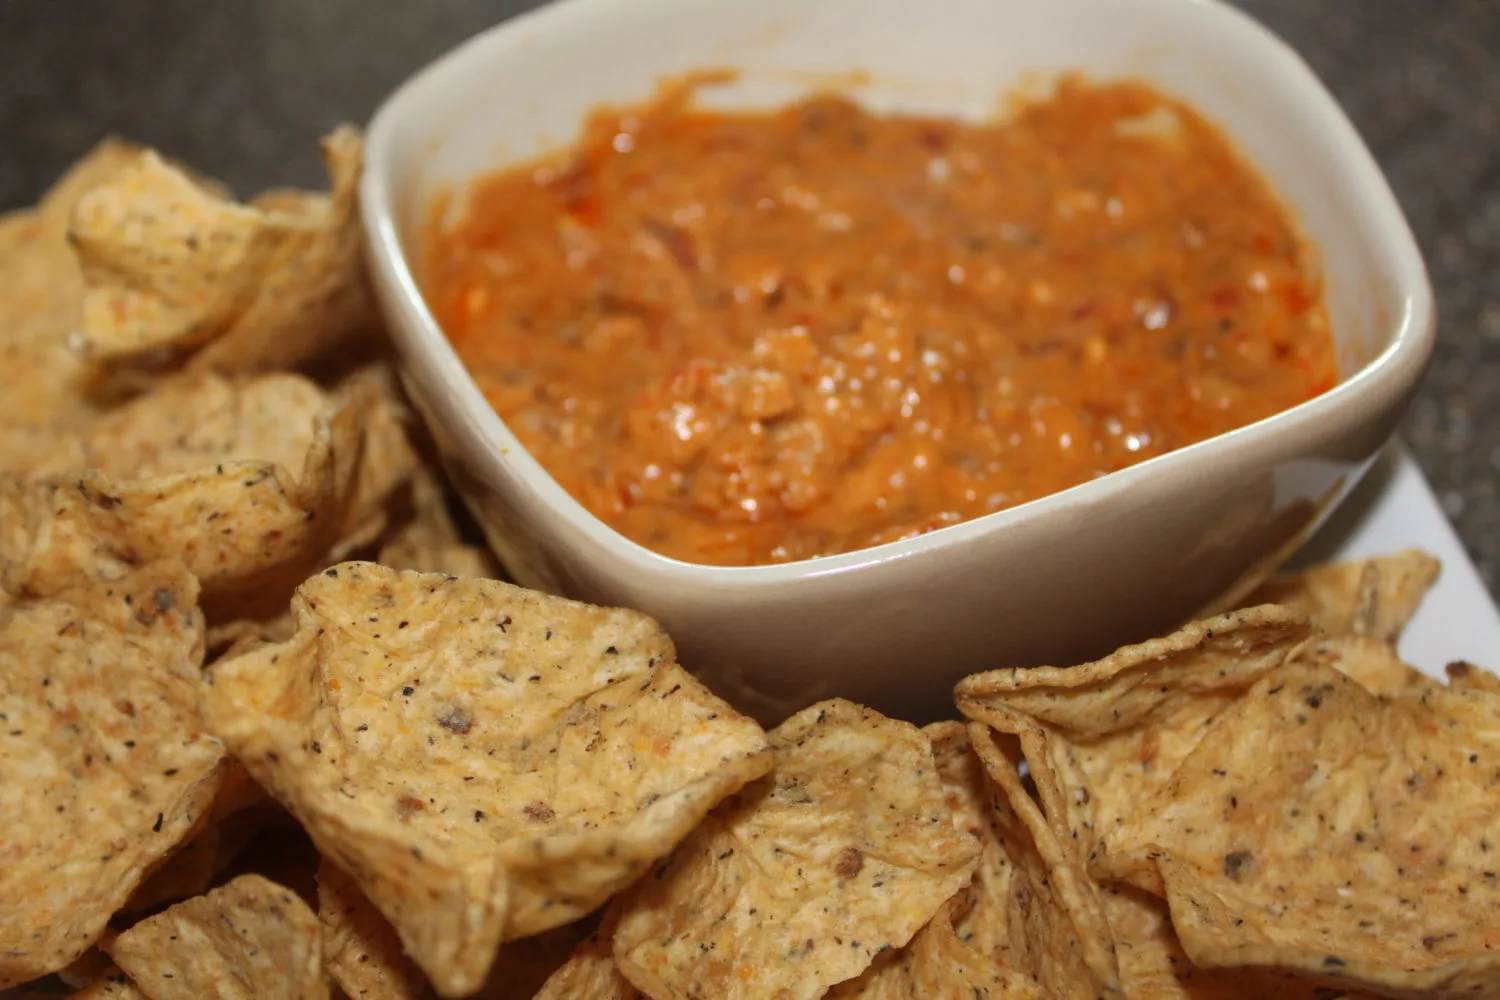
Crock Pot Tailgate Nacho Dip Recipe

Typically, I would save my tailgating recipes for the weeks leading up to Superbowl Sunday.  However this year, our tailgating season has become extended due to our high school’s run into the state playoffs.

We have two boys and a lot of their friends who play on the team – and this weekend , we head to Northern Ohio for the State Championship Game.  So in honor of the big game  - I thought I would share one of our favorite nacho dip recipes for tailgating.  Of course, it’s just as good to eat in between the games, practices, and pep-rallies!  Not only is it easy to prepare, it makes enough to provide for a large party (or a few football players).

The Ultimate Tailgaiting Nacho Dip

Crockpot Nacho Dip

Ingredients:
8 oz. bar of cream cheese
1 pound (16 0z.) of Velvetta cheese  (I prefer the Mexican or Jalapeno versions)
2 cups of Shredded Sharp Cheddar Cheese
1 can of Hormel Chili No Beans
1 jar of Salsa (we used our homemade salsa that we canned this summer)
1 pound of Hot Italian Sausage

Optional: diced jalapenos, green chiles, diced fresh onion

Simply Irresistible – especially to the football players!

Directions:
Brown and drain Sausage. Cut cream cheese and Velveeta cheese into cubes for faster melting.  Place all ingredients into a crock pot.  Place on high if you are serving it within the hour.  Or place crock pot on  on low if you have 3-4 hours before needed.   Stir occasionally.

Once melted and hot, serve with tortilla chips.

-Mary

Preparing And Planting The Raised Row Bed Garden

PART 2 :Today is the 2nd part of our four-part series on how to plant a simple garden using raised row beds. We call it Growing Simple. Over the course of the four weeks, we will take you through the process of how we plan, plant, care and maintain our raised row garden – and how to create your own simple garden in your yard.  If you missed the previous week (part 1) – you can click on the highlighted text below to view.
1. Growing Simple – Raised Row Gardening –  Click Here For Part 1 
2. Preparing And Planting The Garden  
3. Maintaining The Garden Through The Season
4. Keeping Your Beds Productive

Raised Row beds with straw walking rows not only keep the garden neat – but more importantly keep the plants away from your feet! Foot traffic around plants can cause a big reduction in root growth and eventually yields.

Part 2: Preparing And Planting The Garden:
If you live in most parts of the country, winter is just around the corner. Believe it or not – now is actually a great time to get started with building your raised row beds for next year – and with little effort!

Wherever I have lived, one of the first requirements was to stake out the best place to put a garden.  The old adage of location-location-location certainly applies to this task! Start by finding the sunniest location possible in your yard.  Full sun is best – but if your limited to spaces with a lot of morning or afternoon sun – choose the afternoon. Tomatoes, peppers and most vegetables like it sunny and warm– and that afternoon sun is the better choice of the two.

Setting Up Your Garden:

The raised beds method can work with any size garden. This is our plan from last year. No matter the size – there are always two consistent factors – 18″ planting rows – and 22 to 24″ walking rows.

For this post – we’ll guide you through setting up a  10′ x 15′ raised row bed garden area.   Obviously, you can make your beds any size you want by following the same principles and methods; however, a 10′ x 15′ set up will give the average family plenty of fresh vegetables throughout the growing season. One final assumption we make here is starting your raised row beds with a pick up load or two of additional pulverized topsoil or growers soil. You certainly don’t have to take this step – especially if you have access to your own topsoil or compost mix at your disposal. However, one method we discourage is tilling up the existing space and using the soil at ground level.  When you utilize the existing soil to make raised row beds – the ground around the garden area tends to end up lower and reduces the effect of the raised row approach.  Not to mention using a tiller is a lot of work, and usually does more harm than good to the soil. (can you tell I am not a big fan of the rototiller?)
When we started our raised row garden at the farm – we used some of the topsoil that had been scraped away to level out an area for the barn – and we mixed it in with a load of growers compost/topsoil mix we purchased from a local feed mill.  I  think the total one-time cost for us was about $60 – which pales in comparison to the cost of buying the 5 tons of vegetables we have pulled from the earth the last two seasons.

How To Build Your Raised Row Beds Gardens:
Once you have found the best available area – you can do a little work now that will help you come spring. Here is all you need to get started:
1 to 2 bales of straw (or if you have them available for free – a few big bags of shredded leaves)
1 sheet of black plastic big enough to cover an area 10′ x 15′
4 or 5 rocks, cement blocks or spare 2 x 4′s to hold down the plastic

Spread a sheet of heavy duty black plastic over the entire 10 x 15 area to help kill all  thegrass and weeds off of your future garden

Step 1 – Preparing The Space
Start by spreading out the straw or shredded leaves over the entire 10′ x 15′ area. It should be at least a 3 to 5″ thick layer. Now take your black plastic sheet, lay it on top of your layer of straw or leaves to completely cover the area. This will serve to eliminate almost all of the grass that now occupies the area – and keeps you from having to dig at all. After you have covered it – secure the plastic down with your rocks, bricks, or whatever you can use to ensure it won’t fly up during the winter and early spring. When complete, head inside and enjoy the winter! You can also use this method in the early spring, just make sure to give the plastic a few weeks at minimum to kill off most of the grass underneath.

Step 2 – Building Your First Beds In The Spring
Here is all you need:
2 to 3 Bales Of Straw
2 Cubic Yards Of Topsoil Or Growers Mix

The Row Layout for a 10 x 15 Raised Row Garden

This is the most work you will ever put into your garden – and saying that – I can tell you that you can probably complete this in less than a half a day.  In early spring, a few weeks before your ready to set in the first of your plants or seeds – it’s time to build the beds. Take off the rocks and plastic, and what you should find is some slightly decomposed leaves or straw.  Most, if not all of the grass or growth that was underneath will have died off. Don’t rake or move any of it – it’s the start of your raised row beds.

Our raised row beds in the fall as we start to plant them full of cover crops. Notice that the beds are not massive hills – rather just  slightly raised soil with tapered edges. This is key to success – too big of a hill and the water will run off during rains or watering – keeping your plants too dry.

We use the 10′ length of the garden for the length of the rows, and the 15′ side for the width. Start out by taking the straw (you can use shredded leaves if you have available), and spread out a pile about 18″ wide x 6″ high the entire length on the edge of the 10′ run.  If you use straw – make sure to break it apart as you loosely spread it out – being careful not to leave it in matted clumps.   If you use leaves – make sure they are shredded.  Measure off about 22 to 24″ of space for your walking row – and make another pile 18″ wide x 6″ high x 10′ long just like your first row.  Continue doing so until you have made 5 rows, 18″ wide – each the length of the 10′ row. You will have two rows on the outer edge – and three rows in between.  The 22 to 24″ space in between will become your walking and picking rows.

Pulvarized Topsoil or Growers Mix is the one purchase that can pay for itself quickly and get your garden off to a quick and easy start

Step 3 – Adding Soil To Your Beds

If you don’t have access to your own topsoil – you can purchase a couple of yards of pulverized topsoil or growers soil mix from a local supplier.  In our area, you can usually find it for about $30 to $40 a  cubic yard.  Two yards should be all you need for a 10 x 15 garden – and can fit easily in the back of a pick up truck.  If you don’t have access to a truck – they will usually deliver for an additional fee. Yes, it will cost a little here to get the garden up and running – but remember,  this is a ONE-TIME only expense.  Trust me that the vegetables you grow will easily pay for themselves in year 1!  A couple of things to make sure of if you purchase: 1) Make sure your buying a good garden soil – and not fill dirt – and 2)  Make sure its pulverized – it will make spreading out your soil a snap.

Once you have your straw base in place for your rows – you can  shovel on about 6″ to 8″ of topsoil on top of the straw.   You can smooth it all out with a rake when your done to leave nice, smooth, raised rows.

Spread about 6 to 8″ of soil over the top of each 18″ wide straw planting rows. The goal here is not to make huge mounds – just to cover the straw or leaves.  It will just slightly raise the soil in the working beds from your walking rows.  Don’t worry if you see some straw peeking through – its okay!  Just scallop your beds slightly down from the center height of 6 to 8″ in the middle. If you have a little soil left over – hold onto it – you can use it when you plant.

Once your raised rows are built – take more of the straw and spread out a thick layer (about 6″) in between the raised row beds.  This will help choke out any weeds, as well as not allowing any bare ground to be exposed for weed seeds to be blown into your walking spaces.  It will mat down after a few times of walking on it – so be generous – the more you apply to the rows – the less weeds you will have to deal with later.

NOW YOUR READY TO PLANT!

This is a photo of our first raised row bed we installed on the farm. Our original garden was 20 x 40. We were able to have it all planted in about 30 minutes using this method – a huge time saver!

Although we will get into specifics of the actual plants, planting and spacing next week – planting is a breeze! In a nutshell – planting is accomplished in minutes by simply spreading the topsoil aside using a small shovel and planting directly into the straw/soil mix below.   When we dig our holes – we will add in healthy amounts of compost (or that extra topsoil) to the hole.   For seed portions of the bed (lettuces, beans, etc) – plant right into the topsoil that is above the straw. Just use your finger or a small hoe to make a shallow row in the topsoil and spread the seeds according to the package – cover up with topsoil and your done!   The straw and topsoil acts as a great moisture retainer for the plant’s roots, allowing them to spread and grow quickly down into the soil. As the roots grow into the straw – they will go even deeper into the soil below that has been softened by the organic matter you put down earlier. I know it sounds crazy – but Mary and I planted last years garden – all 34 rows at 20′ long each – in under an hour and half.

Some Raised Row Guidelines… 

Raised Row Beds Help Roots Go Big, Deep and Healthy! Here are the roots of one of our Cajun Belle plants pulled up before the first frost.

One thing you never want to do is to step in your raised row beds.   Make sure to stay in your straw walking and picking rows.  By allowing the straw and dirt to be untouched and untrampled in the growing area – you truly get amazing root growth – which leads to amazing top growth and production! We are always amazed each year when we pull the plants in the fall how big the roots have grown in the undisturbed rows.

In next week’s 3rd segment, we’ll talk specifically about how and what to plant in your raised row garden beds – as well as how to maintain it in just 10 minutes a day. Included will be 3 separate complete 10′ x 15′ garden plans  for a garden to fit your needs – A Salsa Garden, A Salad Lovers Garden, And An All-Purpose Garden.

If you would like to follow along with the series and receive our DIY and Gardening Post each week – be sure to sign up to follow our blog via email, Twitter or Facebook in the right column.

Jim and Mary

Shared On Gnowfglins, Shabby Creek Transformation Thursday

The Silo Rises On The Farm…And Saving Money by Saving Seeds

The metal gets attached to the silo frame.

Finally!!! A little progress this past week on the silo! The project has had to take a back seat the last few weeks – first due to some windy weather, and then while we waited on the metal sheeting to arrive.

On Wednesday however, with some beautiful 60 degree sunny weather – we were able to get a little closer to finishing her up!

We temporarily set the silo up on the east side of the barn –  to shield from any winds while we attached the metal sides.  It will soon move it to its permanent spot above the garden and beside the compost bins – after we pour a small concrete pad for a base.  We’ve decided to attach the side posts to the concrete floor with anchor bolts to make sure it stands strong in any windstorm.  After attaching the posts, we will cut away the temporary wood cross-braces on the base, leaving a nice smooth floor.

The silos dome structure was not not easy to figure out – but its finally ready for it’s metal roof too

We have had a lot of questions about the exact purpose of the silo. The silo will be used to store huge amounts of shredded leaves and grass collected each fall from the yards around our neighborhood and surrounding areas. When full – it will hold close to 275 cubic feet of material. What will we do with all of that?  Well, we have a couple of things in mind.

First – We’ll use the stored leaves to make extra compost through the summer months – when it’s harder to find available composting materials. Each spring, our compost bins are overflowing from all of the fall clean up around the farm.  However, it quickly vanishes, as we use it in all of the planting holes of the garden and flowerbeds – as well as making our own potting soil mix.  In year’s past – it took quite a while to add more organic matter into the bins to get the next batch going – especially in early spring and summer – when there are not a lot of leaves, grass and plant debris readily available to put into the bins.

So we will use the stored shredded leaves and clippings from the silo to fill the compost bins back up immediately - combining them with our chicken coop manure, grass clippings and of course any available vegetable scraps, coffee grounds, etc. to get the next batch cooking.  Our hope is to make quick, continual compost batches through the season – and you can never have enough compost!

Secondly, in the past few years – we have used chopped straw in the beds underneath our raised rows.  Straw is great – but it’s not free – and can be really expensive once we start using it to also mulch the rows in between the garden.  Our plan:  to use the tons of shredded leaves stored in the silo for that purpose as well.  It’s free – and even higher in organic matter than the straw as it breaks down in the garden.

We use ornamental peppers almost everywhere at the farm to add color to the landscape

We try to select the best peppers on the plants to save for next years seeds

We just simply tear them open and use our fingers to remove the seeds

Our Sangria Pepper Seeds

Saving Seeds For Next Year’s Ornamental Peppers

Yesterday, in between watching some great college football games, we also tackled harvesting next year’s seeds from this past summer’s ornamental peppers.  We start the process in late summer – choosing the biggest and best of the peppers on the plants to use for our seeds.  We store them whole, in a cool, dry place for a few months to dry out.  Then, this past week – we simply sliced open the peppers, and scooped out the seeds. We usually let them air dry for a few more weeks on a paper towel – and then seal and store them in a ziplock bag until we are ready to start our seeds indoors in early February.

We grew over 200 ornamental pepper plants from seed last year – and hope to increase that number this year. They are a great plant for annual color in the landscape. They also have the added benefit of being low maintenance – requiring little water, are resistant to most insect damage – and very hardy in cool or hot temperatures. Last year we grew the Sangria, Poinsettia and Tequila Orange varieties – and will add a few more to the mix this year.

We save a tremendous amount of money by growing our own ornamental peppers from seed. They can run upwards of $3.00 a plant – and that’s if you can even find them in local nurseries in the first place.   When you plant as many as we do around the farm – in mass plantings, flower pots and hanging baskets – you have no choice but to grow your own from seed!

Hope everyone has a great Sunday!

Jim and Mary

Shared On Gnowfglins,  Transformation Thursdays

Unexpected Guest equals Unexpected Recipe – Roasted Red Pepper Hummus

This past week has been crazier than the typical Thanksgiving Holiday week.  You see, my immediate family is spread throughout 3 different states and it is nearly impossible for all of us to get together for a typical Thanksgiving meal.  However, last Wednesday , my Grandmother who would have been 94 years old in December, passed away.  And after 4 years, we all were together once again.

Since my Grandmother lived just a short drive from ‘The Farm’, we had several family members staying with us.   When hosting any occasion, we try our best to make each person feel comfortable and welcome.  Pretty easy for immediate family, typically.  However, my brother has chosen a vegan lifestyle which made things a little more interesting in our household.  In order to accommodate his dietary needs, I did my best to come up with something that he could eat after a long trip to Ohio.

Roasted Red Pepper Hummus with Pita Chips

We live in a rural community, with limited options for ‘All Natural’, ‘Organic’ and ‘Vegan Friendly’ food choices.  I knew that he would be able to shop for some food items upon arrival, but as his little sister, I wanted to provide him with SOMETHING he could eat.  That is how I came up with the Roasted Red Pepper Hummus.  Although this is a recipe that is vegan approved, you certainly don’t have to be vegan to enjoy it!  I even got my Mother to try it – and of course, she liked it!

Roast Red Pepper Hummuswith a little Kick!

1 16 oz. can chick peas (garbanzo beans)

Juice from 1 fresh medium-sized lemon

1 clove of garlic (only use fresh garlic)

Simple Ingredients for such a Flavorful Dish

1 small/medium fresh red pepper, roasted (3 Tablespoons canned/jarred)

2 Tbsp sesame tahini

1 tsp. ground cumin

1 pinch cayenne pepper

1 teaspoon olive oil

water as needed (1-2 tablespoons)


Directions:

If you choose to use fresh red pepper – Cut it in halves or quarters, remove seeds and inside membranes. Place skin side up on a foil-lined baking sheet. Place in oven under pre-heated broiler until skin blisters (about 2-5 minutes, depending on how close to the broiler they are placed, etc – you will need to keep an eye on them). There will be some charred spots on the skin as it blisters. This is OK – it gives the red peppers that wonderful fresh-roasted flavor. Remove from broiler immediately, let cool for a few minutes in a paper bag, then peel skin off.  OR – you can use freshly canned roasted red pepper from your summer’s garden, or even jarred roasted red pepper.

Mixing all the ingredients in the food processor

Drain canned chickpeas in a colander and rinse well with water. There’s no need to remove any of the loose “skins” you may find as you rinse them. They add fiber and will blend away as you prepare the mixture in your food processor.

Juice 1 fresh, medium-sized lemon.

Peel 1 medium to large clove of fresh garlic. Cut into quarters.

Mix until smooth – adding olive oil and water to the perfect consistency

Combine roasted pepper strips, strained/rinsed chick peas (garbanzo beans), tahini, lemon juice, garlic clove, ground cumin and pinch (or two depending on taste) cayenne pepper in a food processor. Process on high for 1-2 minutes until the mixture has a smooth, creamy texture. Add the olive oil and water as needed for a smooth, thick, creamy consistency.

Cover and refrigerate – it is best if left overnight for the flavors to blend.

This Hummus spread is perfect as a dip for veggies or as a spread on whole wheat/whole grain toast or bagel.  My brother chose to eat it as a dip with organic, and vegan friendly crackers.  However you choose to eat your Hummus – Enjoy!!!!

If you would like to receive our Recipe Of The Week each Friday – be sure to sign up to follow the blog, hit the “like” button on the Facebook sidebar, or follow us on Twitter.

Mary

Growing Simple – The Raised Row Garden Way

This is part one of our four-part series on how to plant a simple garden using raised row beds. We call it Growing Simple. We take you through the process of how we plan, plant, care and maintain our raised row garden – and how to create your own simple garden in your yard – whether it’s a single raised row for some fresh tomatoes and peppers or a full fledged garden.
1. Growing Simple – A Raised Row Garden Overview  
2. Preparing And Planting The Garden
3. Maintaining The Garden Through The Season
4. Keeping Your Beds Productive

GROWING SIMPLE – The Raised Row Garden   (part 1)

Our Raised Row Beds – The Pepper and Tomato Rows

Our raised row garden is the centerpiece of our farm – producing all of the fresh garden produce we use through the spring, summer and fall. It also provides all of the fresh ingredients for canning our pasta sauce, salsa, hot pepper mustard, green beans and more to fill our pantry for winter. You might think we spend hours each day working in the garden, and weeks getting everything planted and harvested – but quite honestly, we don’t.

Truth be told – on average, we spend less than 10 minutes a day working in the garden throughout the entire season, with rarely the need to weed anything, and keeping watering to a minimum. Our garden is not massive by any standards. It measures only 40′ x 60′ from end to end - and over 60% of that space is in the rows between the plants.  And yet, we routinely pick over 2000+ pounds of fresh tomatoes, potatoes, peppers, peas, green beans, lettuce and more with the simplest of gardening methods.

Raised Row’s Allow For Healthy And Productive Plants

For us – vegetable gardening is all about simplicity. It’s about maximizing our yields while minimizing our work load – all with an eye on the garden looking as good to the eye as the vegetables will on our plates. Our way of gardening is not based on some great scientific breakthrough – it comes simply from experience. It’s simple, quick, easy on the back and the environment.  But the real beauty of it, is that it can work in a garden of any size – as small as a single raised row 18″ wide and 3′ long, or in one much bigger than ours.  If you have always wanted to plant a garden – but think its too much work – give this a try! It’s economical, it’s sustainable – and adaptable to almost any situation.

So, what will we need? And what are raised row gardens?

Harvest From Our Pepper Rows

Let me start by telling you what you won’t need for a great raised row garden: You won’t need an expensive tiller. You won’t need to buy costly boards, planks or stone for edging and making raised beds. You certainly won’t need much time – about 10 minutes a day or less. But most importantly, you won’t need a lot of space.  In fact a simple 10′ x 15′ area, with very minimal work and cost – can be grown into a garden that will keep your family in fresh peppers, tomatoes and salads all spring, summer and fall – with plenty left over for canning.   As we will show you throughout this 4 part series – with a little straw or shredded leaves and a little top soil, you can start a raised row garden in an hour or two.

The raised rows allow the best of your soil to be concentrated right where your plants are – while the walking rows make access to the plants easy, without stepping near any of the growing roots.

Our raised row beds are 18″ wide and are about 10 to 12″ high in the center, with a gradual taper on the edges.  The length of the rows  is determined by available space, our’s happen to be 20′ each.  We have found that the 18″ width seems to be optimal  for root structure development – allowing them to become deep and strong – while still conserving the overall space of the garden.  This allows us to concentrate all of our compost and soil building efforts in that 18″ wide space of the row, not wasting them all over the garden.  Why till in and use up valuable compost or topsoil in the rows you walk – when you can put it exactly where it’s needed by the plants! Even our fall and winter cover crops are only planted in the 18″ wide raised rows – not the entire garden – allowing for maximum replenishment of the garden while conserving our cover crop seed.

The straw or shredded leaf mulching keeps the garden looking great, while keeping watering and weeding to a minimum

Our raised rows are very similar to raised beds – with a few minor cost saving changes.  One, we do not use any edging, boards, stone, etc. to keep our beds in place.  Not that it’s inherently  bad to do so – it just adds cost and maintenance issues that are not needed.  For us – going to the expense of building raised beds was a huge obstacle. We have over 30 rows that are each 18″ wide x 20′ long – and to come up with stone, wood or some other material to box them all would be a huge waste of valuable time and resources.  Secondly – our raised row beds use utilize a base of shredded straw or leaves under the mound of dirt – which provides tremendous advantages for the growing plants.  Last – we use a mulching of straw, compost and or shredded leaves on top of the raised rows during the season to make weeds almost non-existent.

Keeping foot traffic off the plants makes for bigger yields through bigger root structure.

Our raised rows allow us to stay off and away from the roots of our plants.  When you compact the area around a plant with big soil-clogging foot prints and heavy foot traffic  - it really does make it harder for the plant to grow bigger roots.  Less roots = less ways for the plant to soak up the valuable water and nutrients from the soil that benefit the plant.  If you leave the area around a plant undisturbed and free of compaction – it makes for much healthier plants.The most important thing in the garden in the structure and health of your soil. Watering, weeds, harvesting and plant choices all play second fiddle to that single important thing – your soil!

So now that you have a little background on our raised row garden space –  for next week’s segment (Preparing And Planting The Garden)  we will go through the entire process of setting up your first raised row bed space - step by step.  We will show you how we initially set up our garden, along with a simple plan for a 10 x 15  garden that can keep your family in fresh vegetables throughout next year –  the Growing Simple way.

If you would like to receive our garden and DIY post each week – be sure to sign up to follow our blog via email, Twitter or Facebook in the right column.

Jim and Mary

How To Grow A Great Garden..From Scratch

How To Grow A Great Garden..From Scratch

Opportunity Comes Knocking On The Farm…On The Table

The original pergola that helped build the farm a little quicker

Trestle Table I

Trestle Table II

Stacks of the old barn rafters and wood we saved from the old barns

The trestle base structure really add the strength to carry the heavy top – and gives the table the “vintage” look

When you are trying to build a completely self-sufficient farm – you have to be able to think outside of the box for opportunities.  Most who follow along know that through the summer months, we build pergola kits and garden structures to help the farm expand a little quicker. Pergola kits that simply grew out of a few friends and family wanting us to replicate the one we built for the farm. All in all – it’s allowed us to get the orchard and vineyard purchased and planted ahead of schedule, not to mention purchase Betsy, the farm truck.

Well, when we built our 12′ trestle table for the barn back in the middle of summer – it certainly wasn’t with any of that in mind. We just wanted to build a big ol’ farm table with long benches to use for dinner parties in the barn. There was just something that appealed to Mary and I about that throwback concept of having a huge table that everyone could sit around to enjoy a family style meal. As it turns out, that idea is shared by many others too – leading us to a really neat opportunity for the farm this past week.

It wasn’t too long after building the first table we had an offer from someone who wanted it for their carriage house. We decided to part with #1 in order to put a little more into the farm – and then built trestle table II to replace it – with my promise to Mary that it would stay put.

That leads us to a few weeks back when we received an email from some really wonderful people inquiring about the farm tables, and a request to come look at what we had built for the barn. They were in the process of outfitting a new business, and wanted the “vintage old wood” look. They had noticed our tables while searching on-line – and wanted to see what they looked like in person.  So last Sunday – we had the pleasure of showing them our little farm, along with the barn and farm table.  Now before I go any further – let me say that the promise to Mary is still in tact - our big barn table remains in place.

However, the end result of their visit has become a really unique opportunity for us. After looking at our old farm table – they asked if we would build replica tables to furnish the interior of a new growler pub business they are opening up in the Columbus area.  I have to admit it will be pretty neat to know we have our farm tables being used by people everyday!  They are scheduled to open at the end of the year – so we will keep you updated and hopefully show you pictures of the finished tables in the pub when completed.  On a sad note – this may mean a slight delay in finishing up the silo in the next week!

In other news – for those of you who haven’t been to the farm blog this week – you probably noticed today that the site has undergone some big changes.   We freshened up things with a new look, which allowed us to add category tabs for finding all of our old posts.  We hope you like the new look – and please feel free to let us know your thoughts  -  it’s always good to get feedback on what you like, and what we can do to make it better.

Have a great Sunday!  Jim and Mary

Quick and Easy – Cheesy Potato Casserole Recipe

I can hardly believe that we are less than 1 week from Thanksgiving.  No matter how much we pledge to do better this year at planning our holiday gatherings, life just happens to take over, and we spend the last few days leading up to Thanksgiving preparing for our meal.  Now, it always turns out wonderful, but having a plan in place makes things run smoother.

Cheesy Potato Casserole

For every gathering, potatoes are a must.  This classic Cheesy Potato Casserole recipe fits in perfect at any Thanksgiving meal.  It falls into the “fix it and forget it” category – and don’t we all need some of those dishes on a busy day.  It only takes 5 minutes to prepare and is a great side dish for anyone to make.  If oven space is limited, you can even fix this in a crockpot and it will stay warm until the last scoop is taken.

Heat ingredients in a saucepan before adding to the potatoes

Cheesy Potato Casserole 

32 oz. bag of frozen potatoes (I prefer cubed but shredded works just as well)
¼ cup butter
1 can cream of chicken soup
1 can of cheddar soup
2 cups sour cream

Using frozen potatoes makes this recipe quick and easy

1/3 cup onion, finely chopped
2 cups sharp cheddar cheese, shredded
1 teaspoon salt
1 teaspoon pepper

Topping:
1 cup crushed corn flakes
2 tablespoons melted butter

Place cornflakes in a bag and crush with your hands – no need for a rolling pin!

***To make the topping, mix crushed corn flakes with melted butter. Reserve for potato casserole topping.

If you would like to use fresh potatoes you would just wash, boil, cool, peel then shred the potatoes. If there is no time for that, as in most cases during the holidays, then thaw a bag of frozen potatoes – they work just fine. Place in a large bowl and set aside.

In a medium-saucepan mix and heat the butter, soup,                                                                          sour cream, onion, salt and pepper.

Bake at 350 for 40 minutes

Cook until butter is melted and sauce is smooth. Remove from the heat and stir in the cheese. The cheese does not have to be completely melted. Stir 2/3 of the mixture into the shredded potatoes and mix until potatoes are coated. Pour into a greased 9 x 13-inch baking dish. Spread with remaining sauce. Sprinkle with corn flake topping. Bake at 350 degrees for 40 minutes uncovered.

If you would like to receive our Recipe Of The Week each Friday – be sure to sign up to follow the blog, hit the “like” button on the Facebook sidebar, or follow us on Twitter.

Enjoy!!!

Mary

Building A Trestle Desk From Scrap Lumber

The Trestle Desk In Place – With Our Two Salvaged Vintage Chairs. It’s 8′ Long and 30″ Deep

The obligatory “before” picture

Our living room also doubles as our home office area.  It seems like there is never enough space  to organize our own work – let alone the homework assignments and projects of the kids.  So this desk, like almost everything we build, came purely out of necessity.

We wanted a long work space that could have two separate working areas on either side – with room for a shared printer in the middle.  We had a couple of old wooden chairs that we wanted to use to fit the room’s “vintage” theme – so we designed the trestle desk around them.   The beauty of a vintage build like this – even if it gets a ding or a scratch – it just adds a little more character to the piece.  Not something you can do when you scrape or scratch the flimsy pressboard desks you buy in big box stores.

To help manage the cords and keep a clean look on top – we added a few holes along the back edge to drop cords through for the laptops and printer.  So for now – the end result is a nice clean vintage look in the living room / office.  That is, of course, until the projects, papers, and everything else soon clutter this desk as well!  We are realists after all. :)

From a material standpoint – it’s an inexpensive build – especially if you have some scrap lumber lying around.  But even if you have to buy all of the materials at the lumber store – you can build it for under $50.

Here’s how we did it:

Step 1 – Assembling the 28″ and 25″ pieces to for 3 squares

Next – scribe the angle cuts with a pencil and cut to make the inside “x”

The Finished “x”

Attach the back 2 x4 x 93″ boards flush to the top and bottom of the back of the desk

Pre-drilling some 3/8″ holes in the top desk boards – these are to put the buttons in after they are screwed down on the desk

After all holes are pre-drilled – we then screw the top down flush with the 3″ screws and glue

With The Top On – We added the back trestle angle boards

We then cut out 1″ circles in the back for pass through cords

Before painting -we added a 2×4 trim board all around the desk to give some depth to the piece.

Bottom primed and getting its black paint – all that is left is to stain and seal the top

Stained and waiting to move indoors

We have two separate lists below – one if you are buying all new lumber, and one if you are making from scrap pieces.  Make sure to look for nice straight pieces with no bowing or warping – it makes the project go easy.

Building From Purchased Lumber Material List:

(4) 2x4x10’
(5) 2x4x8’
(3) 2x10x8’  For Main Top
(75) 3″ screws
Wood Glue / Construction Adhesive
3/8″ Wood Plugs – approx. 40

Building From Scrap Wood Material List:

(6) 2×4’s  28” pieces
(6) 2×4’s  25” pieces
(6)  2×4    32” pieces
(2) 2x4x93” for back boards
(3) 2x4x8’  For Outer Trim Boards
(3) 2x10x93″  For Main Top

We started by cutting 2×4 boards into 6,  28” long pieces

Next, we cut 6 more pieces of 2×4 boards at 25” long

We pre-drilled each end of the 28” boards for 2 screws

Taking two (2) each of the 28″ and 25″ pieces, we applied a little construction adhesive (you could also use wood or carpenters glue) to the ends of each 25” piece – we screwed the 28″ pieces into the 25″  to form a square.

*2×4′s are 1 1/2″ thick – so they make a perfect 28″ square when glued together with the 28″ boards overlapping the 25″ boards.

We repeated this process two more times until we had 3 complete squares.

Up next – the inside cross bracing.  Now, you can be fancy and figure out the exact inside measurement – or you can take the easy way and just simply lay down a 2×4 piece on top of the square and make simple cut marks by tracing the line.  2 angle cuts later – and your x braces are ready to assemble.  Once again we drilled a few pilot holes on the outside of the squares, applied construction adhesive and screwed them together.  We repeated it again for the other 2 squares and the desk was ready to start assembling.

We set 2 of the finished squares 93” apart from outside edge to outside edge on a flat surface – and then set the 3rd square in the dead middle of the two.  We then took two 93” boards  – and screwed them into the back side of the 3 squares – one flush to the top – one flush to the bottom, connecting the back of the desk.

To add the “trestle effect” to the desk – we then cut two more angle boards to fit in between the back two boards – and screwed them into place.

For the top – we wanted the screws to be hidden – so we used a 3/8″ drill bit and pre-drilled the 2 x 10 x 93″ top pieces down a 1/4″ inch on each board.  This way – when we were finished assembling we could pound in some 3/8″ wooden dowel plugs to hide the screws and give an old peg “look” to the piece. Then – we applied some glue on the top of each square support and screwed down each board.

After the top was all glued and screwed down – next came the dowel plugs. You can buy them at all most any hardware store – or  can cut your own from a long dowel – either way – - installing them is a snap.  We put a little glue in each hole – put the dowel plug on top and with a little tap of a rubber mallet (or hammer if you go easy) – we secure them down in the screw holes.  Some of them were just a touch above the board surface height – but a quick sanding smoothed them all out.  Finally we added a 2×4 edge board to the front and side edges to give a thick wood look.  We used the same plug method here to hide the trims screws as well.

Next we gave the entire pieces a quick sanding – and it was time to paint.  We decide to match the pieces in the room – so we painted the base a matte black – and used a dark walnut stain for the top.  For the base painting – we used a quick coat of primer before applying two coats of black matte paint.  For the top – we wiped on two coats of walnut stain – and then applied 3 coats of urethane (with a light sanding in between coats).

The finished result – a two station work desk for our home office / living room.

If you would like to receive our weekly DIY and Gardening Tips Post each Tuesday – be sure to  hit the “Like” button on our Facebook page, sign up to follow us via email on the blog, or sign up to follow us via twitter.

Jim and Mary

Shared on Wow Us Wednesday, All Star Block Party Shabby Creek, Gnowfglins

Preparing For Winter At The Farm – And The Blog Hits 2500!

Before we get to the farm update – we want to take a quick second to thank everyone who follows along with us each week!  Yesterday, we reached a milestone  - our 2,500th follower to the blog!   Thank You, Thank You, Thank You!!!

So with that said and Winter knocking on the door – weatherproofing became the theme of the week at the farm.

Chickens are actually pretty winter hardy – you just need to keep them dry and draft free.

We started with the Chicken Coop.  Chickens are really good at handling the cold if you follow two simple rules – keep them dry and keep drafts out of the coop. We attached a sheet of plexiglass over each of the two windows to prevent the cold winter winds from whipping through the coop.  We also added about 8 to 10″ of straw to the floor to give them extra protection against the winter cold.  I long ago gave up trying to put it where I think they need it – because within 10 minutes – they are busy at work scratching and moving the straw to where it best suits them.  Once the cold weather sets in – we practice whats called the “deep litter” method in the coop – adding straw every few weeks through the winter months to keep it clean and dry –  but not removing any to keep it warm.  It works well, and helped our chickens keep laying all through the winter months last year.

Next up was shutting down the farm’s rainwater collection system for winter.  We opened up the taps and emptied the remaining water from the barns two (2)  275 gallon rainwater collection totes.  The plastic totes would crack  from freezing if we left them filled with water –  so emptying them is a must.   We brought the tanks into the barn, and attached a 20 foot section of drain tile to the downspout to let the water run off for winter. We’ll set them up again in early March to fill up quickly with the spring rains.

The watering system kept our garden green through the summers drought

The rainwater system was an absolute miracle to have on the farm this year with all of the hot and dry summer conditions.  It easily provided over 2000 gallons of water for our garden, trees and plants.  We came close this year a couple of times  to running out during those dry spells – so we are planning to add in one more 275 gallon holding tank to see us through any more drought conditions.

As for other happenings around the farm…

The Trestle Desk Project

The Silo still sits quietly on its side in the barn – on hold while we wait for the metal panels to arrive to put on its framework.  They are supposed to finally come in this Tuesday – I can’t wait to get them on and get it up!

Finally, for about the last year we have wanted to build a trestle desk  out of lumber scraps for the space we use as our home office.  With the Silo project still on hold – we got around to it this week.  It will be Tuesday’s “How To” DIY feature.  But for now – here is a sneak peek of the desk as it dries from another coat of urethane out in the driveway.

Shared On Savvy Southern Style, All Star Block Party

Peanut Butter Pie With Oreo Crust Recipe

As we continue our November recipe theme for Thanksgiving, a little warning, this one might just become your year round favorite!  Not only is it easy to make, but it is sinfully delicious!

Peanut Butter Pie –a family favorite!

I have to admit, I am a peanut butter fanatic.  It all began my Kindergarten year when I would beg the school bus driver to hurry and get me home so that I could eat my after school peanut butter and jelly sandwich.  No wonder why I became known as the “peanut butter kid”.  Honestly, I could eat peanut butter on EVERYTHING!!!  I eat it on bananas, apples, crackers, and don’t forget the sandwiches – the “Classic”(peanut butter and jelly), the “Pregnancy craver” (peanut butter and bacon), and the down right “Weird” (peanut butter, mayo, and pickles).

So I had to find a way to incorporate peanut butter into my favorite meal of the year….Thanksgiving.  Since I have to be somewhat traditional, putting peanut butter in the cranberries was out of the question.  But since not everyone loves pumpkin pie, it has become tradition that I also make Peanut Butter Pie.  Believe me, there isn’t a crumb left over at the end of the day.

Oreo cookies ready to be crushed

Ingredients

Peanut Butter and Cream Cheese mixture

For Crust:
25 whole Oreos
4 Tablespoons of Butter, melted

**Yes, you can buy a pre-made Oreo crust that will work just fine.

PEANUT BUTTER FILLING

  • 1 cup Creamy Peanut Butter
  • 1 package (8 Ounce) Softened Cream Cheese
  • 1-1/4 cup Powdered Sugar
  • 1 package (8 Ounce) Cool Whip, Thawed

Peanut Butter Filling Poured onto the Oreo Crust

Preparation Instructions

Crust:
Crush Oreos into a fine crumble mixture – If you have a food processor use this — it will save you a lot of time and clean up later.  Don’t worry, the cream filling will just disappear.  Pour melted butter over the top and stir with a fork to combine. Press into pie pan and bake at 350 degrees for 5 to 7 minutes.

Remove from oven and allow to cool completely.

Chocolate being shaved for the topping

Filling:
Beat the peanut butter with room temperature cream cheese until smooth. Add powdered sugar and beat until smooth. Add in the thawed Cool Whip and beat the mixture on high for 1 minute, scrape the sides, and beat on high again until smooth and fluffy.

Pour filling into crust, evening out the top with a knife or spatula.

Optional – top with mini chocolate chips or chocolate shavings.  Chill for at least an hour before serving.

Warning: This pie is ultra-rich. Cut small slices—your guests will thank you!

If you would like to receive our Recipe Of The Week each Friday – be sure to sign up to follow the blog, hit the “like” button on the Facebook sidebar, or follow us on Twitter.

Enjoy!!!

Mary – aka “The Peanut Butter Kid”

Shared On Little House In The Suburbs, The Barn Hop, The Chicken Chick, Savvy Southern Style, Full Circle Creations, Shabby Creek, Gnowfglins