Raccoons, Hens and Bees (No Bunnies) – The Easter Sunday Farm Update

First and foremost, thank you to everyone for all of the kind and encouraging words sent after last Sunday’s post.  It was nice to hear from so many of you, and also to have some of your ideas and thoughts on tackling the problem of the raccoons in the coop and mice in the equipment!

Spring at the farm always seems to be the time of year that everywhere you turn, a project is either starting, in process, just completed, or just created.  With the weather finally warming to the 40′s and 50′s – this week had it’s share of projects in all of those phases:

Update On The Hens and Raccoons:

The cat was not happy with his capture!

The cat was not happy with his capture!  He happily ran off off after his release and went back to his life of leasure.

We spent the last week making an extra nightly trip to the coop to shut off the entrance from the enclosed run to the coop.  We have finally figured out that it must be baby raccoons wedging themselves into the coop through the 1.5 x 4″ wire mesh fencing we have in the coop run.  For two years, we never had a single problem with a predator entering our coop until now. Most likely, the baby raccoons are just small enough to squeeze through.   For now, shutting off the entrance has kept them safe.  This week – we will install smaller mesh to the outside of the run to keep them out.

On a somewhat humorous note – we have set two live traps each night to hopefully catch the raccoons.  To this point – they have worked incredibly well in catching and holding only a couple of neighborhood cats! Apparently, cats love the taste of marshmallows and peanut butter bread too!  Needless to say – the look on the cats face as we let them out is one of pure disgust.  I haven’t been able to figure out if the disgust is at us for setting the live traps, or at themselves for being caught in such a basic walk-in trap :) .

The Honey Bee Project:

The beehive is all assembled and ready for our first hive!

The beehive is all assembled and ready for our first hive!

Our quest to have our first bee hive is getting close!  The bees are scheduled to arrive the 19th of April, and we spent the last two weeks building the beehive from the kit we purchased last month.  It’s actually quite the process to assemble all of the boxes, frames and beeswax foundation sheets.  All I can say is that Mary and I have a new respect for the craftsmanship and details that go into making and building a hive – and I am really glad we have a nail gun!

None the less, by weeks’ end, our entire beehive was assembled and ready to go!  We are going to apply a couple of coats of stain to the outside of the hive body to match the barn and we are ready for the bees….and of course, the honey!

Baby Chicks Head Into Week Four:

The chicks are starting to get their feathers

The chicks are starting to get their feathers

We are almost to the halfway point with raising our baby chicks in the brooder.  At 8 weeks, they will have completely feathered out and be ready to move into their permanent digs at the farm.  Weeks 3 and 4 are always filled with new achievements for the chicks.  All of them have begun to roost on the starter poles we put in the coop.  It’s hilarious to watch them jump up and learn the art of balancing.  It usually only takes a couple of falls before they get the hang of it.  They could easily be mistaken for little pigs – they have nearly quadrupled their daily intake of food and water, and so far – all 18 are getting along well.  Usually at around week 6 or so, they will start to establish more of a pecking order and have a few dominant hens put the other “ladies” in their place.

New Coop Progress:

Jazzy looked confused when we asked her if she wanted to live at the new coop to protect the hens :)  She would probably be more scared of the raccoons than the chickens...

Jazzy looked confused when we jokingly asked her if she wanted to live at the new coop to protect the hens. She would probably be more scared of the raccoons than the chickens :)

With only a little over 4 weeks to go – that means the new coop has to be finished soon! This past week – we worked on finishing up the foundation, so hopefully, with the forecast for sun and 50′s this week – we can get the coop walls installed.  I am really glad we pre-built the walls back in January – it will save a lot of time in finishing the project.  With the recent coop break-ins we have had with the raccoons – we are adding some extra security to the new coop.  A double layer of smaller 1 x 1 wire mesh will be used to fence in the coop run, and we will install it down into the soil a full foot and embed with concrete.  Hopefully, that will keep them safe and happy.  We should have some good pictures next week – hopefully of the coop mostly finished!

Wishing everyone a Happy and Safe Easter, and here is to Spring finally arriving!

- Jim and Mary

Dirt Pudding Recipe – Adding A Spring Touch To Dessert

Dirt Pudding served in a flower pot.

Dirt Pudding served in a flower pot.

Centerpiece for the 'kids' table at Easter Dinner.

Centerpiece for the ‘kids’ table at Easter Dinner.

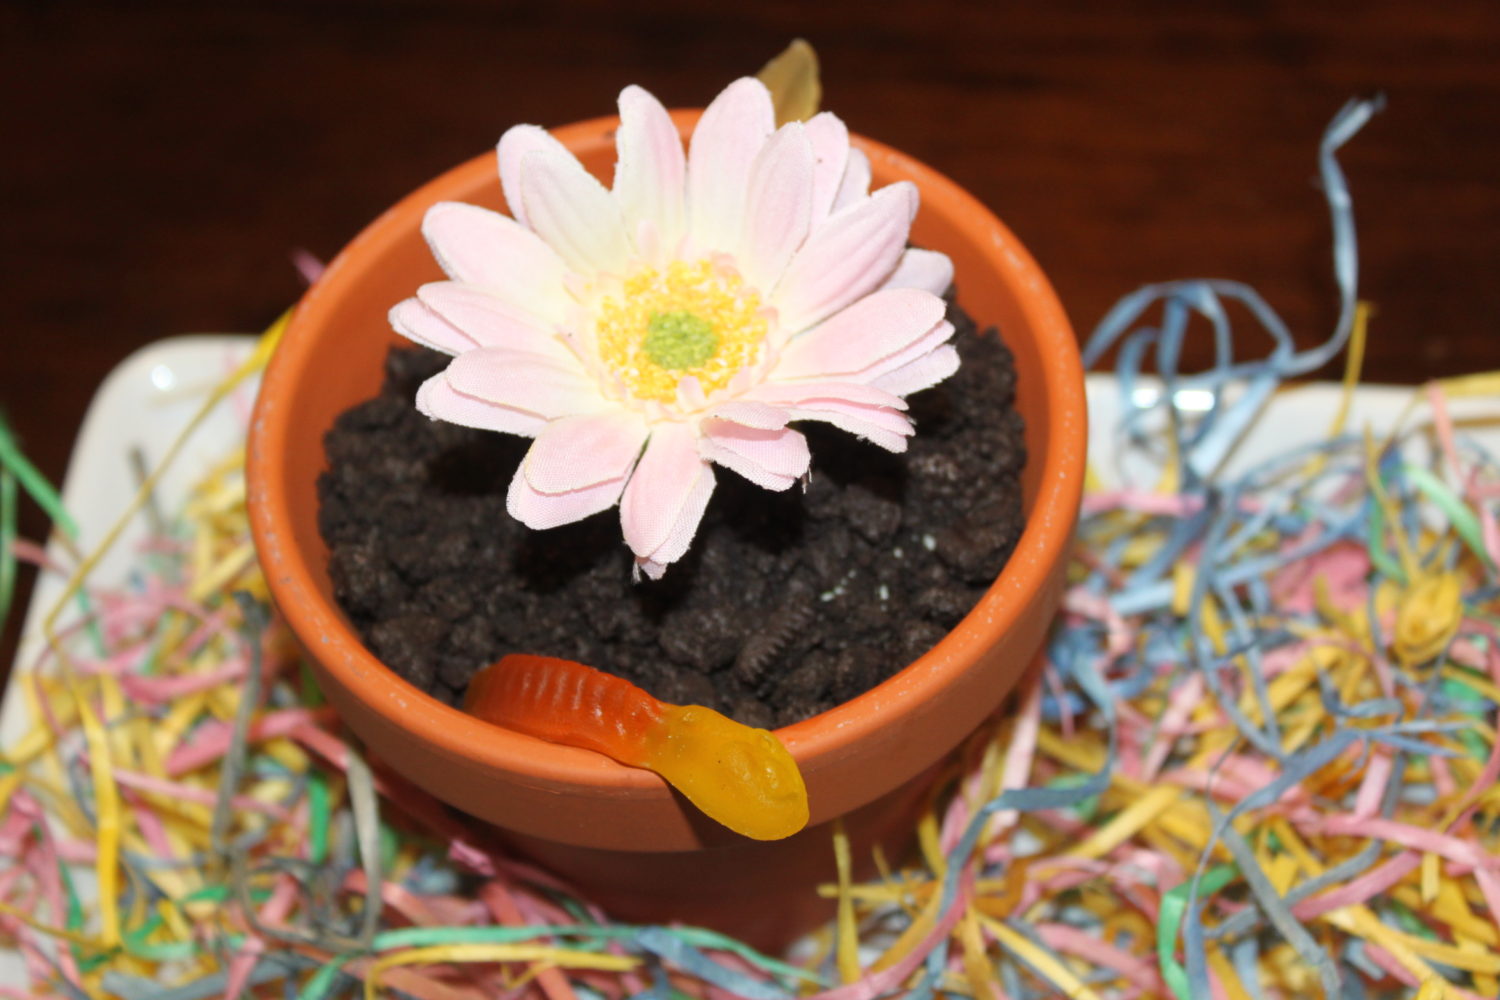
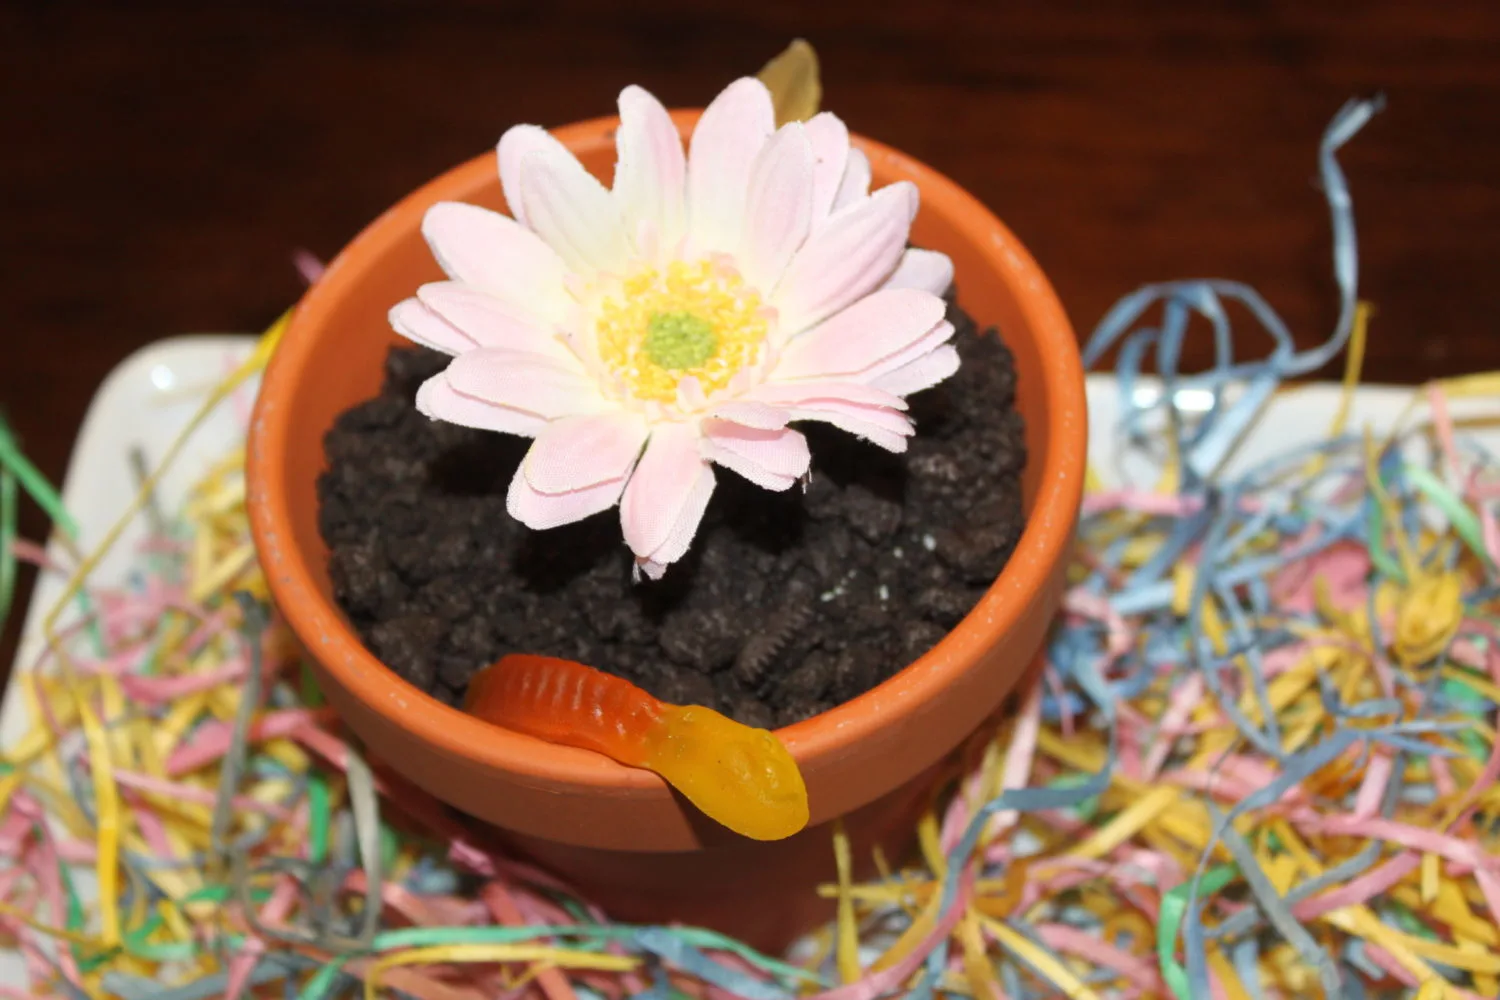
In our family, not only do we have an Easter egg hunt, we also hunt for our Easter baskets.  When I was growing up, the tradition was to find an original clue on the kitchen table, which would lead you to the next clue, and the next, and the next.  Those clues finally led to that much awaited Easter Basket filled with the treats that were saved for special occasions.  These are the traditions that we cherish and pass down from generation to generation.

With the holiday weekend among us, we find ourselves once again deciding who is bringing what to the extended family meal.  The traditional Easter dinner will be served, with several pies made for dessert.  But because we have a big family, with lots of children, I thought it would be nice to bring another aspect of Spring into the Easter Celebration.

Dirt pudding has always been a favorite of the kids.  The combination of crushed Oreo cookies and pudding, and of course gummy worms,  leads to empty bowls and smiles on their faces.  For this year’s Easter celebration, we decided to take it one step further.  We used the element of surprise to win over the crowd.  The addition of the terracotta pots and fake flowers made everyone take a double take to the edible center piece in the center of the table.

Good stress buster - crush your oreo cookies using a gallon bag and a rolling pin.

Good stress buster – crush your oreo cookies using a gallon bag and a rolling pin.

INGREDIENTS:

1 lg. pkg. Oreo cookies
1/2 stick butter (room temperature)
1 (8 oz.) pkg. cream cheese (room temperature)
1 c. powdered sugar
3 1/2 c. milk
2 pkgs. instant French vanilla pudding
1 (12 oz.) carton Cool Whip
unglazed terra cotta pots – clay or plastic
drinking straws
Artificial flowers to insert into dessert

Line your pot with a piece of parchment paper to prevent leaking through the hole

Line your pot with a piece of parchment paper to prevent leaking through the hole

Layer the bottom of your pot with the crushed oreos.

Layer the bottom of your pot with the crushed oreos.

Add the straw once you place some of the pudding on top of the crushed oreos

Add the straw once you place some of the pudding on top of the crushed oreos

INSTRUCTIONS: 

1. Crush well one whole package of Oreo cookies. Set aside.
2. Cream together butter, cream cheese and powdered sugar.
3. In separate bowl, mix together milk and pudding mix.
4. Add pudding to creamed mixture.
5. Fold in Cool Whip.
6. Wash and dry flower pots.  Place a piece of parchment paper in the bottom of the pot to cover the hole.
7. Place a couple of tablespoons of the crushed oreos in the bottom of the pot.  Add a tablespoon of pudding mixture.
8. Cut straw to 3/4ths the height of the pot. Insert the straw in the center of the pot, allowing the pudding mixture to hold it upright.
9. Continue to fill the pot with the pudding mixture until it reaches the height of the straw.  Do not cover up the straw.
10. Place the stem of the flower into the straw – cut the stem to the height that you want.
11. Place the crushed oreos on top of the pudding to represent dirt.

12. Place gummy worms in the ‘dirt’.

Enjoy!

Mary

**If you would like to receive our Recipe Of The Week each Friday – be sure to sign up to follow the blog via email in the right had column, “like” us on  the Facebook, or follow us on Twitter

Growing Herbs – Great For Your Garden…And Your Kitchen!

growing herbsThe varieties are endless. Basil, Cilantro, Thyme, Dill, Oregano, Chives, Mint and oh so many more. Herbs are some of the easiest and low maintenance plants to grow, and can be tucked in almost anywhere. It’s a shame that more often than not, they take a back seat to more familiar food crops such as peppers, tomatoes, corn and beans in the backyard garden plan.  Especially when you consider they bring loads of taste and flavor to the dinner table.  Herbs are the ultimate dual use plant – providing for great culinary use in the kitchen, while adding visual and aromatic appeal to your landscape, garden, patio or porch area.

Although they flourish when planted in a garden or flowerbed setting – almost all herbs can be grown in pots and containers as well.   The key with working herbs into your landscape is to think outside the “box” to add extra interest – like adding mint to a hanging baskets as a trailing accent plant – not only will it look beautiful, but it can make your porch or patio come alive with its wonderful scent.

Basil and Oregano are a big part the fresh ingredients we use to make our home made pasta sauce

Basil and Oregano are a big part of the fresh ingredients we use to make our home-made pasta sauce

And as an added benefit, many herbs can be successfully potted up and grown through the cold winter months in a sunny windowsill, providing a little extra “freshness” to your winter cooking.

A final note on using herbs in the kitchen –  it may sound a bit odd, but remember when using in a recipe – you need to increase the amount of fresh herbs to equal the same effect if you used traditional dried varieties.  Why? Dried herbs have much more concentrated flavors, and therefore you need less of them.  There is no perfect ratio, but most cooks will tell you a 2:1 or 3:1 ratio is best.  The trade off for using fresh – the flavors are more pure and true.

Although there are endless varieties available, here are 6 of our favorite herbs that are easy to get started, and serve many uses in our kitchen and landscape.

Cilantro / Coriander

The coriander seeds late in the season on a cilantro plant

The coriander seeds late in the season on a cilantro plant

If you love salsa and want to make your own – cilantro is the choice for you.  Many think that cilantro and coriander are two separate plants – when in fact – they come from the very same plant and produce two separate and distinct flavors. Cilantro and Coriander are one in the same.  The fresh young tender leaves are the unique spicy taste we know as cilantro in salsa, and the mature seeds that develop on older plants are the spice you know as Coriander. Cilantro will grow best in the cooler temperatures of spring and fall, so sewing seeds both early and late in the year is a good idea. Cilantro is one of those plants that do well in pots and planters.  Once the hot heat of summer comes, the plants will bolt and go to seed, and now you have coriander.  Consider this one the 2 for 1 herb.

Basil

Basil is easy to grow, and has so many uses in the kitchen!

Basil is easy to grow, and has so many uses in the kitchen!

There is nothing in the world that can compare to the taste of sweet basil!  We use generous amounts when we make our home-made pasta and pizza sauce, and it is one of the 3 key ingredients in our favorite summertime appetizer – Basil, mozzarella and tomato slices.  If you have never tried this – make this the year you do!  Basil is extremely easy to grow, and will continue to grow throughout the summer.  Our basil grew out of control last season, and actually re-seeded itself for a tender fall crop as well.  It is considered an annual in our zone – but we rarely have to purchase seeds, because of its ability to re-seed itself each year.

Oregano

Oregeno is a key ingredient in Italian seasoning, and sometimes preferred dried over fresh

Oregano is a key ingredient in Italian seasoning.

This is another must have if you are a lover of fresh pasta sauce! Oregano is a perennial that comes back year after year with its distinct and fresh tasting leaves.  Although there are many types of oregano, we are partial to both the Italian and Greek varieties, using them to flavor our pasta  and pizza sauces. They dry extremely well, and are perfect to make your own home-made Italian seasoning – using equal parts of dried parsley, oregano, basil, thyme and rosemary.  It is actually one herb that a lot of cooks will prefer using dried as opposed to fresh, as the flavor seems to change for the better in the drying process.

Chives

Chives can be used as a garnish, or you can put them in oil to flavor

Chives can be used as a garnish, or you can put them in oil to flavor

Chives are one of the tiniest members of the onion family, and their use dates back to ancient Chinese times, where it was used for both medicinal and culinary purposes.

Chives are another perennial that will do just as well in the soil of a garden as it will in a pot on your back porch.  Their uses are many, but probably best known for chopping up and sprinkling on baked potatoes.  They also add a great onion flavor to soups and dry rubs.   Chives can be placed with their stems and blooms in tact in a container of olive oil, to flavor it with a hint of aromatic flavor.

You can split, divide and transplant chives much like ornamental grasses. You can also dig up a small piece and bring indoors in a sunny location to enjoy fresh chives through the winter.

Mints.

Spearmint is a fantastic smelling herb that can be used in drinks and more

Spearmint is a fantastic smelling herb that can be used in drinks and more

There are a vast array of mint types available – peppermint, spearmint, chocolate and more!  They are fantastic to use as garnish or the main ingredient in your favorite teas or mixed drink –  like a mint julip, mojito, or a soothing peppermint tea to name a few. As an added benefit, they fill the surrounding air with their amazing fragrant scents.

A word of caution with mint however.  They are best planted in pots – even of you plant in the garden.  Mints can be invasive and once they become established – their underground roots can travel far and long and become difficult to remove.  So keeping them in pots is the key.  They are a perennial, and will come back each year with little trouble.

Dill

Dill is a wispy, tall plant that gives texture to your garden

Dill is a wispy, tall plant that gives texture to your garden

If you want to make your own pickles – then growing dill is a must!  Fresh dill is easy to grow, and can become a focal point in the garden with its tall, fern-like, aromatic spikes. It is one of the taller herbs you will find – growing to heights of 2 to 3 feet depending on the variety.  As dill matures, it is usually best to drive a small stake in the ground for support.   The foliage and flowers are wonderful to use in all kinds of recipes from deviled eggs, to soups and of course pickles! As the plant matures, you also can harvest dill seeds as well.  Dill is a great choice to use in large planters as a tall accent plant – it’s a creative switch to use in place of the old standards like traditional spikes.  They are an annual as well, although much like basil, if you have them in a garden or flowerbed setting, they more than likely will re-seed themselves each year.  Dill is best planted by seed directly in the ground, as it does not transplant well.

So this year, as you get ready to put out all of those fresh vegetable plants in your garden – throw in some herbs in the plan as well – and increase your gardening and kitchen horizons!

Happy Gardening!  Jim and Mary

If you would like to receive our DIY & Gardening  Tips every Tuesday – be sure to sign up to follow the blog via email in the right hand column, “like” us on Facebook, or follow us on Twitter

Shared On Gnowfglins

Dealing With A Little Sadness At The Farm…The Sunday Farm Update

It was a tough week at the farm as we lost Big Mamma.

It was a tough week at the farm as we lost Big Mamma and two other of our chickens to raccoons

Sometimes…things don’t come up all roses.  Sometimes they don’t work out the way you had planned.  And sometimes, things can happen at the farm that really break your heart.  This was one of those weeks.  In fact, it was a really tough and trying week.  But, as crazy as it sounds  -  it’s the tough weeks that make you realize how important it is to work every day at your dreams.

It started off last weekend when we tried to fire up Betsy, the old farm truck. While in winter storage at the farm, it seems that field mice had decided to seek comfort and warmth inside of the glove box, under the seat, and inside of the engine compartment. To make matters worse, they decided to chew up the firewall material and wiring to make their fluffy, warm nests.  After spending the better part of a day cleaning it all up – we discovered the trucks two batteries finally were beyond charging and needed replaced.

The remnants of an ornamental pine tree after catching fire from a spark

The remnants of an ornamental pine tree after catching fire from a spark

And when I went to fire up our gas generator for a little power – the cord of course, came off in my hand with the very first pull of the year! Next up, we watched one of our little ornamental pine trees shot up in flames from a tiny spark that blew in from a nearby ornamental grass clearing fire we had set.  It was also the week we decided we had to tear apart the leaf silo project and start over – after it toppled over in a winter windstorm and became damaged beyond repair.

And then finally, the past few nights, total heartbreak. For the first time since our coop was built two years ago,  raccoons somehow found a way into what had been a  secure area – and claimed the life of three of our beloved chickens, including our absolute favorite “Big Mama”.  It was indeed a tough week at the farm.

So it got us to thinking about why we started the farm in the first place – and why we choose to garden, raise chickens, keep bees and build and work at the projects we do – even though they can bring their fair share of disappointment at times.

The old farm truck - the winter home of field mice :(

The old farm truck – the winter home of field mice :(

The farm is an escape for both of us.  It’s not our “real job”, but the one we love to do no matter what.  One of my pet peeves in the “real” business world has always been those that hold meetings for the sake of meetings, and to think so long and plan so hard that nothing ever happens (think congress?). I’m not sure who said it, but I have always loved the saying “Don’t be a think tank – be a DO tank”.  The farm has always allowed us to be doers.  If we had waited  for the “prefect time” to build the coop, create the garden, or build the barn – we may never get to experience any of them.  And yes, we have made plenty of mistakes along the way – and had our share of  set-backs and disappointments.  

The silo as it looked in the fall, before the windstorm that toppled it.

The silo as it looked in the fall, before the windstorm that toppled it.

Yes it’s true if we had never started raising chickens we wouldn’t have the heartbreak of losing any this past week.  And if we didn’t have the old farm truck – we wouldn’t have to worry about it getting destroyed by mice.  And if the leaf silo project had never been thought of – we wouldn’t have lost it to a windstorm.  But at the same time – we would never have accomplished a single thing.  The farm simply allows us to be doers – and  not just thinkers – and that makes it all worth it.

So although our hearts are a little heavy for our chickens, and although things didn’t go quite right this week – we will keep trying and keep building and growing - because the real disappointment for us would be to never try at all.  The best way to put it is that we are and always will be blessed with work we love to do.

One of my favorite quotes of all time comes from Albert Einstein, when he simply stated, “you have never failed until you stop trying”.   That’s the way we feel about our little farm and garden. it’s a never-give up proposition for us.

Our chicks are growing up and starting to get their feathers.

The chicks are growing up and starting to get their feathers – and will be enjoying the farm in a few weeks.

So this week, we will continue to care for our 18 little chicks that will head to the farm in late April, and ready our new beehive with a coat of paint to prepare for our first hive of honey bees coming in late spring.  All in an effort to keep growing and building our dream of the farm.

Happy Sunday,

Jim and Mary

Blackberry Jam – Adapting 4 Natural Ingredients To Make A Thicker Jam With No Sugar Or Pectin

This recipe will make 4 pints of all natural blackberry jam.

This recipe will make 4 pints of all natural blackberry jam.

Fresh blueberries make excellent jam!

Fresh blackberries make excellent jam!

As many of you might recall, a few weeks back we did a recipe post on Strawberry Honey Jam which was made from just 4 natural ingredients (strawberries, apples, honey, and lemon juice).

We received a tremendous amount of comments from those who have made the jelly and loved the flavor, and more from others wanting to know if it could be made with other fruits.  It definitely is a touch thinner than traditional jam made using white sugar and boxed pectin. However, you can’t beat the thought knowing it isn’t loaded with all that sugar.

Ever since we began using that jelly in our house, I have been asked by several family members to try it with blackberries.  Home made blackberry jam has always been a favorite of Jim’s, and we couldn’t resist trying the recipe with a different fruit.

We made a few tweaks to the original recipe to see if we could get the jam a little thicker this time.  By using two large Granny Smith apples, we were able to increase the amount of natural pectin found in the skins of the apples, which made this recipe thicker than the original.  Below is the recipe that I used which made 4 pints plus a few spoonfuls extra.

2 Large Granny Smith Apples are the thickening agent for this recipe

2 Large Granny Smith Apples are the thickening agent for this recipe

Ingredients:

3 lbs fresh blackberries

1 3/4 cups of honey

2 large Granny Smith apples

1 tablespoon freshly squeezed lemon juice

Instructions:

Blackberries boiling down ready to be smashed.

Blackberries boiling down ready to be smashed.

1. Wash the blackberries and place in a large stock pot.

2. Slice the apple into quarters, removing the core.  Grate the apples, leaving the skin attached. Add to pot.

3. Add honey and lemon juice

4. Heat on high until the mixture begins to boil, reduce and simmer 15 minutes.

We canned our jam for 10 minutes in a hot water bath - ready for storage.

We canned our jam for 10 minutes in a hot water bath – ready for storage.

5. Use a potato masher or an immersion blender to smash your blackberries until you reach a smooth consistency free of chunks.

6. Reduce to medium-low heat and simmer for an additional 15-45 minutes.  You can judge this by the consistency desired.  Reminder – it will thicken when it cools.

Blackberry Jam after being canned.

Blackberry Jam after being canned.

7.  Place in freezer safe containers, or can using the water bath process for 10 minutes.  It will stay good in the freezer for 6 months, and canned for 12 months.

Side notes:

Typically you do not want to boil honey as it causes enzymes to break down and lose some of the nutrients desired when using honey. However, in this recipe, we are using the honey as a sweetener in place of white sugar and did not want the strong flavor of our local honey to overpower the blackberry flavor.

When picking out your apples – try to find the under ripe apples.  They hold the most pectin. Definitely do not use over ripened apples in this recipe.

Enjoy!

Mary and Jim

**If you would like to receive our Recipe Of The Week each Friday – be sure to sign up to follow the blog via email in the right had column, “like” us on  the Facebook, or follow us on Twitter

6 Tips To Eliminate Weeds From Your Garden!

Weeds.  The enemy of gardeners the world around! They are responsible for choking the life from vegetable and flower gardens, while stealing life-giving nutrients away from our plants. Weeds are also the reason many gardeners throw their hands up by mid-summer and call it a year.

Weed Free gardens produce higher yields

Weed Free gardens produce higher yields

A weed free garden is a healthy garden

A weed free garden is a healthy garden

It simply doesn’t have to be that way.  In fact, some of the most time-consuming chores we have been led to believe help with gardening and weeds – are actually the main culprit to creating more! Simply by eliminating those weed promoting practices, and replacing with a few time and labor saving methods – you can all but eliminate the issue of weeds in your garden.

We spend no more than 10 minutes a day handling all of the chores in our garden – including weeding – and that’s not a misprint! The first step is realizing that eliminating weeds in a garden is a process and not a one time thing.  But don’t let that scare you –  the process is simple and leads to a productive and beautiful garden in a fraction of the time.

Here are six ways we keep our garden weed free – and fun to be and work in!

TIP 1:  Eliminate Bare Soil From Your Garden And Beds

Bare soil is an invitation for weeds and weed seeds t0 find a home

Bare soil is an invitation for weeds and weed seeds to find a home

Bare soil is at the root of most weed problems.  Bare soil is an open invitation for blowing weed seeds to become established. By using mulches and protecting the soil, you can cut the potential for future weeds dramatically!  We use a combination of mulches in our garden space to keep it covered. Straw and shredded leaf mulch in the walking rows, and a 2 to 3 inch mulching of compost right around our plants.

Just remember – open space is an open invitation for weeds and soil erosion

TIP 2: Resist the Urge to Dig and Till Your Soil: 

This is the biggest time-saving AND weed saving tip we can give.  Stop tilling the garden! In the time it takes a person to till between the rows of a garden the same size as ours, we have finished our 10 minute gardening work day, grilled out for dinner and are sitting on the patio enjoying a cool beverage!  And while working that extra time tilling – that person also just replanted tens of thousands of weed seeds that will germinate in the coming weeks.

Tilling is an invitation to weeds

Tilling is an invitation to weeds

Tilling simply takes all of the weed seeds that are laying on the surface, where they may never germinate, and plants them into the soil.  Tilling over time also can destroy your soil’s structure, but when it comes to weeds – it’s a prime reason gardeners have to spend so much time trying to eliminate them. It takes time, gas, and is a never-ending chore.  Instead – heavily mulch your rows with grass clippings, straw, or shredded leaves – they keep weeds to a minimum and help add vital nutrients to the soil as they break down.

We believe in this one so much we actually have an entire post dedicated to it: Why Not To Use  A Rototiller.

TIP 3: Don’t Over Hoe Your Row

Here’s another long time garden chore that used to take hours in the garden – and should take only minutes.  Using a hoe to loosen the surface soil around the base and root zone of your plant is a great weekly practice. It provides air to the plant’s base and allows nutrients and water to more easily reach the root structure.  But that is the extent of what is needed – just a 3 to 5″ light hoeing of the perimeter soil around the base of each plant. Leave all of the other space in your planting rows alone and simply mulch it!  Over-hoeing creates the same issue as tilling – planting above ground weeds seeds back into the earth.  All you need is a light hoeing immediately around the plants – it saves tons of time and labor, and eliminates replanting weed seeds.

TIP 4 : Start Practicing The Art Of Cover Crops:

Cover crops keep the soil from eroding and weed seeds form finding a home

Cover crops keep the soil from eroding and weed seeds from finding a home

Start cover cropping this fall.  Cover crops really help eliminate weeds over time by protecting your bare soil over the late fall, winter and early spring months.  They have obvious benefits to helping your soils vitality, but they also help to form a barrier for blowing seeds to enter and lay in wait.  After a season or two of cover crops – you will be amazed how little weeds actually even appear in your garden.  You can find more about cover crops here : Cover Crops In Your Garden.

Tip 5 : Keeping The Weeds Out Of Walking Rows:

Keeping weeds out of the walking rows between your plants is just as important to the health of your garden as it is the look.  The answer – Mulch – Mulch and more Mulch!  We use whatever we have on hand.  Straw and shredded leaves work great to create a thick 3 to 5″ covering between our planting rows.  From time to time a few weeds will start to pop up – and we simply pull them on our daily trips through the garden. If they become thicker – we  simply take the weed eater through the garden and mow them down to the grown and  reapply a few more inches of mulch.  It immediately looks great again and stays that way for weeks.  It’s so much quicker and better than tilling up that soil between your rows!

TIP 6: Practice The 10 Minute-A-Day Philosophy 

10 minutes a day goes a long way in the garden

10 minutes a day goes a long way in the garden

I think there are a lot of skeptics when we say we spend only 5 to 10 minutes a day in the garden for maintenance.  However, that is one of the biggest secrets to maintaining a weed free garden - actually  spending that time in the garden each day! This may sound a bit crazy, but 10 minutes of daily work is not the same as spending 70 minutes once a week in the garden.

In fact, there is a huge difference between the two. If you let the garden go for more than a day or two – weeds and the problems they bring multiply and magnify.  Roots get deeper, spread and multiply, and suddenly you feel overwhelmed.  What takes 10 minutes one day can suddenly take 4 to 8 hours when it has been neglected for a week or two. And guess what? It’s not fun anymore at that point.

We head into the garden every day and walk the rows.  If we see a weed around a plant, we pull it as we go. Usually, once a week we will spend the time hoeing the area only around the plants – once again – the process just takes 10 minutes to do the entire garden.  Another day, we spend the time putting down some extra compost mulch around the plants or straw or shredded leaves in the paths.  That’s it.

So there you have it – how we keep our weeds and workload to a minimum.  And remember the reason most of us garden in the first place – to eat healthier and get a little exercise.  This is a perfect 10 minute workout every day!

Happy Gardening! – Jim and Mary

If you would like to receive our DIY & Gardening  Tips every Tuesday – be sure to sign up to follow the blog via email in the right hand column, “like” us on Facebook, or follow us on Twitter

Featured on Gnowfglins

Creating A Simple And Inexpensive Rain Water Collection System

Our entire farms watering needs are met 100% with reclaimed rain water

100% of our watering needs are met using collected rainwater

Our barn's metal roof is our supply of water for the entire farm

Our barn’s metal roof is our supply of water for the entire farm

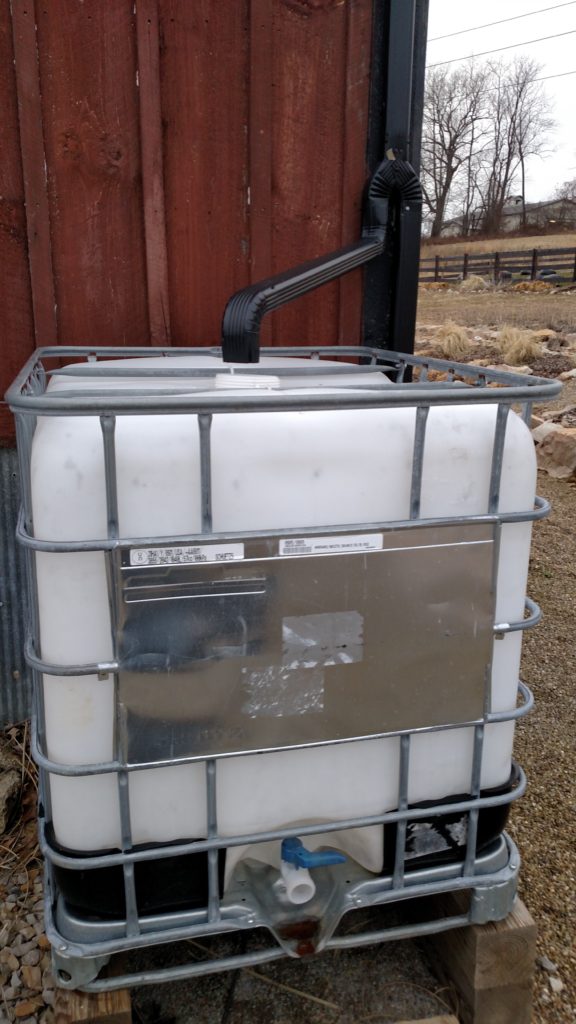
Visitors to the farm are usually surprised to learn that we water the entire garden and landscape with reclaimed rain water. Our system, which collects and stores rainwater from our barn’s metal roof, provides 100% of our annual watering needs. The best part, it was extremely easy to install, and can be inexpensively adapted to almost any home, shed or roof with a gutter.

We spent the past week hooking our tanks back up from winter storage – and within 24 hours  - we had just over 150 gallons stored from a single rain.  It’s been over a year now since we first completed the rain collection system – and I honestly don’t know how we survived without it.

It gives us access to free water, and with our two plastic tote tanks, can collect as much as 550 gallons from a single downpour.  And that’s only using rain from the back portion of the roof!  This spring, we will add a third tank fed by the front gutter – increasing our storage to just shy of 900 total gallons – enough to handle our watering needs for nearly two months of complete drought.

How it works:

Our system starts with the rain coming into simple gutters and downspouts

Our system starts with the rain coming into simple gutters and downspouts

Through a simple in-line diverter - the rainwater is carried to our main capture tank

Through a simple in-line diverter – the rainwater is carried to our main capture tank

The water then empties into our main storage tank

The water then empties into our main storage tank

This is from one single rain last week - about 125 gallons

We quickly filled almost 150 gallons from a single rain last week, the day after we hooked the totes back up.

A second tank sits above the garden for watering all of the plants with simple gravity and a hose

A second tank sits above the garden for watering all of the plants with simple gravity and a hose

We connect a standard garden hose to the tanks with a simple threaded adapter

We connect a standard garden hose to the tanks with a simple threaded adapter

The system collects rain water from a simple adapter made to fit our existing barn’s gutter. The barn has a standard gabled metal roof measuring 13 wide’  x 32′ long on each side.  A  32′ section of guttering runs along the bottom of each side of the metal roof, slanted slightly to carry all of the water to the eastern side of the barn.   From there, both sides empty into standard downspouts.

The front downspout (not used currently), runs down and out to the field for normal drainage. On the back downspout however, we installed a simple 2-way in-line diverter (See Picture). When the metal lever is slid to the left, rain water is diverted into a 275 gallon storage tank located below the downspout. When all tanks are full, the switch can be slid back for normal drainage.

From the main storage tank, we pump and fill a second 275 gallon tank installed above our garden. With that, we can water all of our plants quickly, using gravity and a standard garden hose connected to the tank.

To increase capacity and mobility, we are adding a second diverter to the front gutter this year.  That will fill a 3rd tank mounted on wheels – giving us the ability to pull water anywhere it’s needed with our tractor.  That will be a huge time saver when it comes time to water the newly planted grapevines and fruit trees on the hill this year.

Here is a look at the system’s components and cost:

Totes: $40 each  We found ours for $40 each after searching on Craigslist.  You can also check with local food plants that may receive their raw materials in them.  One word of caution – make sure you know what was originally in your tanks and that it is safe.  Our tanks were used to hold maple syrup and molasses – simple food products that can be cleaned out and re-used.  You will want to avoid using tanks that held harsh chemicals. Most tanks come with a 6″ threaded cap on top, and a 2″ threaded outlet valve at the bottom.  You can convert the bottom 2″ valve to accept a standard garden hose with a few adapters found at your local hardware store.

Diverter Switch :  $15  You can find standard gutter diverters at your local home improvement store for about $15 – they install in minutes with rivets or screws.

Threaded Valve and Hose Adapter: $15 Your local plumbing or hardware store can hook you up with a simple threaded connection valve to convert the 2″ drain at the bottom of your tank to handle a regular garden hose.  We also installed a ball valve ($10) on our tank for an extra shut off point.

A couple of final notes on collecting and using rainwater:

Keep It Dark:  You will want to keep the water from getting direct sunlight to keep algae from growing in the stagnant water. Algae can only grow if there is light.  If your tank is translucent like ours, you will want to cover it.  We use a black covering like a grill cover to cover them up once the sun and algae become a problem. Not only does it dress it up, but it keeps the water and the flow line crystal clear.  For the pictures here, we have the covers off to show the tanks.

Keep It Covered: No matter what system you use to store your water, you will want to keep closed.  Water that sits is an open invitation to mosquito larvae .  Our totes came with 6″ caps and lids on the top.  We simply cut out the hole for the downspout, and then sealed the edge with some inexpensive foam.

Know What To Use The Water For:  We only use our reclaimed water for watering plants or washing off equipment ,etc.  Since we do not treat it in any way, we do not use it for drinking.

Check to make sure your allowed to collect rain water.  Although it sounds crazy, in some states out west you are not allowed to collect rain water, as the water rights still belong to the state.  So to be on the safe side, check with your local or state government to make sure it’s legal where you live.

Happy Gardening!! - Jim and Mary

If you would like to receive our Gardening / DIY and Farm Updates each week – be sure to sign up to follow the blog via email in the right had column, “like” us on Facebook, or follow us on Twitter.

Shared On Gnowfglins

Whole Wheat Banana Muffin Recipe – NO white sugar, brown sugar, or white flour

Healthy Whole Wheat Banana Muffin - No white sugar, brown sugar or white  flour

Healthy Whole Wheat Banana Muffin – No white sugar, brown sugar or white flour

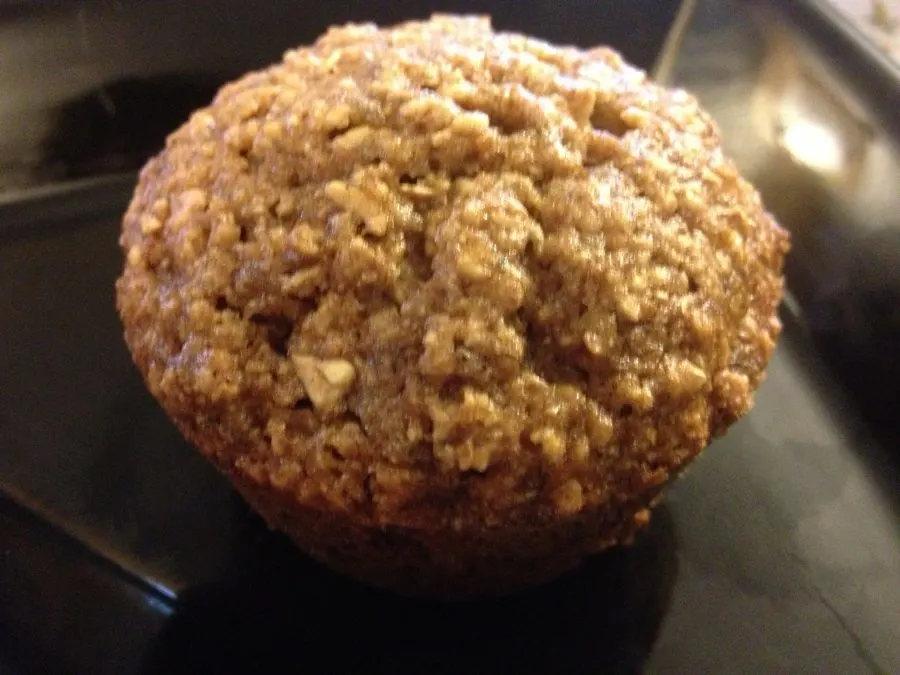
My intention for this week’s recipe was to make something for St. Patrick’s Day.  Irish Soda Bread, Cabbage Rolls, Grasshopper smoothie, or even the traditional Corn Beef and cabbage main course. However, that all changed when ‘life’ happened.

We were extra busy this weekend with the hint of spring weather that appeared.

Healthy Banana Muffins cooling before we can take the first bite!

Healthy Banana Muffins cooling before we can take the first bite!

We had to take advantage of every hour of the temperatures that reached near 70 degrees to get the farm ‘caught up’ in terms of spring cleaning, set up and preparation for the building of the new chicken coop.  Needless to say, that meant that we spent little time at home and our fresh fruit sitting on the counter was quite neglected.

So as I set out this week to prepare my Friday recipe, all I could see was those over-ripened bananas staring pathetically at me.  For those who know me, I have a difficult time throwing anything still of value out. Just because those bananas had some blemishes on the outside (don’t we all), doesn’t mean I couldn’t find a good use for them.  I put aside the idea of the St. Patrick’s day dishes, and I began the baking process.

Of course, I had to tweak my traditional banana bread recipe to make it without  white or brown sugar and without white flour.  Below is the recipe that I used to make banana muffins with more natural ingredients than those typical recipes that you find in most cookbooks.  This combination of ingredients allows for substitutions that produces a moist and delicious muffin that can be eaten as an ‘on the go’ breakfast, or as a healthy alternative to that late night dessert craving.

Banana Oatmeal Muffin Recipe

 INGREDIENTS:

Dry ingredients ready to be mixed with the banana mixture

Dry ingredients ready to be mixed with the banana mixture

3 medium ripe bananas

2 eggs

1 cup rolled oats

1 cup wheat flour

1/2 cup honey

1 teaspoon cinnamon

1 teaspoon baking soda

1 teaspoon kosher salt

1 teaspoon pure vanilla extract

INSTRUCTIONS:

**Hint - grind down the rolled oats in a food processor for a finer consistency

**Hint – grind down the rolled oats in a food processor for a finer consistency

Preheat oven to 325 degrees F

1. Mash bananas in a large mixing bowl  until lumps disappear.  Add eggs, one at a time. Mix well.  Add honey and mix until combined.

2. In a separate bowl, combine flour, oatmeal, salt, baking soda, and cinnamon.

**Hint – I place the oatmeal in my food processor and pulse it to make it more like a powder consistency before I add it to the mixture.  This produces a muffin that is less like an oatmeal muffin, and more like a moist banana muffin.

3. On low speed, add dry mixture a little at a time to the banana mixture.  Once incorporated, add vanilla and mix just until combined.

Ready for the oven!

Ready for the oven!

**Hint – When using wheat flour, it is important to not over-mix your batter.  Over mixing results in dense, thick dough.

4. Place in a lined muffin tin – fill each muffin cup 2/3rd’s full.

5. Bake at 325 degrees F for approximately 20-25 minutes.

6. Cool for a few minutes, then remove to finish cooling on a cooling/baker’s rack.

Enjoy!!!

Mary and Jim

**If you would like to receive our Recipe Of The Week each Friday – be sure to sign up to follow the blog via email in the right had column, “like” us on  the Facebook, or follow us on Twitter

Growing A Garden For Canning – How To PLAN TO CAN and Save Big!

^ quarts of homemade pasta sauce sit in the pressure canner

6 quarts of homemade pasta sauce sit in the pressure canner.

Canning can give you the taste and goodness of your garden year round - and save money as well!

Canning can give you the taste and goodness of your garden year round – and save money as well!

It seems that every year, more and more people are coming back to the art and joy of gardening.  Not just because they love the feel of getting their hands in the soil – but because they ultimately want to feed their families better tasting and healthier food while saving money.  As food prices continue to rise – people are looking to the garden to offset the cost. This spring, with just a little extra planning – you can maximize those gardening efforts into a virtual year-round pantry – and in the process, take a big bite out of those escalating grocery bills!

As much as we enjoy our garden for the fresh tomatoes, peppers, corn, green beans and more –  we create our garden plan each year with the additional goal of canning and freezing enough of the harvest to feed our family year-round.

We’ve figured out that the best way to maximize our effort is to plan now for what we want to eat later.  It’s really no different than the age-old concept of planning out your week’s meals before heading to the grocery. It eliminates ending up with produce that you have no idea what to do with in late fall – and not enough of the ones you need to can and freeze to feed your family.  Here are some helpful tips to help Plan to Can:

Take stock now of what you eat and need year-round

Tomatoes make up a large part of our garden because we use so many of them fresh and canned!

Tomatoes make up a large part of our garden because we use so many of them fresh and canned!

Fresh Picked Pasta Sauce Ingredients :  Roma Tomatoes, Green Bell Pepper, Sweet Yellow Onion, Red Roaster Pepper, and fresh picked basil

Fresh picked Green Bell Pepper, Sweet Yellow Onion, Red Roaster Pepper, and Basil turn into great tasting pasta sauce

This may sound simple – but its easy to overlook!  Nothing can beat the taste of a freshly picked ear of corn, or a spring onion pulled right from the ground.  But sometimes we get caught up in thinking only about the fresh – and not about what you and your family eat and enjoy the most all year long. The key is to take both the fresh and year-round concepts and translate it into your garden plan – planting enough to satisfy both needs.

A great example for us is tomato juice.  Mary and I love our homemade tomato juice.  Its delicious and most importantly – we know exactly what goes into it – just our organic tomatoes!  On average – we go through a quart jar every week, meaning we need a minimum of 52 quarts canned to get us through.   The result: A dedicated row planted each year for our  juicing tomatoes.  Last year that row netted over 70 quarts!

Tomatoes in fact take up a large part of our garden space because we use so many tomato based products throughout the year. Homemade pasta sauce, salsa, picante, pizza sauce and ketchup are all big hits in the house. We make a pasta dish almost weekly for a family meal – and the kids can devour a jar of salsa in a single sitting.  The result – 3 entire rows in our garden each year dedicated to La Roma and Celebrity tomatoes – great for making sauces, salsas and more.

Plant More Of  What You Currently Buy:

We have more rows of green beans planned for this years garden

We have more rows of green beans planned for this years garden

This is also the time to think about what you buy now and that you could grow or grow more of to preserve.  We fell in love with the taste of our canned green beans last year, and just didn’t plant enough to store as many as we would eat.  So for this year, we have bumped up the number of planting rows from one to four.

All of this planning can save big money!  We have not purchased a store bought can or jar of  tomato juice, salsa, picante or pasta sauce in three years.  Just using a conservative estimate – that saves us nearly $500 to $700 a year on those items alone.  The best part – it’s home grown food with no preservatives or chemicals – what could be better than that?!

Growing For The Freezer and Freezing Smart:

Frozen peppers are a great addition to many dishes, and easy to  sue when they are in single dish portions

Frozen peppers are a great addition to many dishes, and easy to sue when they are in single dish portions

The same concept goes into freezing.  We love to use peppers, onions, and snap peas in stir fry’s and other dishes, so we make sure to plant enough to eat fresh, and preserve some by freezing for later.  We also freeze a large quantity of our Cajun Belle and Jalapeno peppers to use later as quick appetizers.

When we first started out – we would simply freeze them into big bags – only to find out we could never use them up quick enough before going bad.  Now – we freeze sliced green peppers, onion, and snap peas in the perfect dish serving size.  Come winter – it’s a snap (no pun intended) to pull them out and throw them in whatever we are making.  No waste of time or produce!

Thinking Outside Of The Box With Surplus Vegetables:

A bumper crop of peppers led to us making our own dried pepper flakes, grind and chili powder

A bumper crop of peppers led to us making our own dried pepper flakes, grind and chili powder

Now we enjoy our own hot pepper flakes, smoked chipotle peppers and chili powder

Now we enjoy our own hot pepper flakes, smoked chipotle peppers and chili powder

You also have to think outside of the proverbial box when a certain plant goes crazy and your left with a huge surplus. A few years back – we had a mammoth crop of hot peppers.  We love them more than anybody – but there are only so many fresh jalapenos and habaneros you can eat in a given day without shooting flames from your head.  The solution: We decided to take the extras and dry them on low heat in the oven and our smoker.  The result – some of the best homemade pepper grind, flakes and chili powder we have ever tasted.   We’ve since cut back on the amount of peppers we grow – but we make sure to include enough every year to roast a few pans for our needs.

So this year as you think about the garden and all of those amazing fresh things you will grow and eat – put a little extra thought into what you want year round – you will be rewarded with some great winter produce – and huge savings on your grocery bill!

Happy  Growing!  For those that want to see our garden plan for this year – you can see it here : 2013 Garden Plan

- Jim and Mary

If you would like to receive our DIY & Gardening  Tips every Tuesday – be sure to sign up to follow the blog via email in the right hand column, “like” us on Facebook, or follow us on Twitter

Shared on Savvy Southern

The Chicks Are Here!!! Raising Our Chicks At The Farm

Our newest additions to the farm - our day-old baby chicks!

Our newest additions to the farm – our day-old baby chicks!

It doesn't take the little girls long to find the food!

It doesn’t take the little girls long to find the food!

The new chicks are here!  Our 18 little girls arrived home with us last Wednesday evening under the watchful eye of our Labrador Retriever, Jazzy.

We started raising our first chickens two years ago – and it has been a truly rewarding experience.  When we first began, we really knew little other than what we had read in books and on line. But before we knew it, we had a coop, nine full grown hens and about four to five dozen eggs a week!

I think more people might consider raising a few chickens if they knew how simple it can be – not to mention the added benefits they can provide to your garden, flowerbeds and breakfast table.

Our chicks come to us as 1 day old little balls of fur.  We keep them in a brooder we made from some old shipping crates that we set up in our basement.  The brooder gives them plenty of room, and will serve as their home for the first 8 weeks of their life. We use a heat lamp attached to the brooder to keep the temperature around 90 to 95 degrees during the baby chick’s first 5 to 7 days.  With no feathers and just a little fuzz to protect them at birth, its important to provide them the warmth their little bodies need to survive.  As they continue to grow – we reduce the temperature by about 5 degrees each week until they feather out and can provide their own body heat.  It is amazing to watch how quickly they learn to use the water and food feeders – and by the end of the first week, they are already trying to learn the art of perching.

Our older girls out and about looking for insects - they provide valuable natural pest control for our farm.

Our older girls out and about looking for insects – they provide valuable natural pest control for our farm.

At about 8 weeks, they will be ready to move to the farm and will take up residence in the “big coop” with our older chickens. It takes about 18 weeks on average for our new chicks to start laying eggs.  The first few eggs are usually on the small side – but they get the hang of it pretty quick and start laying nice sized eggs at about week 20.  We raise mainly Golden Comets and Leghorns, and they will lay an egg about 6 of the 7 days each week.

Our chickens have become the stars of the farm, and are an integral part of our goal of creating a self sustaining homestead.  In addition to the great tasting eggs they give us each day – they provide us with valuable manure that is a key ingredient to our composting process.  Chicken manure is high in nitrogen, and when mixed with carbon materials such as shredded leaves, coffee grounds, straw, grass and vegetable scraps – it helps to heat our compost pile quickly.  The end result is rich organic matter  that we work into our garden soil to provide valuable nutrients to grow our vegetables each year.

Our girls checking out the morning from atop the coop

Our girls checking out the morning from atop the coop

Our chickens also provide crucial pest control services.  Chickens can devour hundreds of bugs each day as they roam about, and do wonders in keeping the farms insect population under control. When Mary and I first cut down the high grass on the property, we would almost always come home with a tick somewhere on us.  Once the chickens arrived – finding a tick has been rare!

And of course last but not least – they are just plain fun to have around.  The farm wouldn’t be the same without them!  We will keep you updated on the progress of new chicks as we head into spring!

- Jim and Mary

If you would like to receive our Sunday Farm Update each week – be sure to sign up to follow the blog via email in the right had column, “like” us on Facebook, or follow us on Twitter.