Use Pallets To Build Your Own Double Compost Bin for under $15!

Our 2 compartment compost bin made from pallets for under $15

Our 2 compartment compost bin made from pallets for under $15

Compost Bin before staining to match the barn.  We only stained the exterior - leaving the interior free of all paints and stain

Compost Bin before staining to match the barn. We only stained the exterior – leaving the interior free of all paints and stain

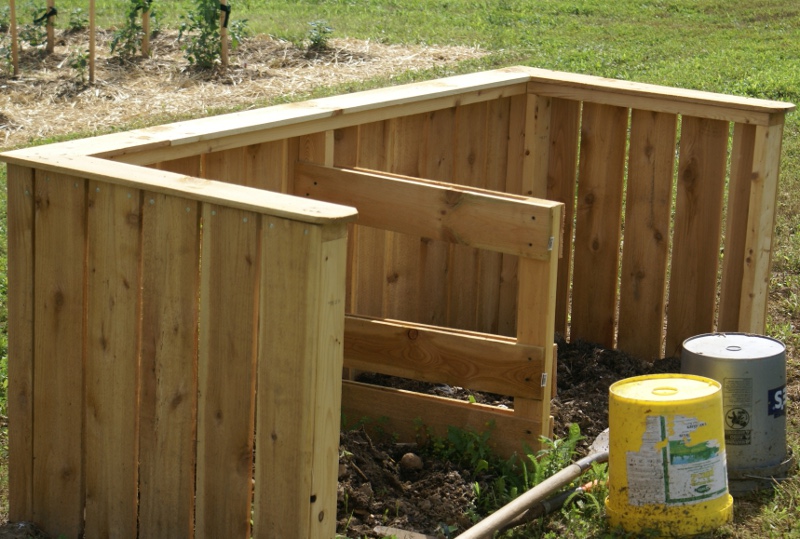
There are few things that can make your garden more successful than compost. Compost, or “Black Gold” as it is so often called, improves soil vitality and structure – and significantly bolsters your plants health and yields. The best part of all – you can use your own coffee grounds, kitchen scraps, grass clippings, and leaves to make great compost right in your own backyard.

The market place is flooded with all kinds and type of compost making systems – from wood and plastic bins, to compost tumblers, barrels and buckets. Although they all work – they also can be expensive to buy.  So here’s a way to use a few a pallets and 2 x 4′s to make a great looking double bin system for under $15.

The double-bin pallet composter is a simple structure that looks and works great! We built our 2 bin system from 3 free pallets and (5) 2 x 4 x 10’ boards in just a couple of hours.

Here’s how we did it:

Materials Needed:
3 or 4 pallets
5 ea. 2 x 4 x 10’ lumber – cut into the following lengths : 2 ea. @ 72″ long, 9 ea. @ 27″ long, 6  ea. @ 30″
2 ½” screws or nails – approx. 40
1.5″ screws or nails – approx. 50
Tools Needed : Reciprocating saw, screw gun, tape measure and hand saw or circular saw.

Building The Frame:

If you can, find 3 similar pallets to help make the project go smooth

If you can, find 3 or 4  similar pallets to help make the finished project look great!

Once you have disassembled the pallet - you will end up with nice slats to cover your compost bin with

Once you have disassembled the pallet – you will end up with nice slats to cover your compost bin

blah blah blah

The front frame of the compost bin

blajh balh ablah

One of the (3) three square frames

You can attach the 3 squares to the back with screws to the front panel - then cover with the pallet boards to finish

You can attach the 3 squares to the back with screws to the front panel – then cover with the pallet boards to finish

You will want to try to find 3 pallets that are in decent shape and similar length and size. First – disassemble the pallets to end up with about 30 or so slat boards. It’s an easy process and can be accomplished in minutes with a reciprocating saw.

(Click Here to view our post : How to Easily Disassemble A Pallet In Minutes)

The frame is a simple assembly of 2 x 4 rectangles and squares. A 6′ front rectangular frame, and 3 smaller square frames attached to it to make up the 2 bins. You will want to use regular framing 2 x 4’s and not treated lumber. We get a lot of questions about using treated lumber – but we use standard everyday framing lumber. I don’t like to use treated because we are making compost to put on our garden plants –  and I don’t like the thought of any chemical byproducts leaching into the soil and compost.

The front frame is made from 2 pieces of 2 x 4 that are each 72″ long. They will lay flat and make up the top and bottom of the frame. In between we add three sandwich boards that are each 28” long. Simply screw the top board into the three sandwich boards on the top and bottom. When all assembled – your front frame will be 6’ wide x 30” high.

Next – we need to make the three square frames for the two ends and the middle section. Once again – it is simple assembly. Using two (2) 30″ boards for the top and bottom and two more 27” boards on each end. Assemble all 3 squares,  and your ready to put your quick 2 bin compost bin together.

Simply assemble each of the 3 squares to the front frame with a few screws.  One on the end of each side, and one directly in the middle attached to the middle support of the front frame.   The flat 2 x 4′s should be centered right on the middle of the vertical front board.

Now you have your compost bin carcass. The rest is easy. Starting on the front side – lay out your pallet boards all along the front – leaving about ¼” to a ½” space between boards. I lay all of mine out first so that I can get it to work out perfectly even on the ends.  You want the spacing so that your compost can get air flow.
Once that is done – I lay out the boards for each side using the same method – and finish by putting up a double set of board in the middle section to separate the two bins.  With a two bin system – you can make twice as much compost.  Or, even better, you can have one side to store finished compost – and the other to keep “cooking” the next batch!

When finished – you can leave the compost bin completely natural and unstained and it will weather to an “old barn wood” grey.

Finished compost ready to use!

Finished compost ready to use!

To make it even more pleasing to the eye – you can paint or stain the outside of your pallet boards. We never stain anything inside – once again to not allow any paint or chemicals near the pile.
There you have it – an inexpensive yet beautiful 2 bin compost system that you can use for years and years – all for under $15!

If you would like to follow along through the coming year and receive our weekly DIY and Gardening Posts – be sure to sign up to follow our blog via email, Twitter or Facebook in the right column.  -  Jim and Mary

Shared On Gnowfglins, Shabby Creek Cottage

6 Simple Tips To Find Free Pallets and Reclaimed Materials

Projects like this compost bin are easy to make for free if you can find a source of pallets.

Pallets and reclaimed wood make up the majority of our materials when creating our DIY projects.

More often than not – the one question we get hit with is: “Where do you guys find this stuff for free!?”

Here are six tips and hints that have worked best for us – including specific details on the best places to look for  those elusive materials to recycle into your next project:

1. Think Small

The smaller the business – the easier it will be to get quality materials to make your craft or project.  Large businesses tend to have processes already in place to handle their waste materials.  On top of that, for safety and time saving reasons – they are not fond of letting  people in to take one or two pieces of scrap material.  So think small business.  They usually don’t have the resources or volume to unload scrap and spare materials to big haulers – so more often than not, it ends up in their dumpster.

2. Learn The Art of  Asking

Always, always always ask!  Just because there are some pallets piled up against a wall – or some leaves bagged on the road – it doesn’t mean that they are “free” for the taking.  In fact, in some cases – stores that take deliveries on pallets pay a deposit on them – and are charged if not returned.  In the case of  items left at the curb – asking is always the safe and courteous thing to do.  For a business – first thing in the morning or late in the day are some of the best times to stop in and ask.  Why?  Those times tend to be the slower periods  - and they are much more likely to take the time to talk to you.    And when you ask – be sure to share your plans for it with them.  Trust me – when people find out your building a coffee table, a desk, a chicken coop or playhouse for your kids – they are much more likely to be on board and help.  It also goes a long way to our next point:

3. Develop A Relationship

If you do find a business or a builder that has available items – work on developing a relationship with them to get materials as they become available.  Exchange email addresses and stay in contact.  Over time, we’ve developed a network of people who are on the look out for items we use.  We make it a practice of emailing back a photo of the finished project we made from their “junk”.  This works great for more than just pallets and wood – we have people that call us when they have left over stone,  garden materials, etc. because of the relationships we have built.  We have even gained some loyal blog followers now from our suppliers – wanting to see what we are building next.

So enough of the how to ask – here are some of the best places to find those materials.

4. Where To Find Good Pallets

You can usually find some great clean pallets that are perfect for building projects.

Pallets are one of the hottest materials used right now – and you can find a myriad of projects all over the web to make from them.   The key in making great projects is finding nice, clean and damage free pallets.

Our secret?  First – we forget about looking at those big commercial and manufacturing businesses.  Almost all of them have recurring contracts with pallet pick ups and deliveries  - and you never know what chemicals or materials have been used near them or spilled on them.  Instead – we concentrate on small stores that  get a small but steady supply of pallets.

The best places?  Small Garden and Hardware Stores, Motorcycle Shops, Lawnmower and Power Equipment stores.

Garden and Equipment Stores usually have a nice supply of available pallets – most of the new equipment is shipped in clean crated pallets

These stores seem to get inundated with pallets and shipping crates – and in many cases struggle to get rid of them. They are usually nice and clean because they are transporting brand new equipment in them.  Most of the power equipment stores receive their equipment and parts on pallets, or small shipping crates – which are great for re-purposing.   We have a small motorcycle and lawn equipment store nearby that always has a pile of lumber waiting to be scrapped.

5. Where To Find Misc. Lumber and Framing Material Scraps

New home builders and small business construction sites.

New home building sites are a great way to find nice scrap lumber and plywood

Ever drive by a new home building site and see that little fire going in the side yard?  Well,that is what some builders do to get rid of scrap lumber not used on the job site.   If not in the fire – it usually ends up in their dumpster.  Usually a simple walk up to the crew and they are more than happy to let you rummage through the pile.  You can usually find a nice supply of 2×4, and 2 x 6′s in short but very usable lengths.  For a desk or table – remember – most legs are between 28 to 30″ high.  Another great find at these places can be nice supply of short plywood pieces  - great for projects of all types.  Again – you will have much better luck with small time builders.

New Business Openings.

Have a new business coming to town or going into a strip mall or store?  How do you think they get all that product in to start the store?  That’s right – on pallets and in shipping crates!  When you see a new store coming in  - stop and ask  once again – many times – the store is so concentrated on getting open and running – they are more than glad to give you as much as you can take.  Just last week – we stopped by a new store ready to open and asked – and were greeted with a YES! please take them – you will save me from having to get rid of them.

6. Use The Power Of  The Internet

Local Facebook Community Pages Are A Great Place To Find Materials

Look For The Free Salvage Materials On Craigslist or your local Facebook Community Pages.

Okay – so beyond the pitfalls and the horror stories you here about buying things on Craigslist.  If you use common sense, and some basic personal safety rules –  it’s a great place to find materials for next to nothing or even free!  In our case – within just the last year we have found an old barn, 1000+ paver bricks,  and a huge load of crates and pallets – ALL FOR FREE.  We concentrate on the “for free” and “General” and “Materials” tabs – making sure to give a quick glance every few days to see what’s out there. On the being safe side –  we never ever pick anything up alone, always pick up during daylight hours and stay mostly with businesses that have items to unload.

Also – don’t be afraid to put out a notice on Facebook for what your looking for – you would be surprised to find people that may have something that has been sitting in their garage waiting for the trash.  Also – many local areas have Facebook Community Pages set up to look and ask for items for free, for sale or trade.

So there you go – our tips and tricks of the trade in picking up great building materials on the cheap!  If you want to receive our weekly DIY and Gardening Tips each Tuesday – be sure to “Like” us on Facebook or sign up to follow us via email on the blog.

- Jim and Mary

Shared On The Barn Hop, Chicken Chick, Little House In The Suburbs,Frugally Sustainable, Savvy Southern Style, Gnowfglins

Pallet Projects - Canning Cabinet, Wall Shelf and Crate all made from Pallets

Pallet Projects – Canning Cabinet, Wall Shelf and Crate all made from Pallets

Building With Pallets – How to Disassemble A Pallet With Ease For Great Building Projects

Here is a great pallet to use – nice thick wood and untreated

As most of you know – we love to build with pallet wood.  If you spend some time looking  - it is usually pretty easy to find a source to get them for free – and if you find the right kind – the building potential is limitless.  I thought for today’s DIY post I would show how we go about taking a pallet from its current state to great usable wood in just a few minutes

Working with pallets – the first thing we realized early on is it is nearly impossible and too time consuming to worry yourselves with pulling out the nails.  It is too easy to damage the wood with the claw and hammer or pry bar.

You can get a corded or cordless sawzall – but they are the king of dismantling pallets.

Instead, we opt for our sawzall method – which can disassemble a pallet in less than two minutes into 10 or more pieces of great usable wood.  Besides – the left over embedded nail fragments actually add a ton of character to pieces when either stained or painted.

So – 1st Tip – Invest in a sawzall.  They are the key to quickly destructing a pallet – and without damaging or splintering the wood.  Yes, it’s an expense – but the inexpensive ones will work just fine with pallets.

Throw out the little 5″ min blade and Invest in a 12″ Demo/Construction Blade. They last forever and can rip apart a pallet in a few minutes.

2nd Tip – forget about the little 5″ blade that comes with your sawzall.  That will only frustrate you.  Buy a couple of 12″ construction blades (trust me – the few bucks are worth it – and they last forever).

3rd Tip - How to disassemble. You can follow below with the pictorial below on how we do it – but in a nutshell – set it on its side and simply slice through the nails on each end. Then – head down the middle row doing the same thing and in no time you have a lot of pallet wood great for all of your crafts!  You can also click here to see some of the items we have made from re-using pallets : http://oldworldgardenfarms.com/category/recycling/

If you would like to follow along through the year and receive our weekly DIY and Gardening Posts – be sure to sign up to follow our blog via email in the right hand column of this blog, or click the link and follow us on our Facebook or Twitter pages.

First Step – take your sawzall and cut down through one side of the smaller boards all the way to the bottom

Next cut down the opposite side – followed by the middle if there is one – the boards simply fall off

Once you have the front side finished – repeat for the back side – which are usually the largest of the boards

This is what you are left with – great boards to get building with!

This hutch was made from pallet and shipping crate boards

Buffet Hutch Made From Pallets, Shipping Crates and A Piano Lid

The pallet hutch made from old pallets – shipping crates, an old wooden desk top and a piece of an old piano

What to do with a bunch of left over pallet wood and shipping crate panels?  Well – for us – it became the materials to build our buffet hutch in our dining room.  It’s a large piece – measuring  6′  wide x 5′ high x 32″ deep.  But it gives us a great place to display and store our dishes, bowls and glasses – while giving us a lot of storage room underneath.  Storage room that we use to store our crock pots, electric skillet, roaster, and our canning pots and pressure cooker.

We created the framework for the piece by screwing and glueing together some old 2 x 3′ scrap lumber.  Next up – we added two  panels from a shipping crate  to form the two sides of the hutch (The same crate panels we used to build the canning cabinet – they work great to provide walls for any cabinet project).  We then covered the rest of the frame with pallet boards and also used pallet boards to create the base of the display shelf

The left and right sides of the buffet hutch are made from a shipping crate panel

For the top – we used the top of an old wooden work desk that I had salvaged and saved from an old decrepit office desk.  Once we had it all together – we gave it a quick coat of black paint – and then followed up with a single coat of off-white paint to give the piece a worn look.

For some finishing touches – we added the top Italian ristorante sign and some lighting.   For the sign we used the flip top piece of an old upright piano that was headed for the trash.   The panel was the perfect length and a perfect fit for the top of the piece.  After that, a little black paint and some white stenciled letters - and the sign was finished

A simple cabinet light mounted inside of the cabinet provides some nice light for display.

For lighting – we drilled a small hole in the back to allow for a cord – and then hung a small under counter light to illuminate the display shelf – and a small spotlight on top to light up the sign.

The best part – with the dings of the old recycled wood – it looks like it has been around forever.  If we do manage to ding a door or nick the wood – it just serves to add a little more “character” to the piece. :)  To receive our DIY and Gardening Tip Posts each Tuesday – sign up to follow the blog via email or hit the “Like” button on the Facebook tab on the left side of the page.  - Jim and Mary

An old piano lid became a sign after a little paint and some stenciled letters

Full size picture of the hutch

Using Pallets to Build A Canning Pantry Cupboard

Crate and pallet boards after disassembly

Our crate and pallet board pieces after disassembling a pallet and a shipping crate

Over the last few months – about every few days we get a comment or two on the canning cabinet or buffet hutch we built out of old shipping crates and pallets.  A lot of people want to know how we went about making it. So we thought for today’s post we would go through the how 2′s of building things with pallets and shipping crates – with a little extra information on the canning pantry.  In fact, we finally added the canning pantry plans to our Etsy shop because of it’s popularity.  It’s a great project – with very little cost involved – and lets you store over 200 jars of canned goods!

Our Canning Cabinet made from pallets and shipping crates

Our Canning Cabinet made from old pallets and shipping crates.  We tilted the top shelf forward a touch for a better display, and added a lip to keep jars from coming off the other shelves.

We have actually made two of them – the first we built from pallets – the second from some old shipping crates and pallets.  But for both – the only tools we used were a Sawzall, Nail Gun, Construction Adhesive (liquid nails heavy – duty), 3″ coarse drywall screws and a drill with a Phillips #2 screw bit (for drywall screws)

For the canning cupboard, we started by tearing apart about 4 pallets to use for the sides and shelving boards.   We learned early on to not waste time trying to pull the nails from  boards and remove every little speck of everything.  You end up damaging way too many boards and it takes forever!

Canning pantry shelves are made from pallet boards nailed into 2 x4 frames.

We use a reciprocating saw with a long demolition construction blade and simply slice through the nails.  Leave all of the remnant flat nails in the boards, not only does it add lots of  character – its super quick.  If you place the pallet up on end you can slice through all of the nails in about 15 seconds.  Just repeat the process until you have cut them all and you end up with 15 to 25 single boards to work with for every pallet. (depending on pallet size and make-up – you usually get boards about 3 to 5″ wide by 30 to 48″ long).  With shipping creates – we just disassemble the sides with the sawzall and then you have ready-made building panels to work with.  Whatever you use – pallets, shipping crates or old barn wood – the important thing is to have simple straight boards to build with.

Buffet Hutch made with pallet panels and shipping crate remnants.  Same concept – just a little bit bigger than the canning cabinet.

Anytime we make anything with pallets – whether it’s the canning cupboard or the buffet hutch – we will then use the left over 2 x 4′s that make up the pallet’s inside rails to build the carcass structure.  They are durable – and although heavy – they are free and make the structure strong.  Speaking of the structure – we always use coarse drywall screws and heavy-duty construction adhesive to assemble.  The screws hold tight and the adhesive holds forever.  Don’t worry about anything other than the framing being straight.  Once again if there are some left over bits of nail that have been sawed off smooth – let it be – it just makes for a great patina when stained or painted over.

Side of the cabinet – simple straight pallet boards nailed to a long pallet board makes up a building panel.

Once we have the structures carcass built – we just simply use all of the straight boards cut from the pallets to cover.  For this we will use the nail gun for speed and looks – but you could just as easily use a hammer and nails.  Once you have trimmed it out to your liking – you can paint, stain or leave natural – and you have a unique conversation piece.

The biggest piece of advice – don’t sweat the details!  The biggest mistake people make when using reclaimed lumber or pallets is tot try to make it too perfect.  It’s far better to not try to sand everything super smooth  - or take out every little crack or dent in the wood.  Let them be  - it just makes it look that much better.

Jim and Mary

Make sure to hit the “like” button on our Facebook sidebar (in the right column) to get our weekly DIY Tips and Projects Post.

Front view of the cabinet

Front view of the cabinet


Canning Pantry made from pallets

Canning Pantry made from pallets