If you are looking for a simple, strong and easy way to stake your tomatoes this year – then you are going to love today’s feature on how to make your own DIY Stake-A-Cage tomato supports!
Not only are they extremely tough and durable, the supports are effortless to assemble and store. Even better, they go up quick in your garden or raised beds and last for years and years. Perhaps best of all, they won’t cost you a fortune to make either!
Sound too good to be true? Well, the good news is that it isn’t! We have actually been creating our own tomato supports for years, and I can honestly say our latest DIY version really does incorporate strength, ease of use, long term durability and overall cost into consideration. (Be sure to check out the video below to see why!)
Let’s face it, commercial tomato supports can be ridiculously expensive. And even with that high price, they don’t always work very well when it comes to supporting your tomatoes – or allowing you to harvest them easily.
Tomato cages can run upwards of $10 to $20 or more. Not only are cages notorious for coming out of the ground and toppling over plants, they also make picking your tomatoes tough. Anyone who has ever tried to reach through the cage to pick tomatoes knows exactly how hard that task can be!
Other Tomato Support Options…
There are, of course, other options for keeping your tomatoes off the ground. Tomato stakes, tomato towers and collapsible metal square cages are three of the more common. For us, the stakes have just always been so hard to tie off to.
As for the tomato towers, metal cages and other fancier options, at $40 to $50 or more a piece, they just aren’t feasible for multiple plants. After all, if you plant more than a few plants, you could spend a small fortune just in supporting your crop, let alone planting and fertilizing it.
We faced the very same dilemma some 12+ years ago. After planting more than forty plants in our garden, we realized quickly that we had to come up with a more affordable and sustainable solution. And that is when our very first DIY stake-a-cage idea was born.
The Original DIY Stake-A-Cage – DIY Tomato Supports
As you will see below with this year’s updated DIY version, we have made some great changes that make the Stake-A-Cage support even stronger, more durable, and definitely longer lasting than ever. But it all started with a few wooden stakes and wire fencing some 12 years back.
For our very first DIY tomato stake, we used a simple wooden stake and a small 18″ wide x 48″ section of welded wire fencing we cut from a roll. Next, we used “U” nails to attach the wire fencing to the post. It created the perfect low-cost, open-faced tomato support.
The open face made it easy to tie off plants as they grew. Definitely easier than trying to tie to a single wooden stake. But even better, it made picking a breeze! Since the cage portion was open, there was no need to reach through the metal to harvest.
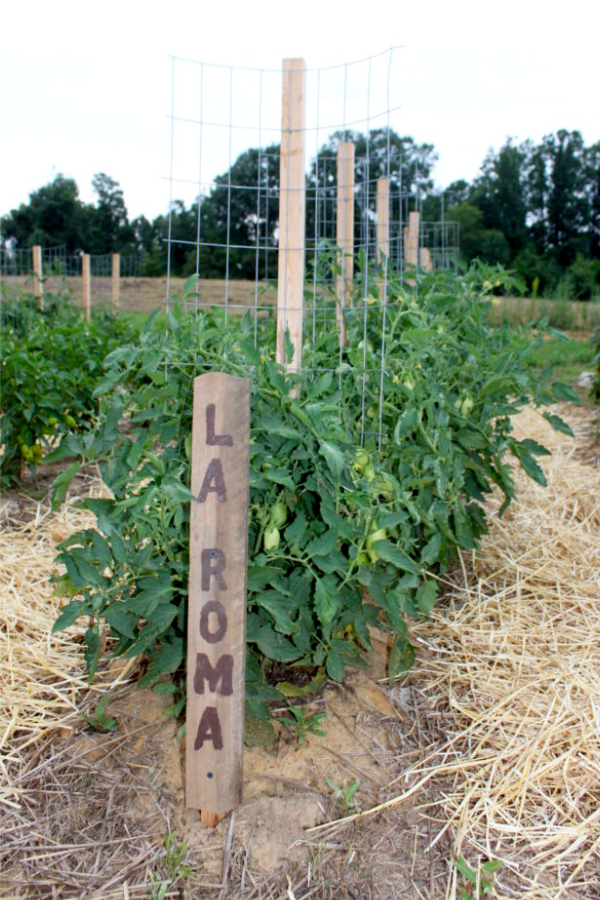
Because it had both a stake and a form of a cage, we aptly named it our homemade Stake-A-Cage. And, have been using an ever improving version as the years passed to support both our tomato and pepper plants ever since!
The New DIY Tomato Support – The Ultimate Stake-A-Cage!
Our first upgrade to the support came a few years back. In place of the welded wire fencing, we began to use galvanized feedlot panels.
Instead of cutting and attaching welded wire fencing for the cage portion, we opted this time for galvanized feedlot or cow fence panels. The wire fencing did well, but it would curl a bit and also would break after a few years.
The feedlot/cow fence panels, with their 4 gauge metal construction were much stronger. Not only that, they are completely flat, making them easy to attach to the stake. At $50 for each 16′ long x 50″ tall panel (depending on where you purchase), they are a bit more expensive than the welded wire, but with 4 gauge construction, they last almost forever!
Watch Our Video Below On How To Make & Use The Stake-A-Cage Tomato Support!
Using bolt cutters, we cut the panels down into 16″ wide sections for most plants. For really large tomatoes, we cut them at 24 inches wide. We kept the 50″ length for large tomato and pepper plants, and cut them in half for smaller tomato and pepper varieties. Product link : Easy Grip Bolt Cutters
The longer 50″ sections are perfect for staking big heirloom tomato plants. The 25″ tall panels on the other hand work well for smaller tomato varieties and peppers like jalapeno and banana. It also allows you to make even more from a single cow panel!
To make attaching the panels to the wood easier, we started using zip ties. They go on fast and are easy to remove in the fall as well. They are also very strong and hold the wire panels to the post very well.
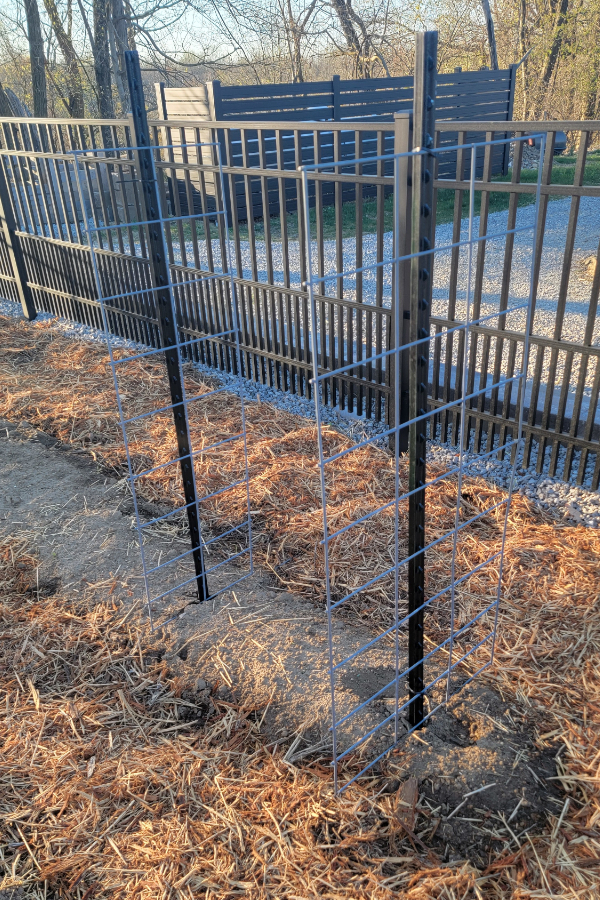
The Stake-A-Cage Goes All Metal – DIY Tomato Supports
Up until last year, we still used wood stakes as the support to attach the cow panel grid to. As most folks know, wood became increasingly costly. In addition, we were starting to break more and more of our wood posts with each passing year – so we decided to go all metal.
It is a bit more of an investment up front, but the metal t-posts last forever. Now, we simply drive in the tomato stake without any cage attached. Next, we take one of our sturdy cattle panels and use two reusable zip ties to secure it the stake. One zip tie at the bottom, and one at the top.
Listen To Our Podcast Below On How To Prune Your Tomato Plants This Year For Big Success!
Strong, quick, and ultra efficient. Not having the panel attached means driving the stake in is easier than ever. But best of all, it makes fall cleanup and storage a cinch. When the tomato plant crop is done, the zip ties get removed, and the panels and stakes can be stored separately.
The Cost – DIY Tomato Supports
So what is the overall cost to stake each tomato plant? For the heavy-duty metal T stakes, they run us right at about $5 for a 6 foot tall stake. It’s actually a great investment. Not only are they close in price to heavy duty wood posts nowadays, but like the galvanized feedlot panels, they are nearly indestructible.
We get 8 to 10 full-size supports, or 16 to 20 smaller supports out of a single 16′ section of a feedlot panel. That makes the per-grid cost anywhere from $4 to $6 per section.
Overall, the total cost to stake each tomato plant still works out to about $10 to $12. And that is an amazing bargain – considering the galvanized grids and the T-post can be used almost indefinitely!
Here is to creating your own amazing Stake-A-Cage DIY tomato supports, and to having a great crop of tomatoes this year too! Happy Gardening – Jim and Mary.
Jim and Mary Competti have been writing gardening, DIY and recipe articles and books for over 15 years from their 46 acre Ohio farm. The two are frequent speakers on all things gardening and love to travel in their spare time.
As always, feel free to email us at thefarm@owgarden.com with comments, questions, or to simply say hello! You can sign up for our free email list in the subscribe now box in the middle of this article. Follow us on Facebook here : OWG Facebook. This article may contain affiliate links.