Sometimes, necessity and fate have a way of coming together, and in the case of our DIY Sawhorse Farm Table, it couldn’t be more true.

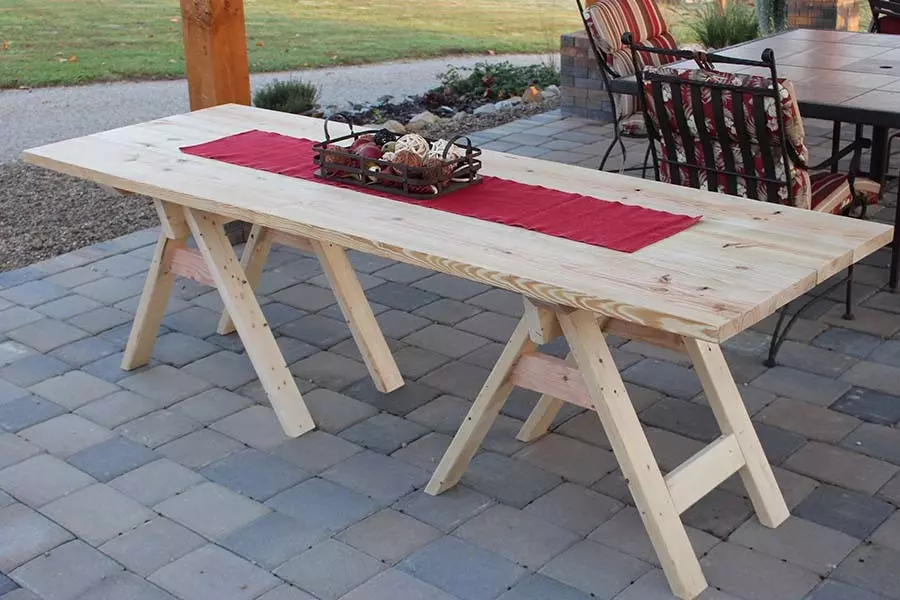
The DIY sawhorse farm table
After hosting our first farm to table event this past summer, we knew we wanted to make the dinners a regular event next year. But the problem was finding a more permanent solution to seating in the barn.
For the first event, we rented tables and chairs. But with hopes to host a dinner once a month next year, renting won’t be an option!
Adding to the problem is we want to have real wood tables for an authentic rustic “barn dinner” feel. That meant plastic, resin and other more cost-effective options for tables just won’t work.
So we started to think about how to make our own. And then a little fate came into play.
It all happened after posting our article on how to make DIY sawhorses a few weeks back. (see :DIY Sawhorse Project),
After we had made a few sawhorses, we began to use a few boards on top of two as a temporary work table. And we suddenly realized, with a few modifications, this might just work as the ultimate farm table!
What we didn’t realize until creating the prototype was how incredibly strong and neat the tables would look. In fact, I think what we like most about the DIY sawhorse farm table is its complete versatility.
To build, you use only basic 2x lumber found at any home improvement store. It can be anything from a farm table, to a strong and beautiful dining room table, portable picnic table, or the sturdiest workbench ever. And all for about a total of $40 in materials, it is one inexpensive table!

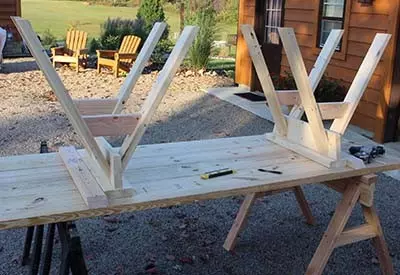
The prototype DIY sawhorse farm table under construction
And if you really wanted to get creative, you could use a different species of wood. The possibilities really are limitless.
These tables can be screwed and glued down to be completely permanent. Or, they can also be portable.
They attach with a simple cleat on each side, (see picture) and can be taken apart in seconds. The tops can also be stacked on top of each other for storage of multiple tables. That is a must for the 7 to 8 we are building for the barn.
Here is a quick look below at how they are constructed. We have also included complete step by step instructions with material and cut lists on our Etsy Plans site for those who want to build their own: ( SEE: DIY Sawhorse Farm Table Complete Plans)
Creating The DIY Sawhorse Farm Table
The table is created from 3 simple pieces. 2 modified sawhorses and a top. We created these sawhorse to be thinner to allow for chairs to easily fit under them. The finished table height is right at 30.5. It can sit up to 10, with four on each side and 1 on each end.
The Base
The base is made up of two modified sawhorses. We modified them so that there would be ample leg room for chairs or benches. Using only a single 2 x 6 and a few 2 x 4’s, they can be constructed in under an hour.
The Table Top
The tops are made up of a total of just 6 boards. (2) 2 x 8 x 8 foot boards, (2) 2 x 10 x 10′ boards, and (3) 2 x 4 cleats that are screwed in from the bottom.
One on each end and the middle to keep the top boards in places and even. The two 2 x 4’s on each end form cleats that fit perfectly over the sawhorses to form a super secure table.
After completing the prototype, I actually stood on top and rocked back and forth just to see how sturdy it really was. ( Not that we ever envision folks doing that at our farm-to-table events! 🙂 ) The table simply didn’t budge. At 6′ 4″ 225 lb’s – that’s a pretty good test of the table.
Now all that is left is to create 6 more over the winter in time for next year’s events!
Happy Sawhorse and Project Building! – Jim and Mary.
If you would like to receive our DIY, Gardening and Recipe articles each week, sign up via email at the bottom of this post. You can also like and follow us on Facebook, Twitter or Instagram. This article may contain affiliate links.

