There is nothing hotter right now than the look of vintage wooden signs.

Shiplap is great for making new look old!
Whether it is a classic “Fresh Eggs”, “General Store”, or an old store sign, vintage wooden signs add a great touch to nearly any decor!
Especially ones that have authentic wooden raised letters. Although hand painted and vinyl sticker signs can look good, there is something special about the look of raised wooden letters.
We have created these vintage signs for our house, our barn, and even our garden shed. They simply have a charm, look and feel all to their own. And they can add incredible depth and dimension as a focal point to any wall.
The only problem is that the “real” vintage ones can cost you a fortune. And, depending on their size and shape, even some of the reproductions can go upwards of $100 to $200 and more.
Well, don’t let that stop you! With a few basic tools and a little inexpensive shiplap, you can easily create your own – and for a mere fraction of the cost of those vintage wooden signs you’ll find in stores.
Even better, you can make your own custom message to make a statement in your home!
How To Create Your Own Vintage Wooden Sign
Tools Needed :
Jigsaw
Measuring Tape
Sand Paper
Nail Gun or Screw Gun ( Nails or Screws)
Selecting the Wood

You can print off custom sized fonts using your computer for cheap stencils!
Using wood with a little dimension and shape will help give an authentic, vintage feel to the piece. And nothing says vintage like a good ol’ piece of rough-sawn shiplap.
Shiplap works incredibly well for creating a vintage sign. It’s rougher facing can be lightly sanded to give an aged look, especially when painted. It is also lightweight, and extremely inexpensive.
We can get two pieces of 8′ long and 10″ wide shiplap for about $15 from a local sawmill. And that is more than enough to make almost any sign.
The size and shape of the sign is all up to you. One of the benefits of making it yourself is that you can design your sign to fit any custom space.
Start by creating your backboard piece first. For some of our signs, we simply use a long single board. To dress it up, run a piece of shiplap through a table saw to create trim strips for an outer edge.
If you need a wider sign, you can join two pieces of shiplap together with the trim pieces.
A few screws or nails from a nail gun can make for quick assembly. I love our little nail gun set for projects like this because it makes for quick assembly! ( Porter Cable Nail Gun Set)
Creating Wooden Letters – On The Cheap!
What makes a raised wooden sign so unique are of course the wooden letters. And making them is a cinch with a jigsaw. Orbital jigsaws will work best, but even a traditional jigsaw cut large letters easily.
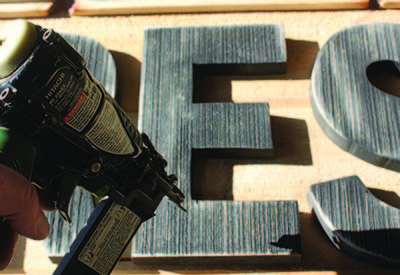
A nail gun makes quick work of attaching letters
Although you can purchase stencil sets to trace your wooden letters, the choices for size and fonts are limited. Not to mention, very pricey!
To save big, we create letters with our computer’s word program. You can choose hundred of fonts, and make them any size you need.
Then simply print them out and cut with scissors for your own custom stencil set. I love this idea because it opens up thousands of fonts at almost zero cost. The best part is you only need to make the letters you need, not the whole alphabet!
You can save on your computer ink as well by selecting an outline feature on your word program. When printed, only the outline of the letters shows for cutting out, so very little ink is used.
Cutting and Attaching Letters
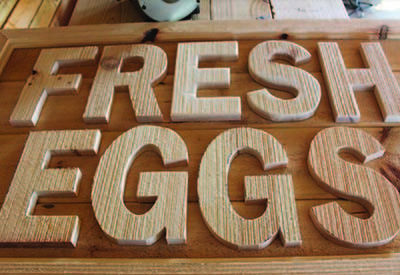
The fresh eggs sign before painting and assembly.
Simply, trace the letters onto the shiplap, and cut with your jigsaw. We rough sand our letters to make them look a bit older. For painting, choose flat or primer colors for an aged look.
We painted our egg sign with a can of .99 black primer. Once the letters dried, we ran a piece of sandpaper over them to expose some of the wood for a vintage look.
Attach letters with a little liquid nails or wood glue and a few nails. If you choose to use screws, screw from the back side they can keep the sign clean on the front.
Now all that’s left is to simply hang and enjoy! For other great DIY projects, check out our DIY Project Page on the website – OWG DIY PROJECT PAGE.
Here’s to creating your own incredible vintage wooden signs! Jim and Mary.
To receive our 3 Home, Garden, Recipe and Simple Life articles each week, sign up for our free email list. You can also follow us on Facebook, Twitter, Pinterest, or Instagram. This article may contain affiliate links.