So how do you maintain and plant a no-till garden in the spring? And what do you do if you have cover crops growing in the garden, but have early seed crops or vegetable transplants that need to go into the ground?
All of those questions and more have been rolling into our website over the last few weeks. And as spring hits full stride, we thought it was the perfect time to cover the various tasks, chores and topics that make up working in a spring no-till garden.
Especially when it comes to what to do with cover crops growing in the garden, early seed sowing, and planting transplant crops as well.
There truly is nothing more magical than the ease of growing and planting a no till garden. And, as you will see below, not only are the chores simple and effortless to accomplish, they also set the stage for a weed-free, easy care summer garden.
In addition to the information in the article below, be sure to check out our short video at the end that walks you through all of the steps of how we maintain our spring cover crops and no-till garden. From mowing the cover crop to planting, hopefully it will help bring all of the information to life.
Maintaining A No Till Garden In The Spring
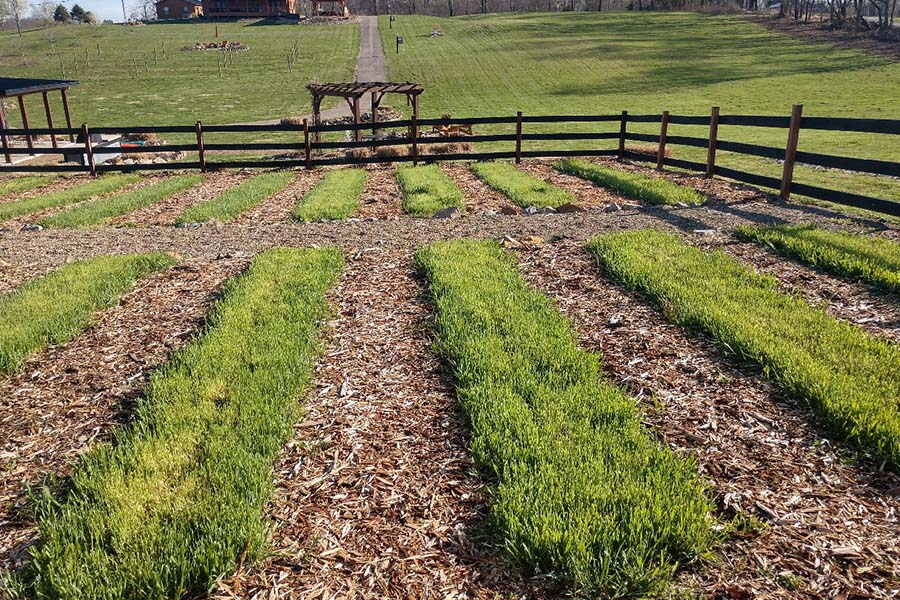
Spring really is a magical time for a no till garden. Especially one that has a lush, green cover crop growing over its soil.
Cover crops are the backbone of rototiller-free garden. Planted in the fall, they shelter the garden with a lush winter blanket that not only feeds and replenishes the soil, but protects it from erosion. Even better, it also keeps the soil from being overtaken with weeds and weed seeds.
Mowing Off The Cover Crop – The No Till Garden In The Spring
We use annual (cereal) rye as our main fall cover crop every year. Annual rye really is the perfect cover crop for a vegetable garden. (See : Planting Annual Rye)
We plant our annual rye seed in the early fall as soon as our plants are pulled from the soil. It quickly establishes in the cool weather of fall to form a thick, green cover over our planting rows. Then, as the cold arrives, it goes dormant through the winter months.
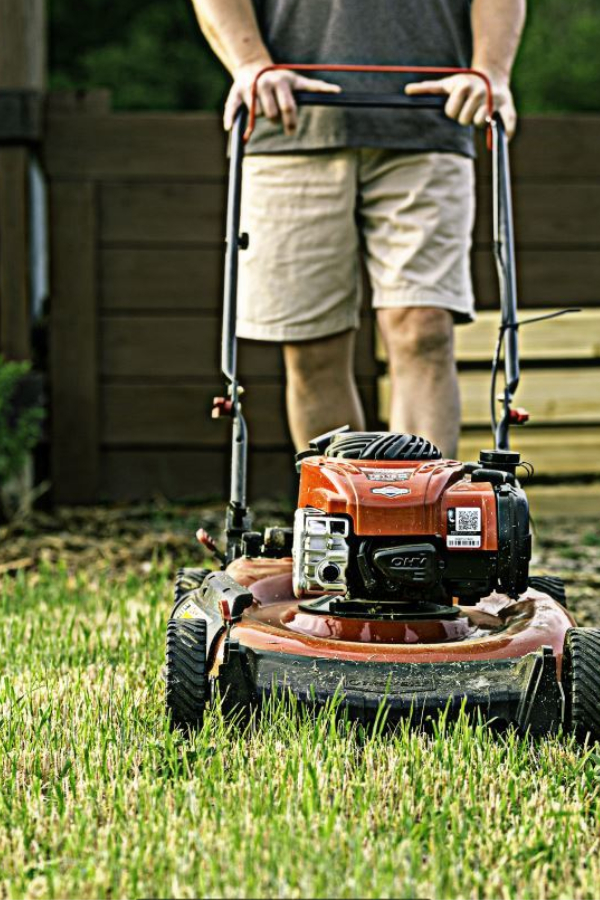
In the spring, as the temperatures warm, the rye again comes back to life. And that is exactly when we “spring” into action to begin mowing it off. We use a push mower to mow off our rows, and with each succeeding mowing, the rye begins to die off.
We actually bag the clippings from our first few mowing sessions to add to our compost pile. But they can also be mulched right into the soil to add their power back to the soil as well. If you don’t have a push mower, string trimmers are also a great option for cutting down cover crops.
We usually start in the first few weeks of March to begin mowing, and by the third or fourth mowing, the rye has almost completely died back. It is important to note that sometimes a few stragglers of rye will hold on and grow for a few weeks, but they eventually die back and will not cause any issue.
The Spring No Till Garden Video Tutorial
To handle stragglers, we simply trim or pull off any extra blades that happen to grow, and eventually, they die off. The best part is that the garden soil is not disturbed at all with this process. And that means weed seeds can’t find a home to wreak havoc later.
In addition, there is no waiting for the soil to dry out to till or work the soil – which means planting can begin right on schedule. And as you will see next, planting a no-till garden couldn’t be easier!
Planting Through Cover Crops
So how exactly do you plant through cover crops? Well, it actually depends on what and when you will be planting. But the good news is, no matter if it’s seeds or transplants, the process is quick, easy, and painless.
And it all can be done right through the surface of the decaying cover crop, without ever disturbing the soil below.
Planting Early Seed Crops Through A Cover Crop
One of the first crops to go into a vegetable garden are the cool weather crops of early spring.
Whether it’s sugar snap peas, spinach, lettuce, radishes or any other seed crop, the process is the same. Once the cover crop has been mowed down to a low level, we use a pick or mattock to create a small planting channel or furrow in the soil. (video shows the process)
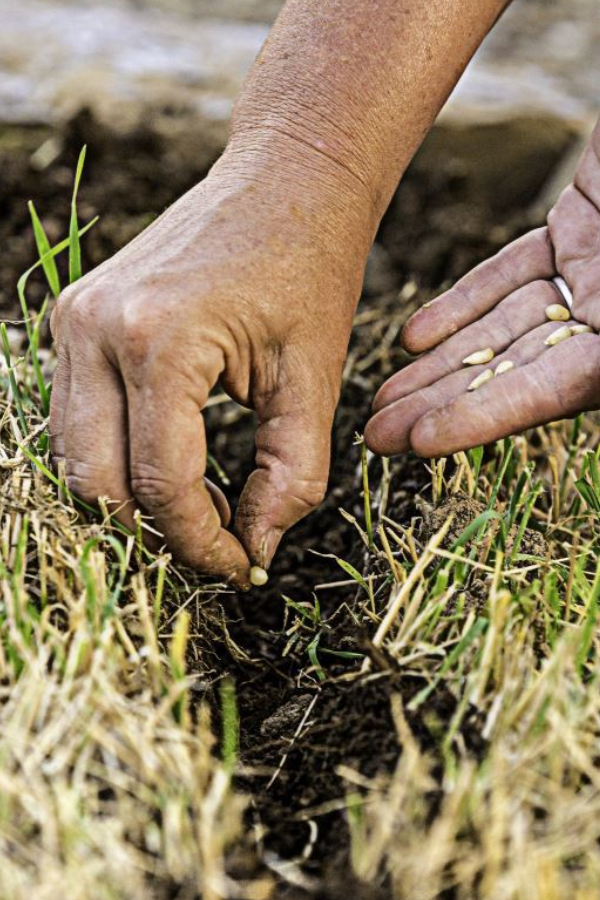
The beauty is that it does not disturb the soil in the rest of the row, and leaves the decaying cover crop in tact. That means the soil stays fresh underneath, and the chance for weeds to develop are then minimized.
The seeds are then planted down in the furrow to the depth needed, and covered with a bit of soil and compost. It takes mere minutes to plant a row of seeds with this method. No tilling, no raking, no hoeing – just create a simple furrow, and plant away!
And don’t worry if the cover crop hasn’t died off all together when you begin to plant early seeds. You can still mow it off a few more times before the seeds germinate and grow. And by then, the cover crop will be nearing its end. The rows get their mulch, and the garden is off and running!
Planting Transplants – The No Till Garden In The Spring
For transplants, the process is nearly the same, but we use a different tool. In place of a pick or mattock, we use a post hole digger.
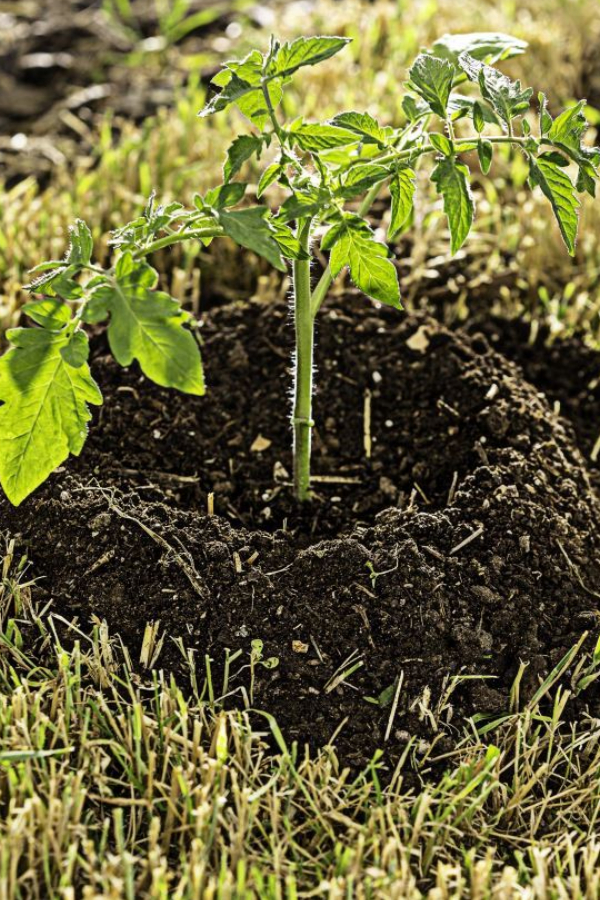
To start, we mow off the cover crop to a low setting. We then drive the post hole digger into the soil to create a perfect planting hole for our transplants. Again, it only disturbs the soil right around the plant, leaving the rest of the soil free from any issues.
We fill our planting hole with compost and soil and then finish by mulching. For early transplants like cabbage, broccoli and cauliflower, the cover crop may again still have a bit of life. We trim any cover crop blades still growing around the plants with a string trimmer or hand trimmer, and within a few weeks, the cover crop stops growing.
By the time planting day has arrived for frost-free transplants such as tomato and pepper plants, the cover crop has died back completely. We simply plant, mulch, and watch the garden grow without worry.
A Look Ahead To Fall
So what happens to that dying rye by the fall? Well, it is another magical moment for a no-till garden. The layer of grass slowly decays under the mulch in the rows during the summer. And by fall, when you pull out your plants and pull back any mulch, you can plant your cover crop seeds right into the earth with ease to start the whole process over again.


Talk about one easy way to garden! Here is to Raised Row No Till Gardening – and to growing with ease like never before! Happy Gardening- Jim and Mary
Jim and Mary Competti have been writing gardening, DIY and recipe articles and books for over 15 years from their 46 acre Ohio farm. The two are frequent speakers on all things gardening and love to travel in their spare time.
As always, feel free to email us at thefarm@owgarden.com with comments, questions, or to simply say hello! You can sign up for our free email list in the subscribe now box in the middle of this article. Follow us on Facebook here : OWG Facebook. This article may contain affiliate links.