Sourdough bread is one of the most rewarding breads you can make at home. While sourdough has a reputation for being difficult, the truth is that it simply requires patience, a few basic techniques, and an understanding of how the dough behaves over time.
What makes sourdough bread so special is that it relies on a natural fermentation process instead of commercial yeast. This gives the bread its signature tangy flavor, chewy texture, and beautifully crisp crust. Even better, once you learn the basics, you can use the same process to make endless variations all from using the same sourdough starter.
This beginner-friendly sourdough bread recipe focuses on simplicity. No complicated steps, no unnecessary tools, and no confusing terminology. If you’ve ever wanted to bake a rustic loaf with that classic sourdough look and taste, this recipe is the perfect place to start.
Why Sourdough Bread Is Worth Learning
Sourdough bread isn’t just about it’s amazing flavor. The long fermentation process helps break down gluten, making it easier for many people to digest. It also improves mineral absorption and gives the bread a longer shelf life without preservatives.
Another benefit of sourdough bread is the consistency. Once you learn how your starter behaves and how your dough feels at each stage, you’ll be able to bake reliable loaves again and again. Over time, you’ll also learn how temperature, hydration, and timing affect the final bread.
There’s something deeply satisfying about turning flour, water, and salt into a beautiful loaf using nothing but time and natural fermentation. That’s right – there is no commercial yeast required!
What Beginners Should Know Before Starting
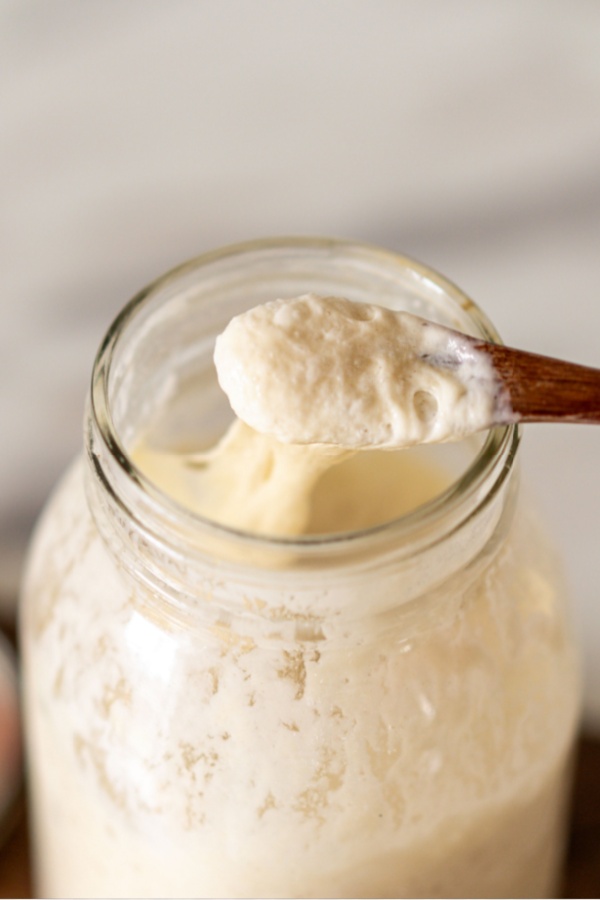
Before diving into this sourdough bread recipe, it’s important to understand that your starter is the key ingredient. An active starter should be bubbly, doubled in size, and pass the float test before you begin. (See: How to Make Sourdough Starter)
Kitchen temperature also matters. Warmer environments speed up fermentation, while cooler kitchens slow things down. This recipe allows flexibility so you can adjust timing as needed.
Finally, trust the process. Sourdough dough behaves differently than yeast-based bread. It may feel sticky, loose, or slow to rise at first, yet all of that is normal. I have been making this recipe weekly, and it turns out perfect every time.
Beginner Sourdough Bread Recipe
*Complete recipe instructions including specific measurements, cook temperatures and times are located in a printable recipe card at the bottom of this article. However, be sure to keep reading for helpful tips and tricks when making this recipe.
INGREDIENTS
*Making sourdough is more of a science than a baking recipe. Therefore, I highly recommend purchasing a kitchen scale and measure the ingredients in grams.
- 475 grams all-purpose flour (3½ cups)
- 100 grams active sourdough starter (½ cup)
- 325 grams water (1⅓ cups)
- 10 grams salt (2 teaspoons)
INSTRUCTIONS
Begin by feeding your sourdough starter anywhere from 4 to 12 hours before mixing the dough. The starter should be very active, bubbly, and at its peak for best results.
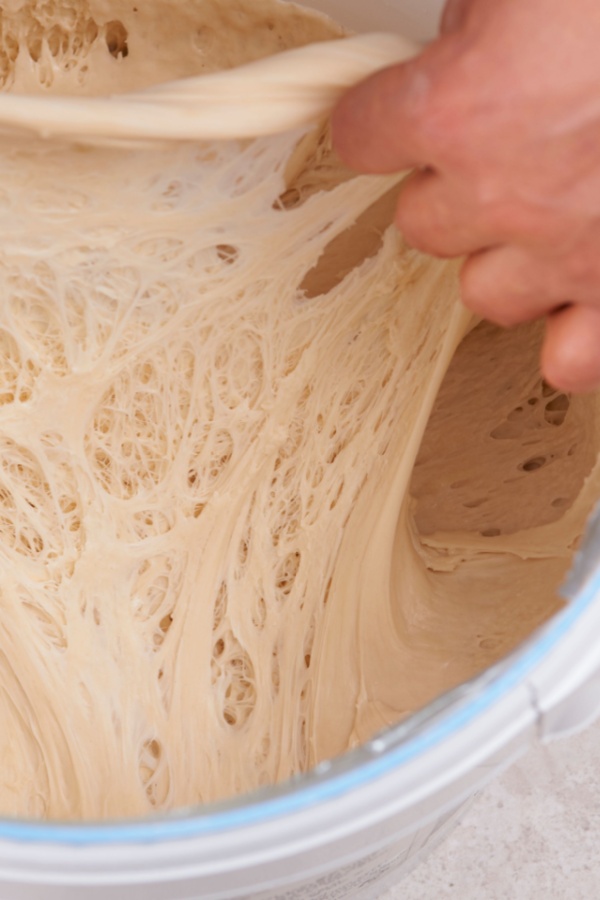
In a large mixing bowl, add the warm water, active starter, salt, and flour. Use a wooden spoon or your hands to mix until all of the flour is fully incorporated and a shaggy dough forms.
Cover the bowl with plastic wrap or a lid and let the dough rest for 30 minutes. This resting period allows the flour to fully absorb the water and makes the dough easier to work with later.
Stretch and Fold Process
After the initial rest, lightly dampen your hands. Grab one side of the dough, gently pull it upward to stretch, then fold it back toward the center. Rotate the bowl a quarter turn and repeat. Continue until you’ve completed four stretches total – this counts as one round.
Cover the bowl and let the dough rest for another 30 minutes. Perform a second round of stretch and folds in the same manner, then cover again and allow the dough to rest for an additional 30 minutes.
Complete one final round of stretch and folds (a total of 3 rounds). Once finished, cover the dough securely with a lid, plastic wrap, or a damp towel.
Allow the dough to bulk ferment in a warm area until it has doubled in size. Depending on the warmth of your kitchen and the strength of your starter, this can take anywhere from 6 to 12 hours or longer.
*I put the bowl on our heated floors and it will double in 5-6 hours. However, keep an eye on it to avoid over-fermentation. If this happens the bread won’t rise as much in the oven.
Shaping the Sourdough Bread Loaf
Once the dough doubles in size turn the dough out onto a lightly floured work surface. Gently fold the edges inward and roll the dough into a loose log, then shape it into a round by pulling it toward you to create tension.
For easier handling later, let the dough rest uncovered for 15 to 20 minutes.
Flip the dough over and reshape by folding each side toward the center and pinching the seams together. This step helps build surface tension, which improves oven spring.
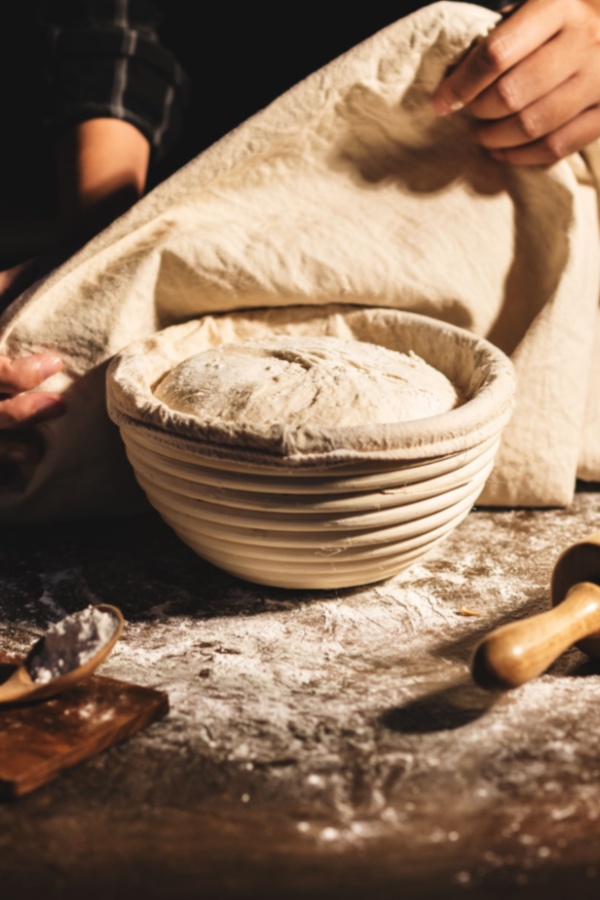
Place the dough seam-side up into a well-floured banneton bread proofing basket or a bowl lined with a floured tea towel.
Cover with the towel and then place the bowl in a plastic bag (optional). Refrigerate for 12 to 15 hours.
If prefer, you may let the dough rise at room temperature for 3 to 4 hours instead of placing it in the refrigerator. It may be a little more difficult to vent, but it will still rise sufficiently in the oven.
Baking
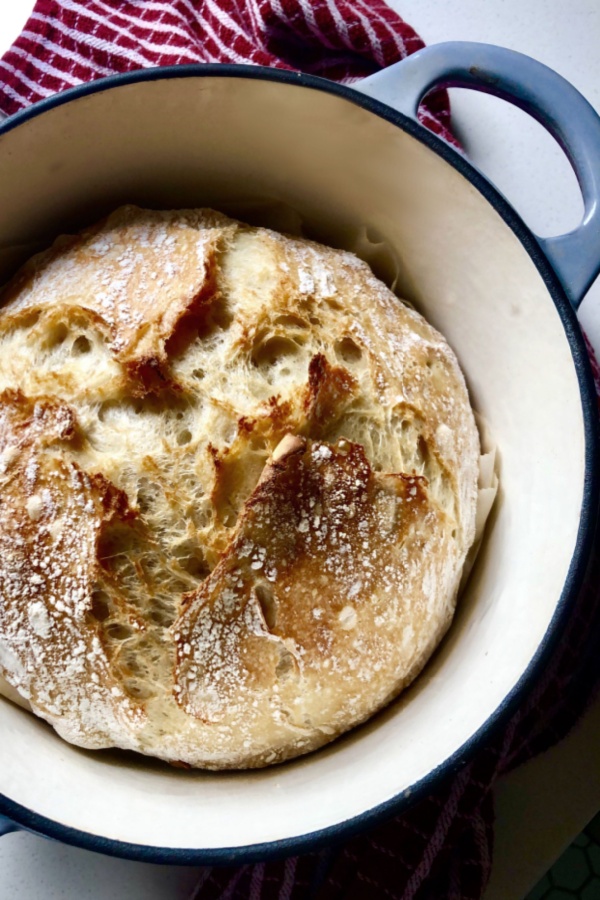
Before baking your sourdough bread loaf preheat your oven with a Dutch oven & lid on the bottom rack to 500°F.
Remove the dough from the refrigerator just before baking. Flip the bowl over and place the round loaf on parchment paper or a silicone sling (I prefer the sling).
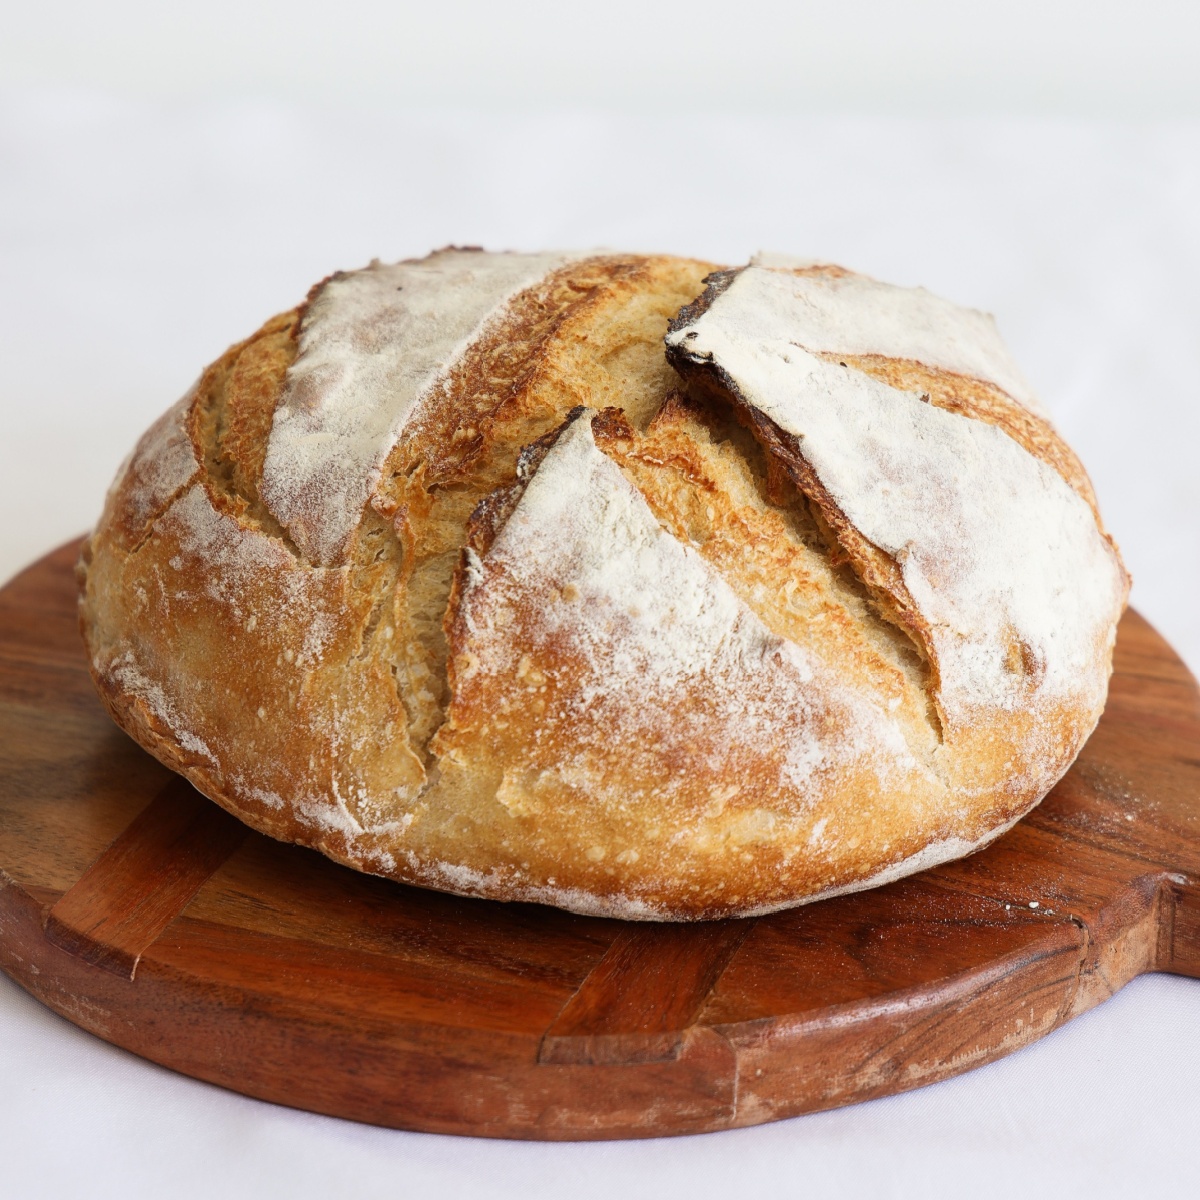
Lightly dust the top with flour, and score a cross pattern in the top of the loaf using a razor or bread lame.
Carefully transfer the dough and parchment paper or sling into the hot Dutch oven. Cover with the lid and bake for 20 minutes.
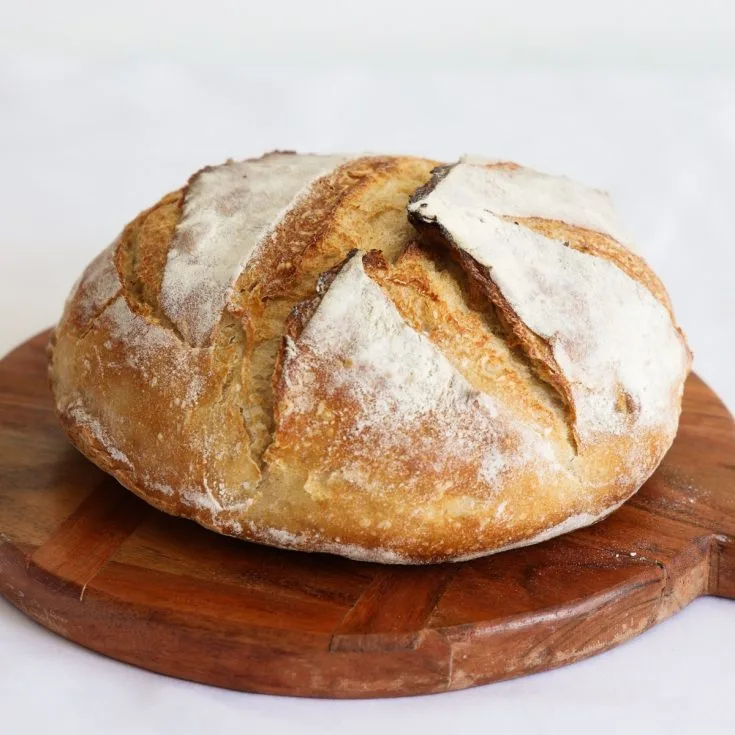
Remove the lid, reduce the oven temperature to 475°F, and continue baking for 15 to 25 minutes until the crust is deeply golden brown.
Baking Tips For Sourdough Bread Success
One of the biggest mistakes beginners make (including me) is rushing the process. Sourdough bread develops flavor and structure over time, so patience is essential.
Avoid adding extra flour or water unless absolutely necessary. A slightly sticky dough is normal and improves the final crumb.
Scoring the dough allows steam to escape and controls how the bread expands in the oven. Even a simple single slash works perfectly for beginners.
Let the bread cool completely before slicing. Cutting too early can result in a gummy interior.
What To Expect From Your First Loaf
Your first loaf of sourdough bread may not be perfect – and that’s okay. Each bake teaches you something new about timing, texture, and fermentation.
Over time, you’ll learn how your dough should look and feel at each stage. With practice, your loaves will develop better rise, more open crumb, and deeper flavor.
The most important thing is consistency. Use the same recipe, pay attention to your environment, and adjust slowly as you gain confidence.
If I can do it, I know you can too!
Enjoy!
Mary and Jim


Jim and Mary Competti have been writing gardening, DIY and recipe articles and books for over 15 years from their 46 acre Ohio farm. The two are frequent speakers on all things gardening and love to travel in their spare time.
As always, feel free to email us at thefarm@owgarden.com with comments, questions, or to simply say hello! You can sign up for our free email list in the subscribe now box in the middle of this article. Follow us on Facebook here : OWG Facebook. This article may contain affiliate links.
Sourdough Bread Recipe

Easy sourdough bread recipe for beginners using simple ingredients and step-by-step instructions for a perfect homemade loaf.
Ingredients
- 475 grams all-purpose flour (about 3½ cups)
- 100 grams active sourdough starter (about ½ cup, bubbly and fed)
- 325 grams warm water (about 1⅓ cups)
- 10 grams salt (about 2 teaspoons)
Instructions
1. Prepare the Starter
Feed your sourdough starter 4 to 12 hours before beginning. The starter should be active, bubbly, and doubled in size before mixing the dough.
2. Mix the Dough
In a large mixing bowl, combine the warm water, active sourdough starter, salt, and flour. Mix with a wooden spoon or your hands until no dry flour remains and a shaggy dough forms.
3. Rest the Dough
Cover the bowl with plastic wrap or a lid and let the dough rest for 30 minutes. This allows the flour to fully hydrate and improves dough texture.
4. First Stretch and Fold
Lightly dampen your hands. Grab one edge of the dough, stretch it upward, and fold it back toward the center. Rotate the bowl a quarter turn and repeat until four folds are completed. This is one full round.
5. Second Stretch and Fold
Cover the bowl and let the dough rest for 30 minutes. Perform a second round of stretch and folds the same way. Cover and rest again for 30 minutes.
6. Final Stretch and Fold
Complete one final round of stretch and folds. Cover the dough with a lid, plastic wrap, or damp towel.
7. Bulk Fermentation
Let the dough ferment in a warm place until it has doubled in size. This typically takes 6 to 12 hours depending on room temperature and starter strength. Do not allow the dough to over-ferment.
8. Shape the Dough
Turn the dough out onto a lightly floured surface. Fold it onto itself, roll gently, and shape into a round loaf by pulling it toward you to build surface tension.
9. Bench Rest (Optional)
Let the dough rest uncovered for 15 to 20 minutes to make final shaping easier and reduce sticking.
10. Final Shaping
Flip the dough over. Fold each side toward the center and pinch seams together to create surface tension.
11. Cold Rise
Transfer the dough seam-side up into a floured banneton or a bowl lined with a floured tea towel. Cover with plastic wrap or place inside a plastic bag. Refrigerate for 12 to 15 hours.
(Alternatively, allow the dough to rise at room temperature for 3 to 4 hours.)
12. Preheat the Oven
Place a Dutch oven with the lid on into your oven and preheat to 500°F for 1 hour.
13. Score the Dough
Remove the dough from the refrigerator. Turn it out onto parchment paper, dust lightly with flour, and score using a razor blade or bread lame.
14. Bake
Carefully transfer the dough (on parchment paper) into the hot Dutch oven. Cover with the lid and bake for 20 minutes.
15. Finish Baking
Remove the lid, reduce oven temperature to 475°F, and bake an additional 15–25 minutes, until the crust is deep golden brown.
16. Cool
Remove the bread from the Dutch oven and let it cool completely on a wire rack before slicing.
Notes
- Use a kitchen scale for best accuracy and consistent results.
- The dough may feel dry at first - avoid adding extra water.
- Fermentation time varies based on kitchen temperature and starter strength.
Recipe courtesy of Old World Garden Farms
Nutrition Information:
Yield:
12Serving Size:
1Amount Per Serving: Calories: 166Total Fat: 1gSaturated Fat: 0gUnsaturated Fat: 0gSodium: 372mgCarbohydrates: 35gFiber: 1gSugar: 0gProtein: 5g
Nutritional Information is to be used as a general guideline only . Nutritional calculations will vary from the types and brands of the products used.