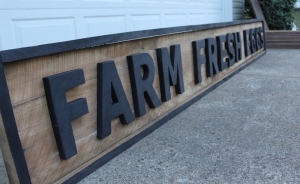
If you really think about it – we all have a little repurpose in us.
After all – didn’t we all learn the great art of repurposing from our youth? First, as children making that incredible fort from an empty box and blankets. Then progressing to our college dorm room or first apartment with fine furniture like “milk crate shelving” and the “empty case of beer box” coffee table.
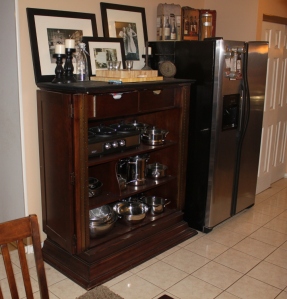
We found this solid wood armoir top for free – the bottom was damaged on delivery – so we turned it upside down, repositioned the shelves and added a top. Now it holds and displays all of our kitchen wares
For us – it’s now taking those early repurposing skills and “growing them up” to speak – to truly craft useful and appealing things from what otherwise would end up in a landfill.
I never realized until looking around the house and farm just how many things we have created and now utilize through the art of repurposing. I have to go back to our beginning for just a second, and borrow a few lines from our “about us” page to get across the point that you don’t have to live on the fringe to be resourceful by repurposing and recycling:
“We’re far from “hippies”…we don’t aspire to live “off the grid”, and in spite of our children and friends constant ribbing, we don’t wish to make our clothes from hemp. What we are – are two individuals committed to a more simple approach to life, who want to be responsible for a majority of the food we eat, and conserve the resources we consume”.
It’s that last line above about a simplistic approach and conserving resources that defines repurposing to us.
The re-use and repurposing of materials has become not just a way to live more responsibly while cutting costs, but evolved into a hobby and an art for us.

Buffet Hutch made from pallets, an old desk top, and piano lid top – the bottom opens up to hold additional serving plates
Yes, it’s true – it really helps us make and build things less expensively – and sometimes far better than we could build or buy new. But, moreover, it gives us the added benefit to create history and stories into the things found in our home.
We take pride in making the finished product aesthetically beautiful AND functional while repurposing. Realizing that it’s pretty easy to stack a couple of dirty crates underneath a piece of found plywood and call it a repurposed table, we strive instead to find balance between re-use and beauty…hence the term “art”.
In some cases – the money we have saved truly has been amazing. Our signature farm piece – our barn, has been built with repurposing in mind from the beginning. We knew we wanted a classic “old world” barn, with beautiful space clearing rafters instead of trusses, a true loft, and real wood instead of pole barn metal for siding. It was also a barn that we knew would cost upwards of $20,000 to $30,000 to have custom-built – until the art of repurpose entered.
Our cost to this point has been just shy of $1600.00 – and that includes $500.00 for having to have massive amounts of grading done. How did we do it – by repurposing the hell out of two barns we tore down.
We’ve include more on that story along with other repurposed projects at the end of this article – but before I get too carried away with our project’s – let me share some of the keys to how we have successfully repurposed – and where we have found our materials.
The How:
Have Ideas in Mind.
Have an idea in mind for what you need when you’re out looking. Don’t become one of those…oh..that’s neat – ill use it someday people. That can really contradict the living simple theory. “I’ll use it someday” is a term I have found to end up somewhere between a garage you can’t park in and a barn full of junk. We never want to be there…ever! So when looking at something that has crossed your path – really have an idea in mind for what you can use it for – or don’t bring it home.
Think Outside The Box.
If you take anything from this article – this is one to take! You don’t have to use things for their intended purpose. Sure, it’s great to be able to find an old table and refinish it into a new purposeful table…but when you think outside the box.. really unique and inspired pieces happen.
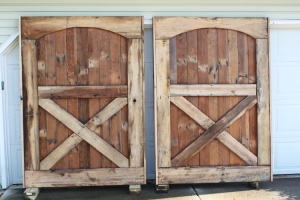
I like to call them conversation pieces. For us it was making barn doors from floors and walls! Or using my father’s old roof to become the lower walls of our new barn. It’s life as a roof was over…it had some surface rust – and some nail holes, etc. – but by bringing it down to the ground level turning it around so the good galvanized side was out – it became a wall covering. It made a great appearance – in fact – the rich patina of the reds and greys from the old painted roof looked so good inside – we kept them in tact to the delight of visitors.
I find the easiest way to look outside the box is to take points 1 and 2 together. If you already have an idea in mind – you can look at materials that are not normally used – and begin to think it through to see if they would work.
Don’t be afraid of Failure…it was already going to the junk pile!!!
Don’t be afraid to try things – what is the worst you can be out when your already starting with junk? It becomes junk!
I have had my share of mistakes, but i’ve learned it’s not the end of the world. There was the massive crate I brought home to try to make my first chicken coop out of…about two hours into it, and with the crate collapsing around me…it made a wonderful bonfire starter for an outdoor party that weekend. The point is, things won’t always turn out, but don’t get discouraged – have fun with the attempts and it just makes you smarter for the next one. And make sure you don’t keep those old failures around…it’s clutter.
SO – WHERE DO I LOOK FOR THINGS?
CRAIGSLIST
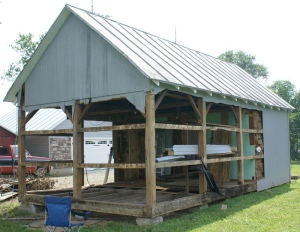
Craigslist find : The post and beam frame shown here will become a massive pergola frame for our outdoor kitchen at the farm. We have re-used almost 75% of this barn on various projects after tearing it down this last summer
Well –I must admit we are both avid craigslist readers. It is where we found our barn for free, the bricks for our barn floor, etc. I will usually take a few minutes early in the morning or late at night to scan through the categories that interest me and see what deals I can find. Sometimes, people truly just want to get things out of their house. You know the saying, one’s person’s junk is another’s treasure.
LEARN THE ART OF ASKING
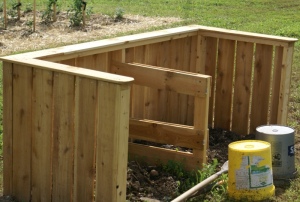
However , an even better tip is to learn the art of asking! If you see something laying out, or something at work that is being thrown out – don’t be afraid to ask! The worse that can happen is a no. Asking has been a great blessing for us – Mary mentioned to a builder last year that if he ever came across old bricks to let us know. A week later – he dug up an old patio with a ton of great old bricks..he dumped them for free at the farm.. We made our pergola, chicken coop and compost bin floor from them, and used the broken ones to fill a small ravine – now that’s re-use! If Mary would not have asked – they would have ended up in a landfill.
We get great leaves and compost material from another landscaper who is looking to drop off leaves he collects..we save him a dumping fee…we get great compost material. It can go on and on.
This tip goes so far beyond just repurposing…and into really helping save space for the landfills. Ask your local breakfast shop to save their coffee grounds, potato peels and egg shells for you – its incredible in the compost pile and they are usually happy to be doing something good that they can promote too!
YOUR LOCAL HABITAT FOR HUMANITY RESTORE
Many areas now have a great store for repurposers. A Habitat for Humanity ReStore. You get great deals on overstock, unused or donated items…and they get to make money for their charity. It’s a win –win. The biggest thing here is to go by often – you never know what will be there and you have to see it first to get the good stuff!
KEEP YOUR EYES OPEN
Yes, I get accused of driving like a grandpa when I go down the road by our kids. They just somehow think it’s because I am old…but truth be told but a lot of the reason is because I’m always looking around. If I see something I really wanted at the side of the road – I’ll look. Once again – I don’t collect junk to collect junk…I have a purpose in mind and a use already . Then I take action on it to get it where it needs to be.
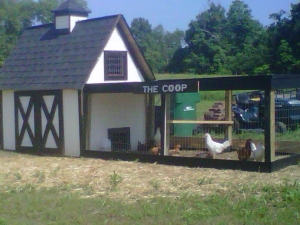
The Chicken Coop was made from used shipping crates and pallets. The only cost was the shingled roof that was purchased at a quarter of the cost at our local Habitat for Humanity ReStore
AVOID THE “Sanford And Son Syndrome”
Now the really difficult part – is to balance all of this with the simplistic approach. We call it, avoiding the Sanford and Son Syndrome – in reference to the old TV show with their house and property amidst a junk yard.
The best way to avoid it is to really concentrate on the ideas you have in mind and what will work for them. Second – if you do pick something up and can’t or don’t have a use for it anymore – get rid of it – don’t become the “collector of junk” . If you struggle with this – just watch one episode of “hoarders” and it should cure you of the Sanford and Son Syndrome.
So with that said – here’s a closer at some of the projects we have accomplished with repurposing the last few years:
The Barn
This was the granddaddy of our repurposing projects for sure! The barn was built from remnants of two old barns we tore down last summer. The metal roofing we reused to skirt the bottom 4’ around the barn. We re-used the boards from my dads barn to remill and make all of the battens for the board and batten look. All four doors were made from the floors and walls of the Cardington barn. And we salvaged the entire frame of the Cardignton barns post and beams to create a massive outdoor garden pergola that will attach to our barn this spring.
The Bar (picture above)
We took 2 old solid wood doors form an old building that were to be thrown away. Cut one down to have the two ends, and left the other whole as the front. The massiveness of the found items made the piece work. The heavy oak top was then salvaged from an old beam from a building in Tiffin, Ohio. We simply added a plywood top and a little cement board and tile, and we have room for our keg and tap on the left – and shelves on the right. Not a bad bar for less than $25
Canning Pantry Cupboard:
What can you u do with old shipping crates and a couple of pallets? Well in this case we came across a supply of shipping crates that used lounge and groove boards as the casing. We carefully dissembled them and had wood for many projects including this one (see below for more of the uses we made from shipping crates). Using remnants of 2 x4’s from the pallets – we built a casing for the canning cupboard – then sheathed it in tongue and groove boards and created space to hold over 200 jars of canned goods – even better – the rustic look makes it a perfect fit in the dining room. The boards work perfect and give a great finish either stained painted or left to weather naturally.
I hope you found this helpful, and if you have any stories as well – please feel free to share. That’s my last point for sure…never stop learning from others. Who knows, one of your tips might just inspire me for my next project like I hope one of mine did for yours.
Happy recycling, repurposing and re-using!
Jim and Mary
If you would like to receive our DIY & Gardening Tips every Tuesday – be sure to sign up to follow the blog via email in the right hand column, “like” us on Facebook, or follow us on Twitter


