Many of you may remember back a few months when we were going to wait until late May to plant the garden to avoid any danger of frost.
Well, one look at the massive home-grown tomato and pepper plants getting too big in their pots on our back porch – and a 10 day weather forecast that had temps nowhere near the freezing mark – and we decided to take a little chance and plant!
One of the biggest advantages of the raised row garden system is that it can be planted quickly and easily – and with a few hours of work on Friday night and again yesterday – the 2015 Garden Plan came to life.

The stake a cages and tomatoes and peppers are all in! We will now begin to lay down the bark mulch in the walking rows over the next week.
All in all, over 150 plants went into the ground – including 24 varieties of heirloom tomato and peppers plants. along with a few rows of cabbage, cucumbers, and zucchini.
We also seeded in multiple rows of purple and green beans to go with the early spring crops of radishes, sugar snap peas, arugula, carrots and lettuce mixes already in the ground. (You can see the entire garden plan at the bottom of the post)
New Trials In The Garden So Far…
The Raised Bed Additions For Small Crops
The newly constructed 6″ high, 8′ long x 18″ wooden raised beds we added for crops like lettuce, carrots, kale and spring onions have worked incredibly well so far.
We still love our raised rows for the rest of our crops, but these simple edged beds made from inexpensive untreated pine lumber have made planting and maintaining our small crops a breeze. We added a total of 8 raised beds – and all of them are already filled with ready to harvest crops of lettuce, arugula and kale – and the onions, carrots and radishes are flourishing as well.
Natural Bark Mulch In The Walking Rows…
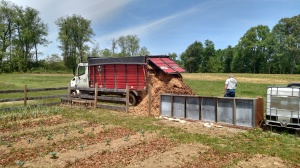
We have always used straw and leaves in our walking rows to control weeds – but this year have decided to switch to a heavy coat of fresh bark mulch in the pathways.
The straw / leaf combo works great – but had to be applied often throughout the year – and straw can get costly. We found a local sawmill that has a supply of freshly shredded bark as an inexpensive by-product of their lumber operations. It is 100% natural with no additives or treatments – and is going to be perfect for creating more permanent walking rows to keep out weeds. We had a huge 20 cubic yard load delivered this week to the back of the garden – and it should be more than enough to keep all of our paths clean and beautiful for a few years!
We will only use this in the walk rows – and continue to use straw, leaves and compost in the growing rows for mulch. The bark would not be good for the soil and plants in the rows, but is perfect to use in the paths as a more permanent and inexpensive material.
The Red Plastic Tomato Experiment…
So this little experiment is still in progress. Quite honestly, we found it really hard to install the tomato plants and our stake-a cages through the red plastic – so we went ahead and planted the entire garden without the few rows of experimental plastic – and will go back today and install the sheets up under each side of the trial tomato rows instead of straight down the middle. This will also allow a nice area for watering in the future.

It will be interesting to see if the red plastic makes any difference in the trial rows to our tomatoes
The red plastic film is supposed to help trigger photosynthesis and stimulate rapid growth and development in tomatoes, and we want to try it in a few rows to see if we notice a difference. All it triggered so far was a little frustration in trying to install it directly in the rows. 🙂
We will keep you posted on the garden and all of our experiments as the Summer progresses!
If you would like to receive our DIY & Gardening Tips each week – be sure to sign up to follow the blog via email in the right hand column, “like” us on Facebook, or follow us on Twitter.
Happy Gardening – Jim and Mary!


