Homemade Apple Pie With Store Bought Crust – An Easy, Old-Fashioned Dessert
Homemade apple pie with store bought crust gives you all the flavor of a classic, old-fashioned dessert with a little less work in the kitchen. Filled with tender apples and warm spices, this pie is perfect for Thanksgiving, a family gathering, or a Sunday dinner dessert.
Apple pie always brings back memories of Grandma baking in the kitchen. There would be flour on her apron, apple peels on the counter, and the smell of cinnamon drifting through the house. By the time the pie came out of the oven, we could hardly wait for it to cool enough to cut a slice.
Of course, Grandma usually made her pie crust from scratch. And although I love a homemade pie crust, there are times when a ready-made crust makes getting dessert in the oven a whole lot easier. That is especially helpful during the holidays when there are several other dishes to prepare.
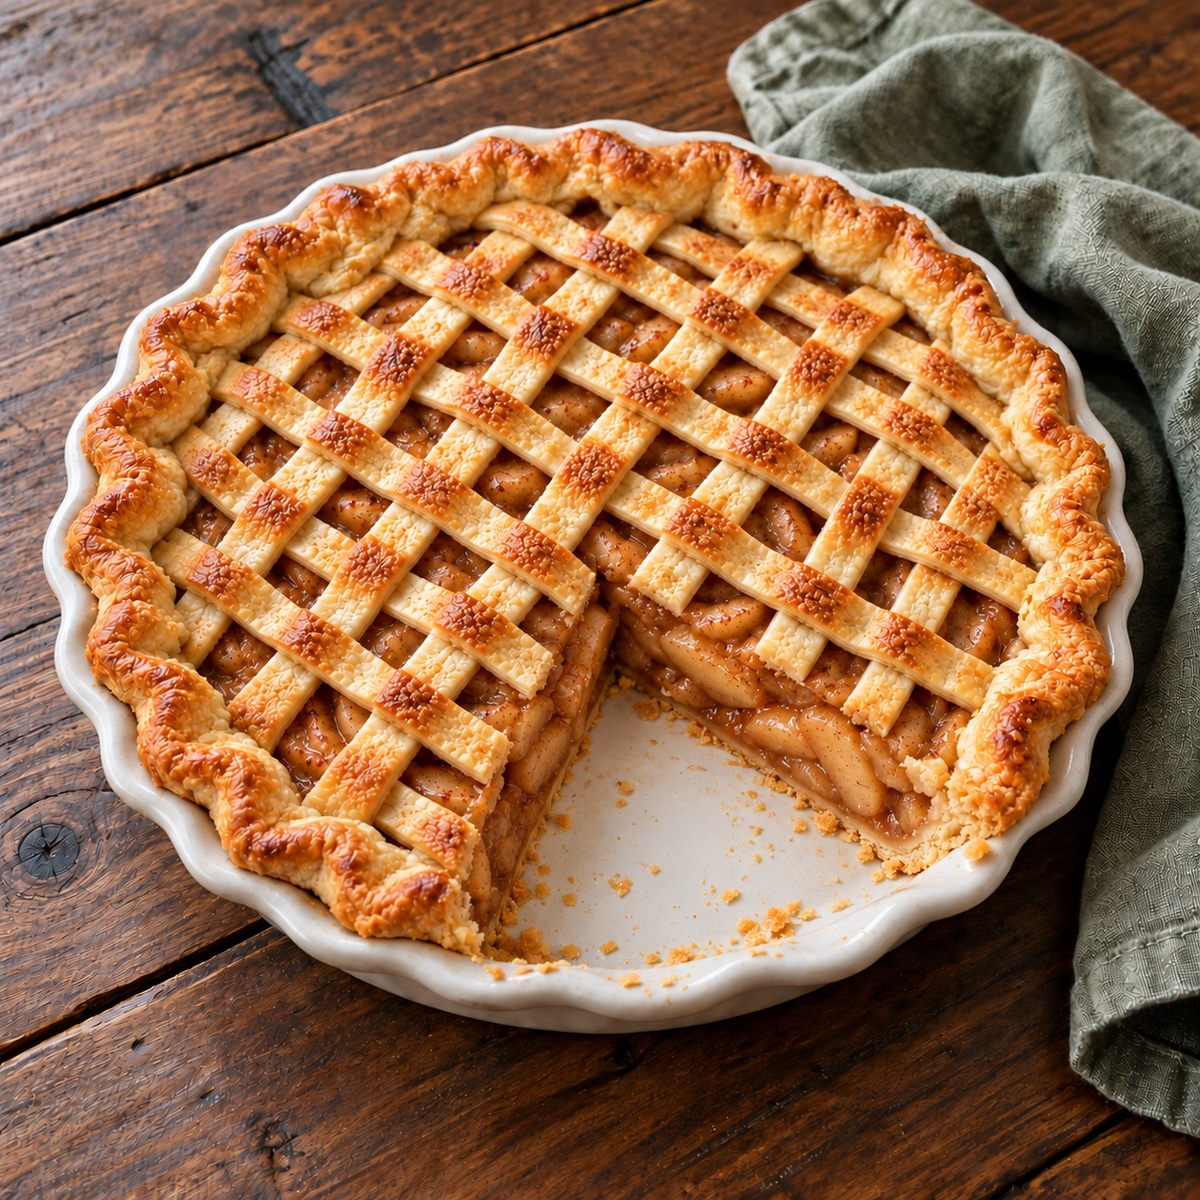
This recipe keeps the homemade apple filling and uses refrigerated pie crust to save time. You can even cut the top crust into strips to create that familiar lattice pattern without getting out the flour and rolling pin.
The result is a golden brown apple pie with a tender, flavorful filling and a flaky crust. Serve a slice slightly warm with a scoop of vanilla ice cream, and you have a simple dessert that brings a little of Grandma’s kitchen to your own table.
Updates on Grandma's Homemade Apple Pie Recipe
Grandma would always use whatever apples that she had in the fruit cellar. Whether there was a sack of Golden Delicious, Northern Spy or Braeburn apples, she would grab any variety to make her pie filling.
For this recipe I use Granny Smith apples which are the perfect apple for baking. They provide the perfect level of tartness while holding their shape during the baking process.
They are easily found at the grocery store and many Farmer's markets in the Autumn months. Just look for their iconic green color and pick out a few that are nice and firm.
Although there are several other varieties of apples that make great pie, Granny Smith are my favorite. Now that we know what type of apple to use, the focus now turns to the pie crust.

Grandma's homemade pie crust always turned out perfect. It was light and flaky and she had perfected how to flute the edges. Although I have a recipe for Homemade Pie Crust I decided to use a store-bought version for this recipe.
You can certainly use your own homemade pie crust if you prefer. However, there are also some really good store-bought crusts that turn out perfect each and every time.
Look for the refrigerated rolls of pie crust that are found near the tubes of crescent rolls and cinnamon rolls. They typically come in packs of 2, and you will need both pie crusts for this apple pie recipe.
Homemade Apple Pie Recipe
*Complete recipe instructions including specific measurements, cook temperatures and times are located in a printable recipe card at the bottom of this article. However, be sure to keep reading for helpful tips and tricks when making this recipe.
INGREDIENTS:
- 1 box of 2 (9 inch) refrigerated double pie crust rolls
- ½ cup unsalted butter
- 3 tablespoons all-purpose flour
- ¼ cup water
- ½ cup white sugar
- ½ cup packed brown sugar
- 8 Granny Smith apples - peeled, cored and sliced
INSTRUCTIONS:
The first step in making homemade apple pie is to prepare the filling. Although I have my own Canned Apple Pie Filling and Freezer Apple Pie Filling, for this recipe I am making the filling from scratch.
Start by peeling, coring and slicing the apples. If you have an apple, peeler, corer slicer, you can do this in just a few minutes.
However, if you don't have one of those nifty devices, simply peel the apples and then slice them with a sharp knife. You want the apple slices to be about ¼ inch in thickness.

If you prefer, you could dice the apples instead. Although to get the classic apple pie look, slices are preferred. The important thing to remember is that you want the apple pieces uniform in size for even baking.
Set the apples aside and prepare the remainder of the filing. Start by placing a medium size saucepan over medium heat. Add the butter to the pan and let it melt.
Then add the flour and whisk. Once the flour and butter forms a paste, add the water, granulated sugar and brown sugar and bring the mixture to a boil.
Once it begins to boil, reduce the temperature to a simmer, stirring occasionally. Now go ahead and preheat the oven to 425°F (220°C).
Assemble The Pie
Place the room temperature, bottom crust in a 9 inch pie pan. It is important for the crust to be at room temperature so it is pliable and can be worked without tearing or cracking.
Poke the bottom of the crust with a fork several times. Then fill the pie crust with the peeled, cored, and sliced apples. Be sure to mound them slightly over the pie pan as they will reduced down while cooking.
Cut the second pie crust into long strips, approximately ½ inch wide. Arrange the top in a weaving, lattice pattern.
Once the strips have been arranged trim the edges to the outer edge of the pie plate. Then fold the bottom crust over top of the edges of the strips and crimp to secure.
Then slowly pour the liquid mixture over the top crust so that it soaks down into the pie. This will help the top of the pie crust to form a delicious glaze and brown up beautifully during the baking process.

Baking Instructions
Place the homemade apple pie on a foiled lined baking sheet. The baking sheet is used to catch any drippings of juice as the pie bakes and the foil will help with the clean up process.
Then place the pan in the preheated oven and bake for 15 minutes at 425°F. Then reduce the temperature to 350°F and continue baking for 35 to 45 minutes, or until the apples are soft.
If the outer crust of the pie begins to brown too much, cover the edges with aluminum foil or a pie shield.
Remove the apple pie from the oven and place it on a cooling rack. Let it sit for at least 45 minutes before serving.
Helpful Recipe Tips
1. If you don't have a pie crust shield it is best to make one out of aluminum foil prior to starting this recipe. Do this by tearing off a sheet of foil that is 1 inch bigger than the size of your pie plate flipped over on its top.
Then trace the outer edge of the upside down pie plate on the foil, ½ inch larger to cover the outer rim of the crust and pie plate. Now remove the pie plate and place the aluminum foil sheet on top of the pie plate.
Gently crimp down the outer edge of the foil. Use scissors or a sharp knife to cut the center out of the foil, leaving you only with the edges covered. You now have a homemade apple pie crust shield!
You can add the shield as the apple pie is baking. However, I find it easier to place it on before the pie goes in the oven. Then remove it for the last 15 minutes of baking to get the crust a nice golden color.

2. As much as you are going to want to take a slice of the pie as soon as it comes out of the oven, be sure to let the pie rest on a cooling rack at least 45 minutes. This time will allow the juices to thicken and it will be much easier to cut.
3. Be sure to have vanilla ice cream on hand. There is nothing better than a piece of apple pie with a scoop of ice cream on top!
Enjoy!
Mary and Jim

Jim and Mary Competti have been writing gardening, DIY and recipe articles and books for over 16 years from their 46 acre Ohio farm. The two are frequent speakers on all things gardening and love to travel in their spare time.
As always, feel free to email us at thefarm@owgarden.com with comments, questions, or to simply say hello! You can sign up for our free email list in the subscribe now box in the middle of this article. Follow us on Facebook here : OWG Facebook. This article may contain affiliate links.
Classic Apple Pie Recipe

Mouthwatering apple pie that tastes just like Grandma used to make but with some modern updates.
Ingredients
- 1 9 inch double pie crust
- ½ cup unsalted butter
- 3 tablespoons all-purpose flour
- ¼ cup water
- ½ cup white sugar
- ½ cup packed brown sugar
- 8 Granny Smith apples - peeled, cored and sliced
Instructions
- Preheat oven to 425°F.
- In a saucepan over medium heat, melt the butter then whisk in the flour.
- Once the flour and butter forms a paste, add water, white sugar and brown sugar and bring to a boil. Reduce temperature and let simmer, stirring occasionally.
- Place the bottom crust in your 9 inch pie pan. Poke bottom with a fork several times.
- Fill the pie crust with the peeled, cored, and sliced apples. Be sure to mound them slightly over the pie pan as they will reduced down while cooking.
- Cut the 2nd piece crust into long strips, approximately ½ inch wide. Arrange the top in a lattice pattern, tucking the edges of the top crust behind the bottom crust edge.
- Slowly pour the liquid mixture over the top crust so that it soaks down into the pie.
- Bake 15 minutes at 425°F then reduce the temperature to 350°F and continue baking for 35 to 45 minutes, until apples are soft.
- Remove from the oven and place the pie on a cooling rack for at least 45 minutes before serving.
Notes
You may cover the edges of the crust with aluminum foil or a pie shied to prevent them from getting too brown.
Recipe courtesy of Old World Garden Farms
Nutrition Information:
Yield:
8Serving Size:
1 gramsAmount Per Serving: Calories: 365Total Fat: 17gSaturated Fat: 9gTrans Fat: 0gUnsaturated Fat: 7gCholesterol: 31mgSodium: 96mgCarbohydrates: 52gFiber: 4gSugar: 35gProtein: 2g
Nutritional Information is to be used as a general guideline only . Nutritional calculations will vary from the types and brands of the products used.